background image

12

13

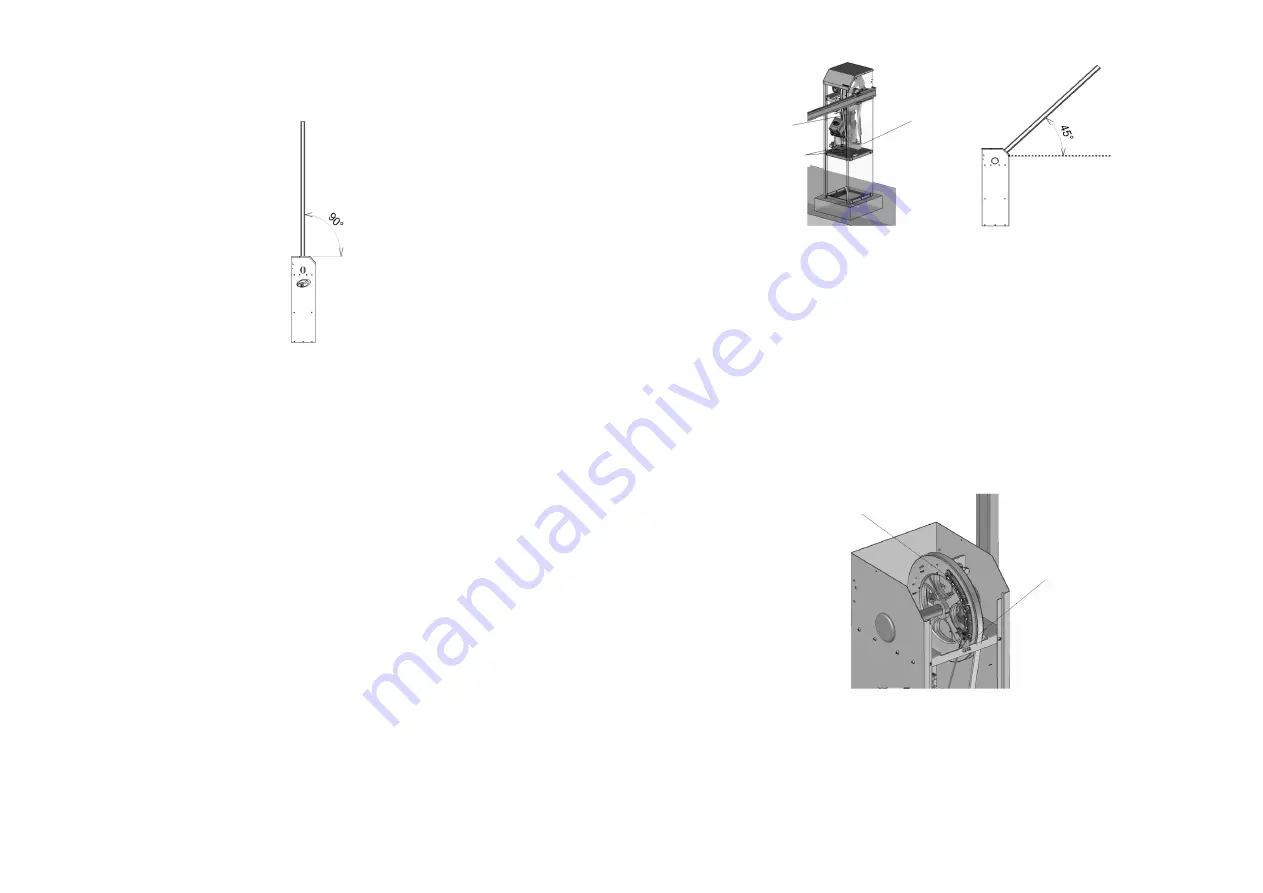
13. The automatic barrier will be in good opening condition, when the 

beam / boom is in the condition shown in the image below.

Note:

 It is not necessary to balance the beam again, as it leaves the 

factory balanced. However, if necessary, follow the instructions below. 

BALANCING THE BEAM AND CHECKING THE 
CHAIN

1.  Remove the gearmotor from the cubicle, leaving the chain free. 

Check if the beam remains at a position around 45°. Otherwise, the 

adjustment will be made through the spring bolt, either loosening or 

tightening it until the ideal adjustment is reached.

2.  Once this is done, place the gearmotor and the chain again. Check 

if it is properly stretched and ready for operation. With your thumb, 

apply an even pressure on the chain. If it does not bend, it is properly 

stretched.  If  the  chain  is  loose,  adjust  it  using  the  belt  tensioning 

bolts, using a wrench according to the respective nut.

ADJUSTING THE MAGNET BARS

With the beam properly balanced, and with its opening and closing 

'mechanical  stoppers'  adjusted,  check  if  it  is  necessary  to  adjust  the 

magnet bars.

1.  Keep the beam in the 'open' position (90°).

2. 

Adjust the magnet bar so that the last magnet is in front of the Sensor 

Hall (Encoder) and tighten the fixing bolts.

Note:

 Perform the same procedure with the beam in the 'closed' position 

(0°).

The automatic barrier is ready to operate. Turn on the circuit breaker, 

press the '+' button on the electronic control board and the barrier will 

function.

Chain

Spring Bolt

Magnet Bar

Hall Sensor

 Chain

Stretchers

Summary of Contents for BARRIER BRC

Page 1: ...ARRIER BRC JETFLEX BRUSHLESS Technical Manual P09754 09 2021 Rev 0 Made by Motoppar Ind stria e Com rcio de Automatizadores Ltda Av Dr Labieno da Costa Machado 3526 Distrito Industrial Gar a SP CEP 17...

Page 2: ...ng of the beam If so the installation of the equipment will be impaired making it necessary to repair the infrastructure of the site Carefully choose the model of the automatic barrier according to it...

Page 3: ...will be fixed close to the automatic barrier cubicle GENERAL FEATURES Universal cubicle the beam can be installed on either side of the cubicle Release system for manual unlocking up to 4 5m 14 8 ft E...

Page 4: ...el this provides the product with a better performance operation FRONT INSPECTION DOOR MINIMUM 3 4 CONDUIT FOR WIRING PLACED IN THE CENTER OF THE CONCRETE PLINTH Ceiling Ceiling Base of the barrier Ba...

Page 5: ...e from the plinth and drill the holes in the previously marked locations Note Drill 04 holes with a 10mm drill and at least 80mm 3 2 in deep 4 Insert the anchor bolts into the holes in the concrete pl...

Page 6: ...V Note Use 2 50mm cables Use a dedicated circuit breaker i e a circuit breaker to which only the barrier will be connected 11 Check define the alignment of the bean opening and closing Use mechanical...

Page 7: ...tched and ready for operation With your thumb apply an even pressure on the chain If it does not bend it is properly stretched If the chain is loose adjust it using the belt tensioning bolts using a w...

Page 8: ...whose function is to start the three phase induction motor from a single phase AC network and a logic controller to perform the Variable frequency drive operations For more information refer to the T...

Reviews: