background image

8

 User Manual

SCANEX PLUS

Table 3.4

Parameter Description

Settings

(Default Value)

OPERATOR PAGE & PARAMETERS

The Operator page contains the parameters that are used most frequently and the commands that are required for day-to-day 

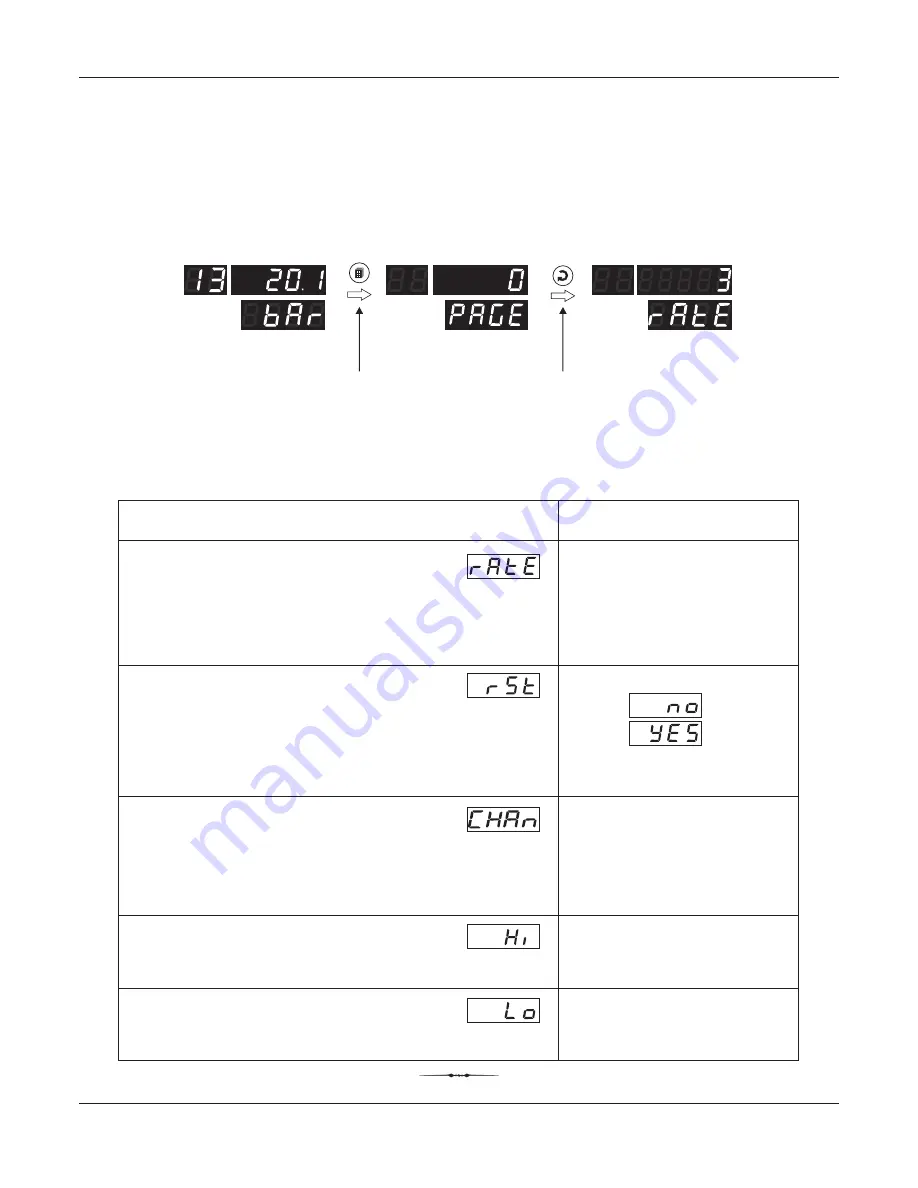
operation. This page is not locked for editing by Master Lock. The Figure 3.2 below illustrates how to access Operator Page 

(Page 0).

RESET COMMAND

This feature clears the current Min/Max values of all Channels and 
starts afresh monitoring the channels for new highest and lowest 
values.

For resetting, set the reset command to ‘Yes’.

View Only

(Default : NA)

MINIMUM PV

The minimum PV attained by the selected channel.

View Only

(Default : NA)

MAXIMUM PV

The maximum PV attained by the selected channel.

No

Yes

(Default : No)

1 to Actual no. of

Channels to Scan

(Default : 1)

CHANNEL NUMBER

Select the channel No. whose Min/Max PV is to be viewed. 

This Parameter reappears cyclically after viewing Max/Min Values 
for each selected channel number.

1 Sec. to 99 Sec.

(Default : 3 Sec.)

SCAN RATE

Applicable for Auto Scan Mode only. This parameter value sets the 
time interval for which each channel is displayed. In other words, 
the  rate  at  which  the  channels  are  sequentially  updated  for 
indication.

The Operator Page parameters are listed in Table 3.4 below.

Figure 3.2

Operator Page

First Parameter

on Operator

Page

Press PAGE

key to enter

Set-up mode

Press ENTER

key to open

Operator Page

MAIN

 Display

Mode

Summary of Contents for ScaneXPlus

Page 1: ...Multi Channel Universal Process Value Scanner with Common High Low Alarms User Manual Scane Plus ...

Page 2: ...UT 4 3 BASIC OPERATION 6 4 SET UP MODE ACCESS AND OPERATION 9 5 CONFIGURATION PARAMETERS 11 6 ALARM CONFIGURATION PARAMETERS 18 7 ALARM SETTING PARAMETERS 19 APPENDIX A DC LINEAR SIGNAL INTERFACE 21 APPENDIX B BOTTOM TOP CLIPPING 23 CONTENTS User Manual SCANEX PLUS ...

Page 3: ...un through conduits use separate conduits for power supply cable and sensor cables 2 Use appropriate fuses and switches wherever necessary for driving the high voltage loads to protect the instrument from any possible damage due to high voltage surges of extended duration or short circuits on loads 3 Switch off the power supply while making removing any connections The Figure 1 2 a Figure 1 2 b sh...

Page 4: ...ect single leaded end of RTD bulb to terminal T2 and the double leaded ends to terminals T3 and T4 interchangeable as shown in Figure 1 4 Use copper conductor leads of very low resistance ensuring that all 3 leads are of the same gauge and length Avoid joints in the cable For 2 wire configuration connect the 2 sensor wires to terminal T2 and T3 interchangeable Also short terminalsT3 T4 Figure 1 3 ...

Page 5: ...y connections ensuring proper polarity as shown in Figure 1 8 The module is not provided with fuse and power switch If necessary mount them separately Use a time lag fuse rated 1A 240 VAC POWER SUPPLY RELAYOUTPUTS There are 4 Relay Outputs provided for common alarms The relay connections are shown in Figure 1 7 below Figure 1 7 Potential free Relay changeover contacts NO Normally Open and C Common...

Page 6: ... that shows the Channel No for which the PV Readout shows the PV In Set up Mode the Channel No Readout remains blank The Unit Readout is a 4 digit 7 segment bright green LED display and usually displays the Unit pertaining to the PV Readout In Set up Mode the Unit Readout displays parameter name prompts INDICATORS There is a single 3 mm red LED indicator that shows the Auto Manual Scan Mode Status...

Page 7: ...f the channels underAlarm Press to toggle betweenAuto and Manual Scan Mode In Manual Scan Mode Use UP DOWN keys to the desired channel Key Press to increase the parameter value Pressing once increases the value by one count holding the key pressed speeds up the change UP ENTER Alarm Ack View Auto Manual User Manual SCANEX PLUS Table 2 2 KEYS There are six tactile keys provided on the front panel f...

Page 8: ... the Process Value for the selected channel indefinitely The user can switch to and hold any desired channel by using UP DOWN keys In Manual Scan Mode the front indicator marked MANUAL is lit ON ALARM SYSTEM There are up to 4 softAlarms AL 1 toAL 4 available for each channel Status Indication There are 16 front panel Alarm Status LEDs one for each channel If any one or more set Alarm for a channel...

Page 9: ...n Range Open Sensor open broken Table 3 3 Figure 3 2 ALARMS Scane Plus Manual User Manual SCANEX PLUS DetailAlarm View Pressing theAlarmAck View key also provides completeAlarm status information for the channels under alarm condition The information available is for view only The Unit Readout indicates the Channel Number under Alarm and the corresponding Alarm Number s are indicated on the PV Rea...

Page 10: ...m PV attained by the selected channel View Only Default NA MAXIMUM PV The maximum PV attained by the selected channel No Yes Default No 1 to Actual no of Channels to Scan Default 1 CHANNEL NUMBER Select the channel No whose Min Max PV is to be viewed This Parameter reappears cyclically after viewing Max Min Values for each selected channel number 1 Sec to 99 Sec Default 3 Sec SCAN RATE Applicable ...

Page 11: ...Each PAGE is accessible only from the MAIN Display Mode That is from the current PAGE the user must return to the MAIN Display Mode before the other PAGE can be accessed Figure 4 1 illustrates access to the desired PAGE from MAIN Display Mode User Manual SCANEX PLUS Section 4 ADJUSTING PARAMETER VALUES For accessing and adjusting the parameter one must first open the PAGE containing the parameter ...

Page 12: ...ault values Refer Figure 4 4 below for regaining the factory default values User Manual SCANEX PLUS Figure 4 4 Default Page Press PAGE key to enter Set up Mode Default Code Use UP DOWN keys to set the Default Code Press ENTER key Scanner resets and restarts with default parameter values MAIN Display Mode MAIN Display Mode Figure 4 3 Default Page Locking Code Press PAGE key to enter Set up mode Use...

Page 13: ...Input type Resolution and PV Units are applied to all the channels No The parameter values for Input type Resolution and PV Units need to be set independently for each channel SENSOR BREAK PV STATUS This parameter setting allows user to define the alarm behavior under Sensor open condition UP AnyAlarm set as Process High gets activated DOWN AnyAlarm set as Process Low gets activated ACTUAL NUMBERS...

Page 14: ...Linear Inputs The transmitter output signal value corresponding to Range High process value For more Description ReferAppendix A SIGNAL LOW Applicable only for DC Linear Inputs The transmitter output signal value corresponding to Range Low process value For more Description ReferAppendix A Input Type Settings Default 0 to 20 mA 0 00 to Signal High 0 00 4 to 20 mA 0 to 80 mV 0 to 1 25 V 0 to 5 V 0 ...

Page 15: ...e Type N Thermocouple 0 0 to 1771 0 C 32 0 to 3219 0 F 1 C F or 0 1 C F 3 wire RTD Pt100 199 to 600 C 328 to 1112 F 199 9 to 600 0 C 328 0 to 1112 0 F or 1 C F or 0 1 C F 0 0 to 1314 0 C 32 0 to 2397 0 F 0 0 to 1826 0 C 32 0 to 3218 0 F 0 0 to 1768 0 C 32 0 to 3214 0 F Reserved for customer specific Thermocouple type not listed above The type shall be specified in accordance with the ordered optio...

Page 16: ...o 5 0V DC voltage 0 to 10 0V DC voltage 1 to 5 0V DC voltage 19999 to 30000 units 1 0 1 0 01 0 001 units Resolution Option What it means Range Min to Max C F Kelvin Engineering Units Percentage Pascals Mpascals Kpascals Bar Milli bar PSI kg sq cm mm water gauge Inches water gauge mm mercury Torr Unit Readout Units Table 5 3 ...

Page 17: ...Liters per minute Relative Humidity O2 CO2 Carbon Potential volts Amps Milli amps Milli Volts Ohms Parts per million Revolutions per pinute Milli seconds Seconds Unit Readout Units Miles per hour Milli grams Grams Kilo grams Minutes Hours PH PH ...

Page 18: ...annels Set Signal High common to all Channels Set DC Range Low common to all channels Set DC Range High common to all channels Choose whether Bottom Clipping to be enabled for all Channel Set the Bottom Clipping Value common to all Channels Select Channel for which Offset value is to be set Set Offset value for the selected Channel Select Input Type All Channel Common YES For DC Input Type For The...

Page 19: ... the Selected Channel Select Channel for which Offset value is to be set Set Offset value for the selected Channel Select Input Type All Channel Common NO For DC Input Type For Thermocouple RTD Input Type Set the Top Clipping Value for the Selected Channel Yes Yes User Manual SCANEX PLUS Choose whether Top Clipping to be enabled for Selected Channel Select Channel D D Set Resolution for the Select...

Page 20: ...for either activating Audio Visual gadgets Normal Logic or for Tripping the system being monitored Reverse Logic Further the output can be programmed to either switch ON OFF with Alarm switching Relay Latch No or remain Latched until acknowledged Relay Latch Yes This parameter allows to select 1 out of 4 Relays for Logic and Latch parameter setting 1 to 4 Default 4 NUMBER OF ALARMS PER CHANNEL The...

Page 21: ...he Process High or Process Low limit forAlarm ALARM TYPE None Disable theAlarm Process Low The Alarm activates when the PV equals or falls below the Alarm Setpoint value Process High The Alarm activates when the PV equals or exceeds the Alarm Setpoint value 1 to User Selected Alarm Default NA ALARM NUMBER Select theAlarm Number whose parameters are to be set 1 to Max Channels Default NA CHANNEL NU...

Page 22: ...arameters listed in this page include Channel number selection followed by Alarm number selection followed byAlarm parameters Refer Figure 7 1 below for the navigation diagram Select Channel Number 1 to 16 Select Alarm Number 1 to 4 Figure 7 1 Set Type for the selected Alarm Set Setpoint for the selected Alarm Set Hysterisis for the selected Alarm Set Inhibit for the selected Alarm Note Press PAGE...

Page 23: ...nal range fits e g 4 20 mA 2 Signal Low Signal value corresponding to Range Low process value e g 4 00 mA 3 Signal High Signal value corresponding to Range High process value e g 20 00 mA 4 PV Resolution Resolution least count with which to compute process value e g 0 01 5 Range Low Process value corresponding to Signal Low value e g 0 00 psi 6 Range High Process value corresponding to Signal High...

Page 24: ...V Resolution 0 1 Range Low 50 0 Range High 250 0 X mA Y psi 4 00 20 00 Signal Low Signal High 0 00 Range Low 5 00 Range High Presume the pressure is to be measured with 0 01 Resolution that is 0 00 to 5 00 psi InputType 4 20 mA Signal Low 4 00 mA Signal High 20 00 mA PV Resolution 0 01 Range Low 0 00 Range High 5 00 X V Y RH 0 5 Signal Low Signal High 0 95 0 1 000 4 500 5 0 Range Low Range High Pr...

Page 25: ... is 4 mA 0 0 LPM to 16 mA 75 0 LPM only If no Clipping is applied on the measured flow rate then the scaled PV will also include out of range values for the signal values below 4 mA and above 16 mA may be due to open sensor condition or calibration errors These out of range values can be suppressed by enabling the Bottom and or Top Clippings with appropriate Clip values as shown in figure B 2 belo...

Page 26: ... a n e t Process Precision Instruments 101 Diamond Industrial Estate Navghar Vasai Road E Dist Palghar 401 210 Maharashtra India 0250 2391722 33 37 42 07498799226 09321985369 support ppiindia net sales ppiindia net Mar 2017 ...

Reviews: