background image

O

UTDOOR ENCLOSURE TYPE 

MINI

 HANDBOOK


9


2.3 

Mounting the ODE-MINI 


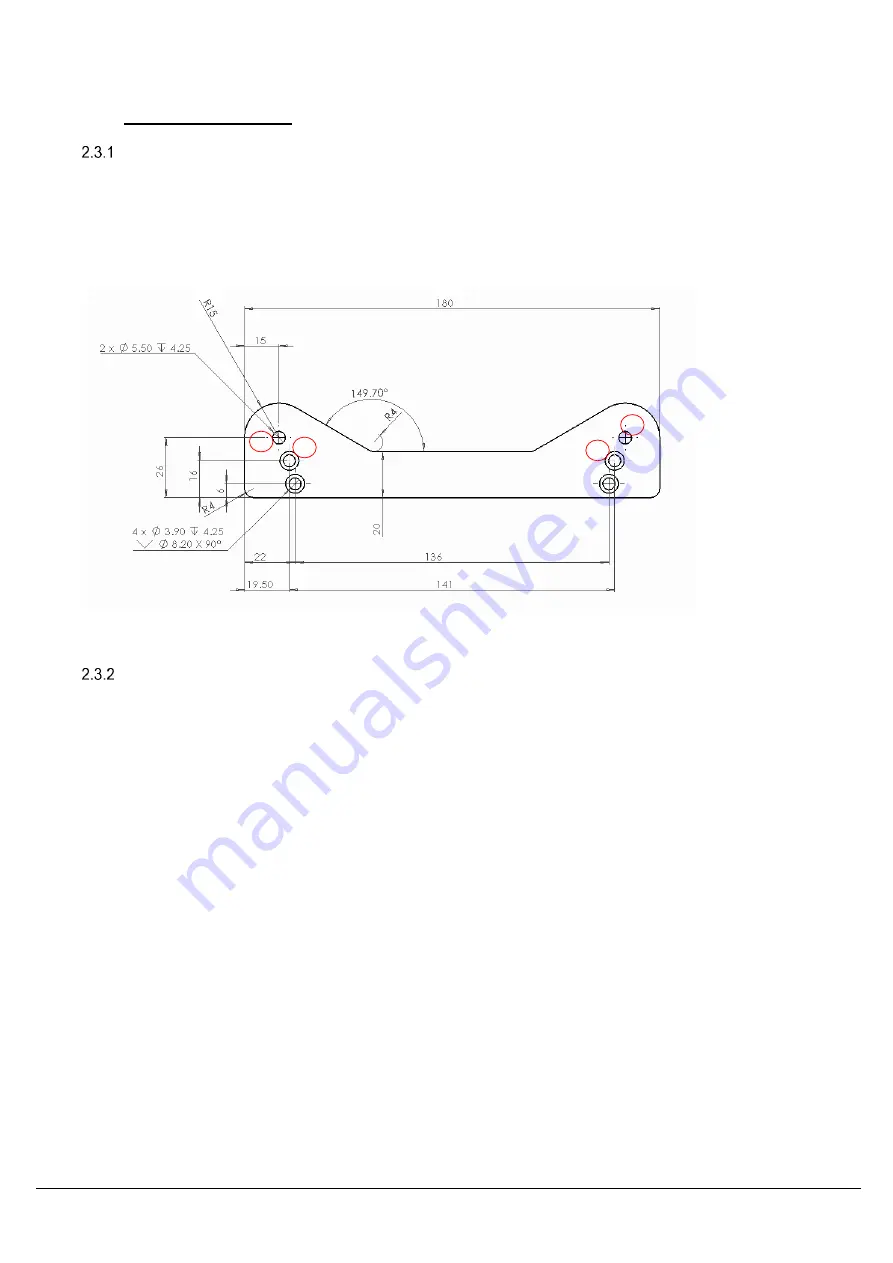
Using the 70004-2 wall mounting bracket kit 

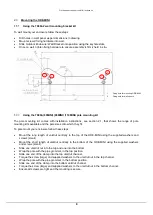
To wall mount your enclosure follow these steps: 


Drill holes in wall/ panel as per dimensions in drawing. 


Mount screws/ fixing hardware into wall. 


Slide Outdoor Enclosure/ Wall Bracket onto position using the keyhole slots. 


Once on wall, tighten fixing hardware to ensure assembly is firmly held in situ. 


Using the 70004-(60MINI) (90MINI) (110MINI) pole mounting kit 

The  pole  mounting  kit  comes  with  installation  instructions,  see  section  2.1,  that  shows  the  range  of  pole 
mounting kits available and the pole sizes onto which they fit. 
 
To pole mount your enclosure follow these steps: 


Mount  the  long  length  of  unistrut  centrally  to  the  top  of  the  ODE-MINI  using  the  supplied  washers  and 
screws (small). 


Mount  the  short  length  of  unistrut  centrally  to  the  bottom  of  the  ODE-MINI  using  the  supplied  washers 
and screws (small). 


Slide one unistrut nut into the top and one into the bottom. 


Wrap the pole with the pipe grommet, in the top position. 


Slide one end of the clamp into the top unistrut channel. 


Torque the screw (large) and supplied washers to the unistrut nut in the top channel. 


Wrap the pole with the pipe grommet, in the bottom position. 


Slide one end of the clamp into the bottom unistrut channel. 


Torque the screw (large) and supplied washers to the unistrut nut in the bottom channel. 


Ensure all screws are tight and the mounting is secure. 


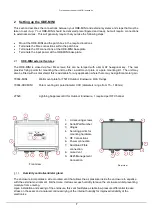
1.

Fixing hole for mounting ODE-MINI 

2.

Fixing hole for wall mounts 


1


1


2


2


Summary of Contents for ViaLite MINI

Page 1: ...pe MINI ODE MINI User Guide HMA HB 2 CR4552 21 12 2020 Pulse Power Measurement Ltd 65 Shrivenham Hundred Business Park Watchfield Swindon Wiltshire SN68TY UK Tel 44 0 1793 784389 Email sales vialite com Web www vialite com ...

Page 2: ... ESD Precautions Precautions for handling electro static sensitive devices should be observed when handling all ViaLite modules Technicians should ensure that they use effective personal grounding i e ESD wrist strap etc when servicing the equipment Any equipment or tools used should be grounded to prevent static charge build up Good practice should be observed at all times For reference see relev...

Page 3: ... 7 2 1 ODE MINI external features 7 Humidity control ventilator gland 7 2 2 Weatherproof interface connections 8 2 3 Mounting the ODE MINI 9 Using the 70004 2 wall mounting bracket kit 9 Using the 70004 60MINI 90MINI 110MINI pole mounting kit 9 2 4 Lightning Suppressor 10 2 5 Antennas 11 2 6 Termination of RF Connections 11 2 7 Termination of power 13 2 8 Termination of Optical fibre 14 2 9 LNB Vo...

Page 4: ...division of Pulse Power and Measurement Ltd PPM 1 1 Typical deployment A typical system operates as follows The ODE MINI would house a set of FOL TX modules in a remote outdoor location connected to antenna equipment Antenna electrical signals are input to the transmitter modules which contain RF signal conditioning and laser control circuitry The modules modulate the intensity of a beam of light ...

Page 5: ...e cleaned before use even where they have been protected with dust caps A large percentage of performance issues can be attributed to dirty fibres For more details please read the cleaning instruction which accompanies the connector cleaning kit Cleaning optical connectors high levels of contamination If there are performance issues that are not resolved by basic cleaning in section 1 4 3 then the...

Page 6: ...t there is no optical radiation being emitted by the fibre Remove all power sources to all modules and completely disconnect the optical fibres SC APC Connectors To connect SC APC optical connectors follow these steps Remove the plug protective cover Align the connector keyway slot in the adaptor to the key of the plug Gently push the plug into the adapter until a click is heard and the connector ...

Page 7: ... advisable for any application where there may be significant solar gain 70002 MINI Wall mount plate for 75010 Outdoor Enclosure Kit Fixings 70004 XXXMINI Pole mounting kit pole diameter XXX diameters range from 15 168 mm 27520 Lightning Suppressor Kit for Outdoor Enclosure 1 required per RF Channel Humidity control ventilator gland The enclosure incorporates a side mounted vent that allows the ai...

Page 8: ...eatherproof interface connections To maintain the enclosure s IP rating you should observe the following The front door should be closed and screws tightened All glands should be compressed on to either a cable or blanking rod All connectors should be mated to either a matching half or suitable sealing dust cap ...

Page 9: ...closure follow these steps Mount the long length of unistrut centrally to the top of the ODE MINI using the supplied washers and screws small Mount the short length of unistrut centrally to the bottom of the ODE MINI using the supplied washers and screws small Slide one unistrut nut into the top and one into the bottom Wrap the pole with the pipe grommet in the top position Slide one end of the cl...

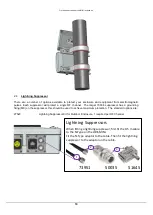
Page 10: ...ressor has a grounding fixing M8 on the suppressor this should be used to achieve maximum protection The standard options are 27520 Lightning Suppressor Kit for Outdoor Enclosure 1 required per RF Channel When fitting a lightning suppressor first fit the 0 5 m cable to the N Type on the ODE MINI Fit the N Type adaptor to the cable Then fit the lightning suppressor to the adaptor on the cable Light...

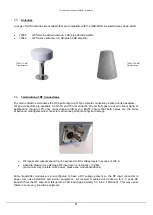
Page 11: ...ectors are fitted you MUST ensure that both halves are the same impedance mating dissimilar connectors will cause permanent physical damage RF inputs and outputs should not be exposed to DC voltage levels in excess of 36 V Absolute maximum no damage RF input level is nominally 13 dBm some units may tolerate more power please see module handbook Some transmitter modules are pre configured to have a...

Page 12: ... be sensitive to large transients 5V applied to either input or output This may result in permanent damage to the units particularly to low frequency units Some receiver modules are equipped with DC loads on their outputs please see the module handbook Contact ViaLite Communications for more details ...

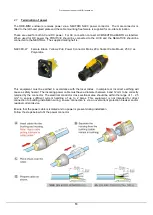
Page 13: ... Power Connector Mains 20A Socket Cable Mount 250 V ac Polyamide This equipment must be earthed in accordance with the local codes Incomplete or incorrect earthing will cause a safety hazard The incoming power cable must have a diameter between 6 and 12 mm to be correctly retained by the connector The electrical conductor cross sectional area should be within the range of 1 2 5 mm2 to ensure suffi...

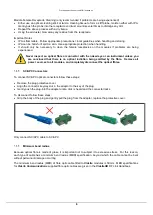
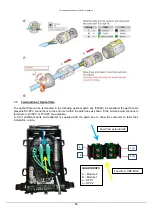
Page 14: ...resents SC APC connections to the end user within the patch box as shown in the picture below Options to terminate in LC APC or FC APC are available A kit of additional parts and adapters is supplied with the patch box to allow the customer to tailor their installation on site A B 1 a 2 b QUAD IDENTS A Module 2 B Module 1 a SFP 1 b SFP 2 Feed from ODE MINI Feed from external site ...

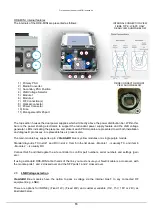
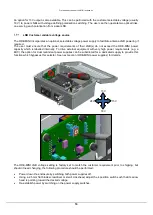
Page 15: ...m 6 Module 2 is usually RX Connect RJ45 and interrogate the site controller to confirm part numbers serial numbers and settings gain etc If using a standard ODE MINI at both ends of the link you must ensure your Neutrik cable is a crossover with the module ports 1 and 2 crossed over and the SFP ports 1 and 2 crossed over 2 9 LNB Voltage selection ViaLiteHD Blue modules have the option to pass a vo...

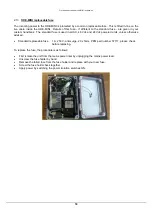
Page 16: ... which is labelled internally To drive external equipment with very high power requirements e g a BUC the option for dual redundant power supplies can be substituted for a dedicated supply to provide this function which bypasses this selector See next section ODE MINI power supplies for details The ODE MINI LNB voltage setting is factory set to match the customer requirement prior to shipping but ...

Page 17: ...h identical modules in the left hand LH and right hand RH positions It can optionally be equipped with either just a single main PSU module LH or with a main PSU LH and LNA BUC PSU RH The voltage inputs for the various power supplies options have the following requirements AC input wide range 88 264 VAC 47 63 Hz Power supply LPS MINI DC input 18 75 VDC Power supply LPS MINI DC 2 12 Replacement of ...

Page 18: ... is used in all AC 48 Vdc and 24 Vdc powered units unless otherwise advised To replace the fuse the procedure is as follows First isolate the unit from the mains power inlet by unplugging the mains power lead Unscrew the fuse holder by hand Remove the failed fuse from the fuse holder and replace with your new fuse Screw the fuse holder back together Apply power by switching the power isolation swi...

Page 19: ...ng shall be as stated in document F292 PPM Manufactured Product Warranty which is available at https ppm co uk warranty periods Extended warranty options are available at the time of purchase Prior to returning any goods for warranty or non warranty repairs please contact PPM ViaLite Communications for a returns reference ...

Page 20: ...is equipment generates uses and can radiate radio frequency energy and if not installed and used in accordance with the instruction manual may cause harmful interference to radio communications Operation of this equipment in a residential area is likely to cause harmful interference in which case the user will be required to correct the interference at his own expense PULSE POWER MEASUREMENT LTD 2...

Reviews: