HRK3-HB-7
V
IA
L
ITE
HD
3U
CHASSIS
H
ANDBOOK
22
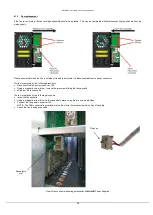
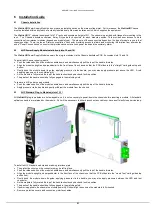
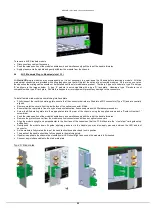
To remove a 5HP Standard module
Disconnect any cables if necessary
Push the release button of the module handle down and simultaneously pull the top of the handle forwards.
Apply pressure via the handle and gently withdraw the module from the chassis.
6.4
5HP Blindmate Plug-in Modules (slots 1-13)
All
ViaLiteHD
plug-in modules are hot-swappable, so it is not necessary to power-down the Chassis before inserting a module. All blind
mate optical connectors are provided with spring loaded covers that will protect the optics of any inserted modules. As there is no cover on
the opposite side, mating cables should not be installed until the slot modules are present.
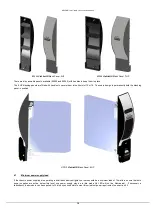
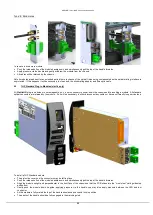
There are 2 types of blind mate, type ‘D’ and type
‘E’ as shown in the images below. A type ‘E’ module is not compatible with a type ‘D’ rack plate. Likewise a type ‘D’ module is not
compatible with a type ‘E’ rack plate. Should this happen in error stoppers will prevent any damage to the connectors.
To install a blind mate module and matching interface plate
Firstly inspect the rear Blind mating plate, ensure that the connector barrels are fitted into all RF connectors
(Type ‘D’) and are centrally
aligned.
Remove protective covers from the inside face of the optical connector if fitted
Ensure that the rear plate is free of any dust and contamination, if necessary clean with filtered compressed air.
Screw the Blind mating plate into the appropriate slot at the rear of the chassis
, using the supplied screws and a “Pozidriv Number 1”
screwdriver
Push the release button of the module handle down and simultaneously pull the top of the handle forwards.
Remove the protective cover from the modules optical connectors and clean any optical connectors
Align the module upright and perpendicular to the front face of the chassis so that the PCB slides
into the “crow’s feet” card guides top
and bottom.
Gently push the module down its guide, applying pressure via the handle, you may also apply pressure between the LED and test
connector.
As the module is fully mated the top of the handle should snap back and lock in position.
The pawls of the handle should be fully engaged in the matching slots.
If power is applied to the chassis the module power LED should light as soon as the module is fully inserted
Connect any interface cables to the blind mate plate.
Type ‘D’ blind mates

