background image

Malfunction: 

depth readings may be two or three times different


than the actual depth. 


Additional attribute: 

two bottom contours are visible on the screen 

(the


manual scaling bar should be large). 


Cause 

Solution 


- Shallow depth; 

Set the deaf zone to 0.5 m or 0.2 

- Incorrect deaf zone and 

m and reduce the sensitivity level 

sensitivity 

to 1-2 units 


Malfunction: 

the screen is “noisy”,


there are too many objects. 


Additional attribute: 

depth readings randomly changing. 


Cause 

Solution 


- Sensitivity set too high; 

1.  Reduce sensitivity. 

- "Littered" pond (a lot of suspended 

2. Increase the deaf zone. 

matter, garbage, fry, etc.) 

3.   Increase NOF by 1-2 units. 


Malfunction: 

zero depth readings. No bottom line at all scales. 


Additional attribute: 

fish outlines and depths sometimes appear. 


34 

Summary of Contents for 6M

Page 1: ......

Page 2: ...ar operation 11 Sonar setup menu 13 Information display modes 14 FISH ID 15 Pro 17 Flasher 18 Depth gauge 19 М В 20 Demo 20 Info 21 Scale 22 NOF 23 ZOOM 24 Conditions 25 Deaf zone 26 Sound 27 Display 27 General recommendations 28 Possible malfunctions and troubleshooting 33 Warranty 37 Manufacturer s contact details 38 Warranty card 39 1 ...

Page 3: ... figures on the right show typical pictures on the sonar screen and the information on the water reservoir in summer and winter corresponding to these pictures It is very important to understand that the sonar does not display a three dimensional representation of the water column on the screen but only its projection onto a vertical plane passing through the middle of the sounding cone This creat...

Page 4: ...Screen displayed in Water reservoir in winter winter 40 Screen displayed in summer Water reservoir in summer 3 ...

Page 5: ...ktik 6 sonar consists of two units electronic receiver unit 1 transducer 2 with battery compartment 3 1 Display screen in work mode control buttons cord clamp transducer 2 sealing ring battery compartment АА battery 3 cable entry 4 ...

Page 6: ...esign is frost resistant and airtight IP 68 The sensor is screwed clockwise into the battery compartment The silicone ring on the sensor is used to seal the joint between the sensor and the battery compartment For reliable sealing the sensor must be tightened with force When installing an AA battery the polarity must be observed see the figure on the left IMPORTANT It is advisable to install the b...

Page 7: ...t depth measurement the sensor must be placed vertically in the water It should be remembered that the distance to the bottom depth and other objects is measured not relative to the water surface but relative to the sensor To prevent the sonar from drowning in the pond we recommend using the Praktik float attached to a cable and or Unibox see www rusonar ru Accessories section ATTENTION Do not ben...

Page 8: ...ng time Open close MENU Open the MENU in work mode by holding the right button for a short time Navigate through the MENU by pressing buttons up and down Activate deactivate selected menu item by pressing left button Exit the MENU by pressing the right button Enabling disabling screen backlight Enabling disabling the backlight in work mode by holding the left button for a long time 6 ...

Page 9: ...in work mode press the down button Switching ZOOM window on off To switch the ZOOM window on off in work mode press the left button To increase the bottom layer from 1 to 5 meters press the up button in ZOOM mode To decrease the bottom layer from 1 to 5 meters press the down button in ZOOM mode Sonar reset 1 Switch off the sonar 2 Press and hold the left button and then without releasing the left ...

Page 10: ...bjects fish RTS window sensitivity level bottom relief battery indicator Water surface line is displayed as a moving dotted line Numerical value of depth is updated four times per second with an accuracy of 5 cm for depths up to 10 meters and 10 cm for depths from 10 to 25 meters 9 ...

Page 11: ...of sensitivity and the number above the battery symbol indicates the exact sensitivity level in digits Sensitivity can be adjusted in the range from 0 to 28 units The default value is 10 units The bar is displayed on the screen only in work mode when the sensitivity adjustment is turned on RTS window is the area of the screen in FISH ID mode in which all registered echoes from the bottom and other...

Page 12: ... Press the right button Praktik 6 screen saver will appear on the screen and the screen backlight will turn on for a couple of seconds After a few seconds the device will go into operating mode ATTENTION After installing the battery it is recommended that you reset the device so that the factory settings are set in the device Scale Auto zoom mode Sensitivity level 10 units Manual screen scale 7 me...

Page 13: ...of the screen will be displayed as a straight line 5 If the sensor is mounted on a moving boat the bottom topography and bottom structures under the boat will be drawn on the screen If fish and other objects swim through the beam cone marks will appear on the screen at the appropriate depth 6 If there are too many signals in the RTS window reduce the sensitivity 7 If the sonar has been operating f...

Page 14: ...he first menu item MODES appears on the screen To move to the next menu item click the up or down buttons To enter the desired MENU item press the left button and then use the up or down buttons to select a parameter value To save the selected parameter value press the left button again Exit the MENU by pressing the right button or it closes automatically after 15 seconds After that the work mode ...

Page 15: ...placing the battery is the sonar is NOT SWITCHED OFF user settings are not saved With such manipulations with the battery all settings will return to the factory default settings reset INFORMATION DISPLAY MODES This MENU item allows you to select the best mode for displaying information on the screen FISH ID mode for detecting fish displays fish outlines Pro professional mode raw information Flash...

Page 16: ...xample a vertically falling load feeder will be clearly visible in the RTS window but it will not be defined as a fish and there will be no fish outline on the screen Fish is defined not as a biological object but as an object with a body density scale skeleton bones swimming bladder different from the density of water Accordingly the stronger the signal the larger the fish the sonar will show In ...

Page 17: ...ties may appear on the screen in the form of fish symbols Shoals of fish juveniles can also cause large fish outlines to appear on the screen Decreasing the sensitivity will allow you to filter out these interfering factors It is impossible to give specific recommendations on setting the sensitivity level since the conditions of various water bodies differ significantly Displaying information on t...

Page 18: ... screen will depend on the sensitivity level For example if you want to watch the moving of your tackle on the sonar screen you need to lower the mormyshka other tackle into the hole to an average depth or closer to the bottom and increase the sensitivity until the signal from the tackle appears on the screen In Pro mode you can often see information lying below the bottom on the screen For exampl...

Page 19: ...the other half of the screen each time the screen is refreshed 4 times per second it draws wide strips of marks of all detected objects including the bottom Next to the mark about the largest detected object its depth is displayed The figure below shows how the position of the balancer which is currently at a depth of 3 4 meters has changed The largest object is not digitized over its entire depth...

Page 20: ...diameter of the sonar beam spot at the bottom trace of the sonar In this mode sounding and signal processing are significantly different from measuring depth in other sonar modes Depth measurement is especially accurately performed in difficult conditions such as shallow water and overgrown ponds No fish or other information on the water column is displayed in Depth Gauge mode The sensitivity dept...

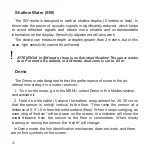
Page 21: ...to 0 5 m Demo The Demo mode designed to test the performance of sonar in the air without immersing it in a water reservoir 1 Turn on the sonar go to the MENU select Demo in the Modes section and activate it 2 Hold it be the cable above the battery compartment for 20 30 cm so that the sensor is strictly vertical to the floor Then raise the sensor at a distance of 0 5 1 0 m from the solid surface fl...

Page 22: ...her hairy surface is too weak so the device will not be able to see such a surface In addition tests should be carried out at a sufficiently large distance from powerful electrical appliances computers televisions etc since they can create significant electromagnetic interference Info If you switch to this mode the following information will be displayed on the screen of the device model firmware ...

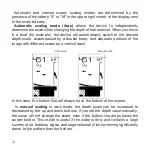
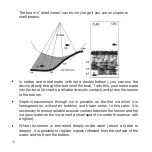
Page 23: ...d by a double beep and separate portions of the image with different scales by a vertical dash Auto scale Manual scale In this case the bottom line will always be at the bottom of the screen In manual scaling in work mode the depth scale can be increased or decreased by the up and down buttons If you set the depth value manually the sonar will not change the scale even if the bottom line drops bel...

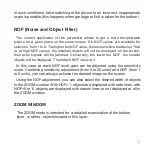
Page 24: ...r echo signals will be jammed Conversely the lower the NOF the smaller objects will be displayed The default NOF value is 3 In this case at each NOF level gain can be adjusted using the sensitivity scale Combining sensitivity adjustment from 0 to 28 units and NOF from 1 to 6 units you can always achieve the desired image on the screen Using the NOF adjustment you can also select the desired width ...

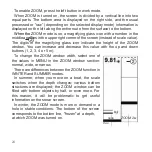
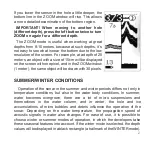
Page 25: ...OOM window You can increase and decrease this value with the up and down buttons 1 2 3 4 or 5 m To change the ZOOM window width select one of the values in MENU in the ZOOM window section normal wide or narrow There are differences between the ZOOM function in WINTER and SUMMER modes In summer when you move on a boat the scale switches when the depth changes various bottom structures are displayed...

Page 26: ...dow 1 meter the same object will be drawn with 30 pixels SUMMER WINTER CONDITIONS Operation of the sonar in the summer and winter periods differs not only in temperature conditions but also in the water body conditions In summer water becomes overgrown there are a lot of micro suspensions and thermoclines in the water column and in winter the hole and ice accumulations of micro bubbles and debris ...

Page 27: ...s unstable values less than 1 m are often displayed although the depth is actually more than 1 m It is necessary to increase the deaf zone by one step for example from 0 2 to 0 5 or from 0 5 to 1 0 If it is necessary to observe the tackle at a great depth 15 25 m In this case in order to clearly display the tackle movement on the screen it is necessary to increase the sensitivity but this will lea...

Page 28: ...the appearance of detected fish on the screen The notification of fish detention is relevant only in the FISH ID mode When the device detects a fish and draws a corresponding icon it will emit a sound signal In the Pro SW Flasher and Depth Gauge modes there is no fish detention notification DISPLAY If necessary the sonar screen can be rotated 180 degrees This is relevant when for convenience you n...

Page 29: ...device can take it for a large fish giving a more powerful signal A characteristic feature of this case is an abrupt decrease in depth by several measurements with its subsequent return to the original value In Depth Gauge mode the sonar selects the optimal power and gain mode If you need only accurate depth measurements and information about other objects is of little interest then we recommend w...

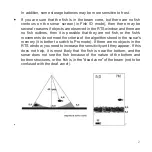
Page 30: ...sible that they are not fish or the fish s movements do not meet the criteria of the algorithm stored in the sonar s memory it is better to switch to Pro mode If there are no objects in the RTS window you need to increase the sensitivity until they appear If this does not help it is most likely that the fish is near the bottom and the sonar does not see the fish because of the nature of the bottom...

Page 31: ...nsor to the bottom Depth measurement through ice is possible on the first ice when it is homogeneous without air bubbles and frozen snow In this case it is necessary to ensure reliable acoustic contact between the sensor and the ice pour water on the ice or melt a small spot of ice under the sensor with a lighter When the sensor is immersed deeply under water about a meter or deeper it is possible...

Page 32: ...ttom structures If these readings change all the time then there is an inhomogeneous bottom surface with developed near bottom structures under the sonar If the values are stable then the bottom is most likely flat and uniform The larger the number of soil density at a constant depth the harder the bottom Automatic scale mode is preferable for use in motion since it eliminates the need for manual ...

Page 33: ...e sonar in direct sunlight for a long time as its liquid crystal display may lose its efficiency Do not bend the cable too much near the connector and battery compartment Sooner or later this will damage the internal conductors of the cable In this case you will need to replace the connector or the entire kit connector cable battery compartment Due to the continuous improvement of the device desig...

Page 34: ...sitivity Sensor loosely screwed into Screw on the sensor more tightly the battery housing manually without tools Signal cable break Contact an authorized service center Malfunction image on the screen blinks and or freezes or the device itself turns on and off Additional attribute the battery icon shows its low charge Cause Solution Low battery Replace the battery If it does not help contact the s...

Page 35: ... and m and reduce the sensitivity level sensitivity to 1 2 units Malfunction the screen is noisy there are too many objects Additional attribute depth readings randomly changing Cause Solution Sensitivity set too high 1 Reduce sensitivity Littered pond a lot of suspended 2 Increase the deaf zone matter garbage fry etc 3 Increase NOF by 1 2 units Malfunction zero depth readings No bottom line at al...

Page 36: ... completely The sensor must be completely immersed in water immersed in water and its surface Bubbles have stuck to the sensitive should be free of air bubbles area of the sensor Malfunction drops of water appear in the battery compartment Additional attribute screen image may be unstable Cause Solution Dry the battery compartment Install the The sensor is loosened battery in a warm room Lubricate...

Page 37: ...o not allow Increase sensitivity until signals sonar to register fish appear in the RTS window Additional attribute there are echo signals in the RTS window other objects not fish are visible in the RTS window the fish is stationary or the nature of its movement does not meet the identification criteria This is not a malfunction It is recommended to work in Pro mode 36 ...

Page 38: ...e fulfilled only provided that the sonar is used in accordance with this Instruction warranty card that was filled at the time of sale is presented specifying the model serial number of the device date of sale stamp of the supplier and trade organization Warranty obligations ARE NOT FULFILLED in case of violation of the rules of operation of the device mechanical damage breaks and failure of cable...

Page 39: ...s and www praktik service ru Main service center in Zelenograd 31 Zavodskaya Street Build 1 Zelenograd Moscow 124365 Praktik NZ LLC Tel 8 916 863 45 06 E mail service rusonar ru PRAKTIK NZ LLC CONTACTS Praktik NZ LLC Address 31 Zavodskaya Street Build 1 Zelenograd Moscow 124365 Tel fax 495 514 11 73 8 910 421 16 16 E mail praktik rusonar ru Website www rusonar ru CONTENTS OF DELIVERY Praktik 6 son...

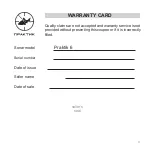
Page 40: ...l number Date of issue Seller name Date of sale WARRANTY CARD Quality claims are not accepted and warranty service is not provided without presenting this coupon or if it is incorrectly filled Praktik 6 seller s seal 3 ...

Page 41: ...SERVICE NOTE Date of repair Date of issue from repair Repairs Expert name service center seal 40 ...

Reviews: