background image

Model PD6200 Analog Input Rate/Totalizer 

Instruction Manual 

70


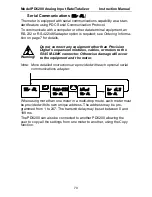
Serial Communications (

serial

The meter is equipped with serial communications capability as a stan-
dard feature using PDC Serial Communication Protocol. 
To communicate with a computer or other data terminal equipment, an 
RS-232 or RS-422/485 adapter option is required; see 

Ordering Informa-

tion

 on page 7 for details. 


Warning! 

Do not connect any equipment other than Precision  
Digital’s expansion modules, cables, or meters to the 
RJ45 M-LINK connector. Otherwise damage will occur 
to the equipment and the meter. 

Note:  More detailed instructions are provided with each optional serial 

communications adapter. 

 baud
 

Serial

 Address
 

Serial

 tr dly
 

Serial

 serial


When using more than one meter in a multi-drop mode, each meter must 
be provided with its own unique address. The address may be pro-
grammed from 1 to 247. The transmit delay may be set between 0 and 
199 ms. 
The PD6200 can also be connected to another PD6200 allowing the 
user to copy all the settings from one meter to another, using the 

Copy


function. 

Summary of Contents for PD6200

Page 1: ...tter Power Supply Math Functions for Flow Round Horizontal Tanks Programmable Displays Function Keys Sunlight Readable Display Rate Displayed as Units per Second Minute Hour or Day Total Grand Total or Non Resettable Grand Total 9 Digit Totalizer with Total Overflow Feature 32 Point Linearization Square Root or Programmable Exponent Multi Pump Alternation Control 2 or 4 Relays Isolated 4 20 mA Out...

Page 2: ...ions where malfunctioning could result in personal injury or property loss Anyone using this product for such applications does so at his her own risk Precision Digital Corporation shall not be held liable for damages resulting from such improper use Limited Warranty Precision Digital Corporation warrants this product against defects in material or workmanship for the specified period under Specif...

Page 3: ... 15 INSTALLATION 16 Unpacking 16 Panel Mounting Instructions 16 Configuration for 12 or 24 VDC Power Option 18 Transmitter Supply Voltage Selection P P 19 Connections 19 Connectors Labeling 20 Power Connections 20 Signal Connections 21 Serial Communications 22 Relay Connections 22 Switching Inductive Loads 23 4 20 mA Output Connections 24 Analog Output Transmitter Power Supply 24 External Relay Di...

Page 4: ...Operation 46 Programming Time Delay 46 Relay Action for Loss of 4 20 mA Input Loop Break 46 Relay and Alarm Operation Diagrams 47 High Alarm Operation Set Reset 47 Low Alarm Operation Set Reset 48 High Alarm with Fail Safe Operation Set Reset 49 Low Alarm with Fail Safe Operation Set Reset 50 Pump Alternation Control Operation 51 Rate Relay Sampling Operation 52 Total Relay Sampling Operation 52 S...

Page 5: ...ns serial 70 Select Menu SElEct 71 Math Function Selection Functn 71 Low Flow Cutoff CutofF 73 Analog Output Programming AoutPr 73 Programmable Function Keys User Menu user 74 Internal Source Calibration ICAL 75 Meter Copy Function Copy 78 METER OPERATION 80 Front Panel Buttons Operation 80 Function Keys Operation 80 Maximum Minimum Readings 81 TROUBLESHOOTING 82 Diagnostics Menu diag 82 Determini...

Page 6: ...wer Connections 20 Figure 8 Transmitters Powered by Internal Supply 21 Figure 9 Transmitter Powered by Ext Supply or Self Powered 21 Figure 10 Voltage Input Connections 22 Figure 11 Relay Connections 22 Figure 12 AC and DC Loads Protection 23 Figure 13 Low Voltage DC Loads Protection 23 Figure 14 4 20 mA Output Connections 24 Figure 15 Expansion Modules DIN Rail Mounting Kit 25 Figure 16 External ...

Page 7: ...an be used for alarm indication or process control applications such as pump alternation control The 4 20 mA isolated output serial communica tions and digital I O options make the PD6200 an excellent addition to any system ORDERING INFORMATION 85 265 VAC Model 12 24 VDC Model Options Installed PD6200 6R0 PD6200 7R0 No options PD6200 6R2 PD6200 7R2 2 relays PD1102 PD6200 6R3 PD6200 7R3 4 20 mA out...

Page 8: ...calibrated at the factory Recalibration is recommended at least every 12 months MAX MIN DISPLAY Max min readings reached by the process are stored until reset by the user or until power to the meter is turned off PASSWORD Three programmable passwords restrict modification of programmed settings and two prevent resetting the totals Pass 1 Allows use of the F1 F3 function keys Pass 2 Allows use of t...

Page 9: ...re RJ45 for external relays digital I O and serial com munication adapters ENCLOSURE 1 8 DIN high impact plastic UL 94V 0 color black MOUNTING 1 8 DIN panel cutout required 3 622 x 1 772 92 mm x 45 mm Two panel mounting bracket assemblies are provided TIGHTENING TORQUE Screw terminal connectors 5 lb in 0 56 Nm OVERALL DIMENSIONS 4 68 x 2 45 x 5 64 119 mm x 62 mm x 143 mm W x H x D WEIGHT 9 5 oz 26...

Page 10: ...ile displaying rate TOTAL DISPLAY TOTAL OVERFLOW 0 to 999 999 automatic lead zero blanking T LED is illumi nated while displaying total or grand total Up to 999 999 999 with total overflow feature oF is dis played to the left of total overflow and LED is illuminated ALTERNATING DISPLAY Either display may be programmed to alternate between rate and total or rate and grand total every 10 seconds TOT...

Page 11: ...or 4 SPST Form A external rated 3 A 30 VDC and 125 250 VAC resistive load 1 14 HP 125 250 VAC for inductive loads NOISE SUPPRESSION Noise suppression is recommended for each relay contact switching inductive loads see page 23 for details RELAY ASSIGNMENT Relays may be assigned to rate total or grand total DEADBAND 0 100 of span user programmable HIGH OR LOW ALARM User may program any alarm for hig...

Page 12: ...anual control mode SCALING RANGE 1 000 to 23 000 mA for any display range CALIBRATION Factory calibrated 4 000 to 20 000 4 20 mA output ANALOG OUT PROGRAMMING 23 000 mA maximum for all parameters Overrange underrange max min and break ACCURACY 0 1 FS 0 004 mA TEMPERATURE DRIFT 0 005 of calibrated span C from 0 to 65 C ambient 0 01 of calibrated span C from 40 to 0 C ambient Note Analog output drif...

Page 13: ...n Protocol manual located at www predig com for details PDA1044 Digital Input Output Expansion Module CHANNELS 4 digital inputs 4 digital outputs per module SYSTEM Up to 2 modules for a total of 8 inputs 8 outputs DIGITAL INPUT LOGIC HIGH 3 to 5 VDC DIGITAL INPUT LOGIC LOW 0 to 1 25 VDC DIGITAL OUTPUT LOGIC HIGH 4 75 to 5 VDC DIGITAL OUTPUT LOGIC LOW 0 to 0 4 VDC SOURCE CURRENT 10 mA maximum outpu...

Page 14: ... EN 55022 1998 A1 2000 A2 2003 Class A ITE emissions requirements Radiated Emissions Class A AC Mains Conducted Emissions Class A IMMUNITY EN 61000 6 2 2001 EMC heavy industrial generic immunity standard RFI Amplitude Modulated 80 1000 MHz 10 V m 80 AM 1 kHz Electrical Fast Transients 2kV AC mains 1kV other Electrostatic Discharge 4kV contact 8kV air RFI Conducted 10V 0 15 80 MHz 1kHz 80 AM AC Sur...

Page 15: ...of entry representing installations designed to optimize EMC performance Declaration of Conformity available at www predig com SAFETY INFORMATION CAUTION Read complete instructions prior to instal lation and operation of the meter WARNING Risk of electric shock or personal injury Warning Hazardous voltages exist within enclosure Installation and service should be performed only by trained service ...

Page 16: ...ind the panel for wiring Panel thickness 0 04 0 25 1 0 mm 6 4 mm Recommended minimum panel thickness to maintain Type 4X rating 0 06 1 5 mm steel panel 0 16 4 1 mm plastic panel Remove the two mounting brackets provided with the meter back off the two screws so that there is 6 4 mm or less through the brack et Slide the bracket toward the front of the case and remove Insert meter into the panel cu...

Page 17: ...put Rate Totalizer Instruction Manual 17 Mounting Dimensions 1 76 45 mm 0 59 15 mm 4 77 121 mm 2 45 62 mm 5 05 128 mm Figure 2 Meter Dimensions Side View 3 61 92 mm 4 17 106 mm 4 68 119 mm Figure 3 Meter Dimensions Top View ...

Page 18: ... option are shipped from the factory ready to operate from 24 VDC To configure the meter for 12 VDC power 1 Remove all the connectors 2 Unscrew the back cover 3 Slide the back cover about 1 inch 4 Configure the J9 jumper located behind the power connector for 12 V as shown below MAIN BOARD 24 VDC 12 VDC POWER J9 12 V 24 V J9 CONFIGURATION Factory Default M LINK _ Figure 4 Jumper Configuration for ...

Page 19: ...ide the back cover about 1 inch 4 Configure the J4 jumper located behind the input signal connector for the desired excitation voltage as shown MAIN BOARD INPUT SIGNAL J4 5 V 10 V 24 V J4 CONFIGURATION Factory Default P P mA COM V Figure 5 Transmitter Supply Voltage Selection Connections All connections are made to removable screw terminal connectors located at the rear of the meter Caution Use co...

Page 20: ...to the equipment and the meter DW1815 R I I MA OUT 1 3 2 POWER SIGNAL P COM P V mA 3 4 1 2 5 M LINK C NO NO NC NC C RELAY4 RELAY3 4 3 6 5 2 1 C NO NO NC NC C RELAY2 RELAY1 4 3 6 5 2 1 1 2 3 4 5 6 7 8 2 1 Figure 6 Connector Labeling for Fully Loaded PD6200 Power Connections Power connections are made to a two terminal connector labeled POWER on Figure 6 The meter will operate regardless of DC polar...

Page 21: ...5 4 P V COM INPUT SIGNAL 3 Wire 4 20 mA Transmitter Signal 2 Wire 4 20 mA Transmitter mA P 2 1 3 5 4 P V COM INPUT SIGNAL Figure 8 Transmitters Powered by Internal Supply External Power Supply 2 Wire 4 20 mA Transmitter mA P 2 1 3 5 4 P V COM INPUT SIGNAL mA P 2 1 3 5 4 P V COM INPUT SIGNAL 2 Wire 4 20 mA Self Powered Transmitter Figure 9 Transmitter Powered by Ext Supply or Self Powered The curre...

Page 22: ...same port is used for interfac ing with all expansion modules e g external relays digital I O Use the PDA1200 meter copy cable for meter to meter interfacing for cloning purposes i e copying settings from one meter to other meters Relay Connections Relay connections are made to two six terminal connectors labeled RELAY1 RELAY4 on Figure 6 Each relay s C terminal is common only to the normally open...

Page 23: ...ollows R 0 5 to 1 Ω for each volt across the contacts C 0 5 to 1 µF for each amp through closed contacts Notes 1 Use capacitors rated for 250 VAC 2 RC networks may affect load release time of solenoid loads Check to confirm proper operation 3 Install the RC network at the meter s relay screw terminals An RC network may also be installed across the load Experiment for best results Figure 13 Low Vol...

Page 24: ...VDC Power Supply 4 20 mA Input Meter R I I 1 3 2 RELAY1 3 2 1 24 V 4 20 mA Input Remote Display Chart Recorder Etc R I I MA OUT 1 3 2 RELAY1 3 2 1 24 V MA OUT Figure 14 4 20 mA Output Connections Analog Output Transmitter Power Supply The internal 24 VDC power supply powering the analog output may be used to power other devices if the analog output is not used The I terminal is the 24 V and the R ...

Page 25: ...te The jumper located between the RJ45 connectors of the PDA1044 must be removed on the second digital I O module in order for the system to recognize it as module 2 Warning Do not connect or disconnect the expansion modules with the power on More detailed instructions are provided with each op tional expansion module Figure 15 Expansion Modules DIN Rail Mounting Kit 1 2 RLY5 RLY6 RLY7 RLY8 3 4 5 ...

Page 26: ...d in milliamps and volts depending on the input selection The calibration equipment is certified to NIST standards Overview There are no jumpers to set for the meter input selection Setup and programming is done through the front panel buttons After power and input signal connections have been completed and veri fied apply power to the meter ...

Page 27: ...l overflow indicator Press the Menu button to enter or exit the Programming Mode at any time Press the Right arrow button to move to the next digit during digit or decimal point programming Press the Up arrow button to scroll through the menus decimal point or to increment the value of a digit Press the Enter button to access a menu or to accept a setting Press and hold the Menu button for three s...

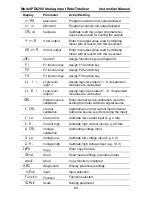
Page 28: ...et max min displays Contrl Control Enter Control menu Auto Automatic Press Enter to set meter for automatic operation mAn Manual Press Enter to manually control relays or analog output operation setup Setup Enter Setup menu Input Input Enter Input selection menu mA 4 20 mA Set meter for 4 20 mA input volt 0 10 VDC Set meter for 10 VDC input Total Total Enable or disable totalizer features Dec pt D...

Page 29: ...condition has cleared relays assigned to rate Altern Alternate Set relay for pump alternation control relays assigned to rate Sampl Sampling Set relay for sampling operation OFF Off Disable relay and front panel status LED Set 1 Set 1 Program set point 1 RSt 1 Reset 1 Program reset point 1 RLY 2 Relay 2 Relays 2 8 setup Note Relays 5 8 are shown only if ex pansion relay module is installed FaiLSF ...

Page 30: ...ter the Program menu sCalE Scale Enter the Scale menu Cal Calibrate Enter the Calibrate menu Inp 1 Input 1 Calibrate input 1 signal or program input 1 value Dis 1 Display 1 Program display 1 value Inp 2 Input 2 Calibrate input 2 signal or program input 2 value up to 32 points Dis 2 Display 2 Program display 2 value up to 32 points Error Error Error calibration not successful check signal or progra...

Page 31: ...Pass 1 Password 1 Set or enter Password 1 Pass 2 Password 2 Set or enter Password 2 Pass 3 Password 3 Set or enter Password 3 Total Total password Set or enter password for manual reset Gtotal Grand total password Set or enter password for manual reset nonrst Non resettable Non resettable grand total set after enter ing 050873 for Gtotal password unloc Unlocked Program password to lock meter locd ...

Page 32: ...ontrl sCale Prog Cal Prog Pass 1 Pass rst t reset rst Gt reset t CF Prog t tb Prog Grand Total Settings t rst Prog Pass 3 Pass Pass 2 Pass Gtotal Pass total Pass input setup dsplay setup dec pt setup aout setup relay setup rst Hi reset rst HL reset rst Lo reset Press Menu at any time to exit and return to Run Mode Changes made to settings prior to pressing Enter are not saved Changes to the settin...

Page 33: ...dis 1 Next Setting 005 000 dis 1 Note The decimal point is set in the Setup decimal point menu Reset Menu reset The Reset menu is used to reset the maximum or minimum reading peak or valley reached by the process both may be reset at the same time by selecting reset high low rst HL Control Menu Contrl The Control menu is used to control the 4 20 mA analog output and the relays manually ignoring th...

Page 34: ...elay operation 6 4 20 mA analog output scaling Press the Enter button to access any menu or press Up arrow button to scroll through choices Press the Menu button to exit at any time dec pt setup Dsplay setup big dsplay Little dsplay relay setup Aout setup dis 1 Aout 004 000 dis 1 d Inty dsplay Fail Safe Delay Break Out 1 Aout setup rate dec pt total dec pt Gtotal dec pt Assign relay rly 1 8 relay ...

Page 35: ...talizer continues working in the background Setting the Decimal Point dEc pt The decimal point may be set with up to five decimal places or with no decimal point at all The rate total and grand total decimal points are independent Pressing the Right arrow moves the decimal point one place to the right until no decimal point is displayed then it moves to the leftmost position Setting the Display Pa...

Page 36: ...rammed to show engineering units or cus tom legends using the following 7 segment character set 0123456789AbCcdefg9HhIijkl nOopqrstuvxyz mw To create the letter m use the characters n followed by m to get nm To create the letter w use the characters u followed by w to get uw See the flow chart on the next page to access the display units menu ...

Page 37: ...d Inty d rate big d Hi Little d Lo Little d HL Little d unit Little d oFF Little Rate Total Grand total dset 1 Little d tot big d Gtot big Alternate rate total grand total dset 1 big Display max min max min Select Set Points 1 8 After setting up the input and the display press the Menu button to exit programming and skip the rest of the setup menu Press the Menu but ton again and the Up arrow to r...

Page 38: ...nal source 2 Calibrate with a calibrated signal source 3 Total time base conversion factor 4 Grand total time base conversion factor 5 Total reset mode for total grand total The process inputs may be calibrated or scaled to any display value within the range of the meter prog sCale Prog Cal Prog t CF Prog t tb Prog Grand Total Settings t rst Prog Additional parameters not needed for most applicati...

Page 39: ... using an RS 232 or RS 485 serial adapter see ORDERING IN FORMATION on page 7 for details Scaling the Meter SCALE The process inputs 4 20 mA and 10 VDC can be scaled to display the process variable in engineering units A signal source is not needed to scale the meter simply program the inputs and corresponding display values SCALE Prog Inp 1 SCALE 04 000 Inp 1 Inp 2 SCALE 20 000 Inp 2 dis 1 SCALE ...

Page 40: ...applied or programmed The error message might be caused by any of the following conditions 1 Input signal is not connected to the proper terminals or it is connected backwards 2 Wrong signal selection in Setup menu 3 Minimum input span requirements not maintained 4 Input 1 signal inadvertently applied to calibrate input 2 Minimum Input Span The minimum input span is the minimum difference between ...

Page 41: ...s m3 etc Total Grand Total Reset The totals can be programmed for manual or automatic reset In the au tomatic reset mode a programmable time delay is available to reset the total or grand total after the assigned preset is reached t CF Prog t tb Prog To Grand Total Settings t rst Prog sec t tb min t tb Hour t tb day t tb d ddddd t CF 0 01000 t CF man t rst Auto t rst t dly Auto Non Resettable Tota...

Page 42: ...ariable in engineer ing units by applying the appropriate input signal and following the cali bration procedure The use of a calibrated signal source is strongly recommended to cali brate the meter CAL Prog Inp 1 CAL Inp 1 Inp 1 Inp 2 CAL Inp 2 Inp 2 dis 1 Inp 1 000 000 dis 1 dis 2 Inp 2 100 000 dis 2 The display flashes while sensing the inputs Warm up the meter for at least 15 minutes before per...

Page 43: ...l 2 Relay action a Automatic reset only non latching b Automatic manual reset at any time non latching c Latching manual reset only d Latching with Clear manual reset only after alarm condi tion has cleared e Pump alternation control automatic reset only f Sampling the relay is activated for a user specified time g Off relay and status LED disabled 3 Set and reset points 4 Fail safe operation a On...

Page 44: ...y on Fls 1 off Fls 1 Fls 1 Failsf break relay ignore break1 On break1 break1 break Off break1 off dly 1 relay setup Act 1 rly 1 rst 1 rly 1 Asign1 Assign Asign8 Assign Relay Assignment Assign The relays can be assigned to any of the following parameters 1 Rate for low or high alarm indication 2 Total for alarm indication 3 Grand total for alarm indication Assign relay Gtotal Asign1 total Asign1 ra...

Page 45: ...ime non latching 3 Latching manual reset only at any time 4 Latching with Clear manual reset only after alarm condition has cleared 5 Pump alternation control automatic reset only 6 Sampling the relay is activated for a user specified time 7 Off relay and status LED disabled The following graphic shows relay 1 action setup relay 2 8 are set up in a similar fashion From Relay 1 Menu Latch Act 1 Sam...

Page 46: ...fe operation is set independently for each relay Select on to enable or select off to disable fail safe operation Programming Time Delay The On and Off time delays may be programmed for each relay between 0 and 999 9 seconds The relays will transfer only after the condition has been maintained for the corresponding time delay The On time delay is associated with the set point The Off time delay is...

Page 47: ...set Relay LED Input de energized energized off on Relay LED Automatic or Manual non latching ACK pressed Relay LED Manual latching ACK pressed Relay LED Manual only after passing below Reset latching with clear ACK pressed Set Reset Automatic non latching For Manual reset mode ACK can be pressed anytime to turn off relay To detect a new alarm condition the signal must go below the set point and th...

Page 48: ... off Relay LED Automatic or Manual non latching ACK pressed Relay LED Manual latching ACK pressed Relay LED ACK pressed Automatic non latching Manual only after passing above Reset latching with clear For Manual reset mode ACK can be pressed anytime to turn off relay For relay to turn back on signal must go above set point and then go below it ...

Page 49: ...ic non latching energized de energized off on Relay LED Automatic or Manual non latching ACK pressed Relay LED Manual latching ACK pressed Relay LED Manual only after passing below Reset latching with clear ACK pressed Set Reset Note Relay coil is energized in non alarm condition In case of power failure relay will go to alarm state ...

Page 50: ...D Automatic non latching de energized energized on off Relay LED Automatic or Manual non latching ACK pressed Relay LED Manual latching ACK pressed Relay LED Manual only after passing above Reset latching with clear ACK pressed Note Relay coil is energized in non alarm condition In case of power failure relay will go to alarm state ...

Page 51: ... Pump 1 Relay1 Set Relay2 Reset Relay2 Set Relay1 Set Relay2 Set Input de energized energized Relay1 Set Relay2 Set Relay1 Relay2 Reset LEDs indicate the relay status Input Input Relay1 Reset Relay2 Reset Relay1 Reset Pump 2 Pump 1 Pump 2 Pump 1 Pump 2 de energized energized de energized energized ...

Page 52: ...resets The cycle repeats every time the set point is crossed going up for high alarms and going down for low alarms The sample time can be programmed between 0 1 and 5999 9 seconds Total Relay Sampling Operation Preset 100 100 Relay LED Total 200 300 Sample Time Sample Time Sample Time When the total reaches the preset the relay trips and the sample time starts After the sample time has elapsed th...

Page 53: ... high alarm relay Relay LED Input Loop Break Ignore de energized energized off on Relay LED Loop Break Off Relay LED Loop Break On Set Reset When the meter detects a break in the 4 20 mA loop the relay will go to one of the following selected actions 1 Turn on Go to alarm condition 2 Turn off Go to non alarm condition 3 Ignore Process as a low signal condition ...

Page 54: ...LED When the signal crosses the set point the On time delay timer starts and the relay trips when the time delay has elapsed If the signal drops below the set point high alarm before the time delay has elapsed the On time delay timer resets and the relay does not change state The same prin ciple applies to the Off time delay Note If Automatic or Manual A mAn reset mode is selected the LED follows ...

Page 55: ...band 3 Sampling Based on Time 4 Pump Alternation Control for up to 8 Pumps Relays Auto Initialization When power is applied to the meter the front panel LEDs and alarm relays will reflect the state of the input to the meter The following table indicates how the alarm LEDs and relays will react on power up based on the set and reset points Alarm HI or LO Alarm Set Point Reset Point Power Up Reading...

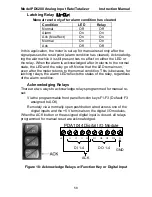
Page 56: ...ently for latching and non latching relays For non latching relays the LED is always off during normal condition and always on during alarm condition regardless of the state of the relay e g Relay acknowledged after alarm condition For latching relays the alarm LEDs reflect the status of the relays re gardless of the alarm condition The following tables illustrate how the alarm LEDs function in re...

Page 57: ...arm On On Normal Off Off Next Alarm On On Ack On Off Normal Off Off In this application the meter is set up for automatic and manual reset at any time non latching relay The LED and the relay automatically reset when the meter returns to the normal condition The next time an alarm occurs the operator acknowledges the alarm manually while the alarm condition still exists This causes the relay to re...

Page 58: ...t the LED remains on even after the meter returns to the normal condition This is because for latching relays the alarm LED reflects the status of the relay regardless of the alarm condition Acknowledging Relays There are two ways to acknowledge relays programmed for manual re set Via the programmable front panel function keys F1 F3 Default F3 assigned to ACK Remotely via a normally open pushbutto...

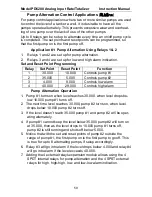
Page 59: ...3 4 000 9 000 Controls low alarm 4 40 000 29 000 Controls high alarm Pump Alternation Operation 1 Pump 1 turns on when level reaches 30 000 when level drops be low 10 000 pump 1 turns off 2 The next time level reaches 30 000 pump 2 turns on when level drops below 10 000 pump 2 turns off 3 If the level doesn t reach 35 000 pump 1 and pump 2 will be oper ating alternately 4 If pump 1 cannot keep the...

Page 60: ...nt Function 1 495 750 Controls low alarm 2 7500 6900 Controls high alarm 3 7000 900 Controls backup pump 4 6000 1000 Controls main pump The following graphics provide a visual representation of a typical pump alternation application with high and low alarm monitoring Relay 4 turns the main pump on at 6000 gallons and turns it off at 1000 gallons With the Pump Alternation feature activated the next...

Page 61: ...ackup pump is not able to keep up and the level reaches 7000 gallons relay 4 transfers and starts the main pump as well Relay 2 trips the High Level Alarm at 7500 gallons and resets at 6900 gallons Relay 1 trips the Low Level Alarm at 495 gallons and resets at 750 gallons ...

Page 62: ... No equipment is needed to scale the analog output simply program the display values to the corresponding mA output signal The Analog Output menu is used to program the 4 20 mA output based on display values Aout setup dis 1 Aout 004 000 dis 1 dis 2 Aout 020 000 dis 2 Out 1 Aout 04 000 Out 1 Out 2 Aout 20 000 Out 2 For instructions on how to program numeric values see Setting Numer ic Values page ...

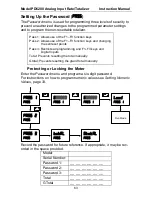
Page 63: ...d Digital Inputs Total Prevents resetting the total manually Gtotal Prevents resetting the grand total manually Protecting or Locking the Meter Enter the Password menu and program a six digit password For instructions on how to program numeric values see Setting Numeric Values page 33 Pass 1 Pass Pass 2 Pass 000000 Pass 1 600000 Pass 1 Locd Pass 1 Run Mode Pass 3 Pass Total Pass Gtotal Pass Record...

Page 64: ...table Total The total and the grand total can be password protected to pre vent unauthorized total resets The grand total can be programmed as a non resettable total by entering the password 050873 Caution Once the Grand Total has been programmed as non resettable the feature cannot be disabled ...

Page 65: ...orrect password twice as shown below The meter is now unprotected until a new password is entered Locd 000000 Locd unLoc Locd reset 20 000 mA Run Mode Pass Enter Password unLoc Pass 1 Enter Password If the correct six digit password is entered the meter displays the mes sage unLoc unlocked and the protection is disabled until a new pass word is programmed If the password entered is incorrect the m...

Page 66: ... process functions not needed for most applications are located in the Advanced Features menu Press and hold the Menu button for three seconds to access the ad vanced features of the meter 20 000 mA Run Mode Filter serial bypass Select user ICAL Copy diaG Press hold Menu for 3 sec to access Advanced features ...

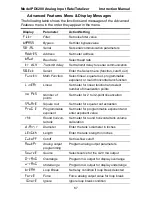
Page 67: ...Set meter for linear function and select number of linearization points No PtS Number of points Set meter for 2 to 32 point linearization Square Square root Set meter for square root extraction Prog E Programmable exponent Set meter for programmable exponent and enter exponent value rht Round horizon tal tank Set meter for round horizontal tank volume calculation diamr Diameter Enter the tank s di...

Page 68: ...c level input 1 8 if expansion modules are connected LL O 1 Logic level output 1 Assign logic level output 1 8 if expansion modules are connected ICal Internal source calibration Enter internal source calibration used for scaling the meter without a signal source C CAL Current calibration Calibrating 4 20 mA current input internal reference source used for scaling the input C lo Current low Calibr...

Page 69: ...certain period The filter level determines the length of time over which the signal is averaged The filter level can be set between 2 and 199 The higher the filter level the longer the averaging time and so the longer it takes the display to settle to its final value Setting the filter level to zero disables the filter function Noise Filter Bypass bypass The noise filter bypass changes the behavio...

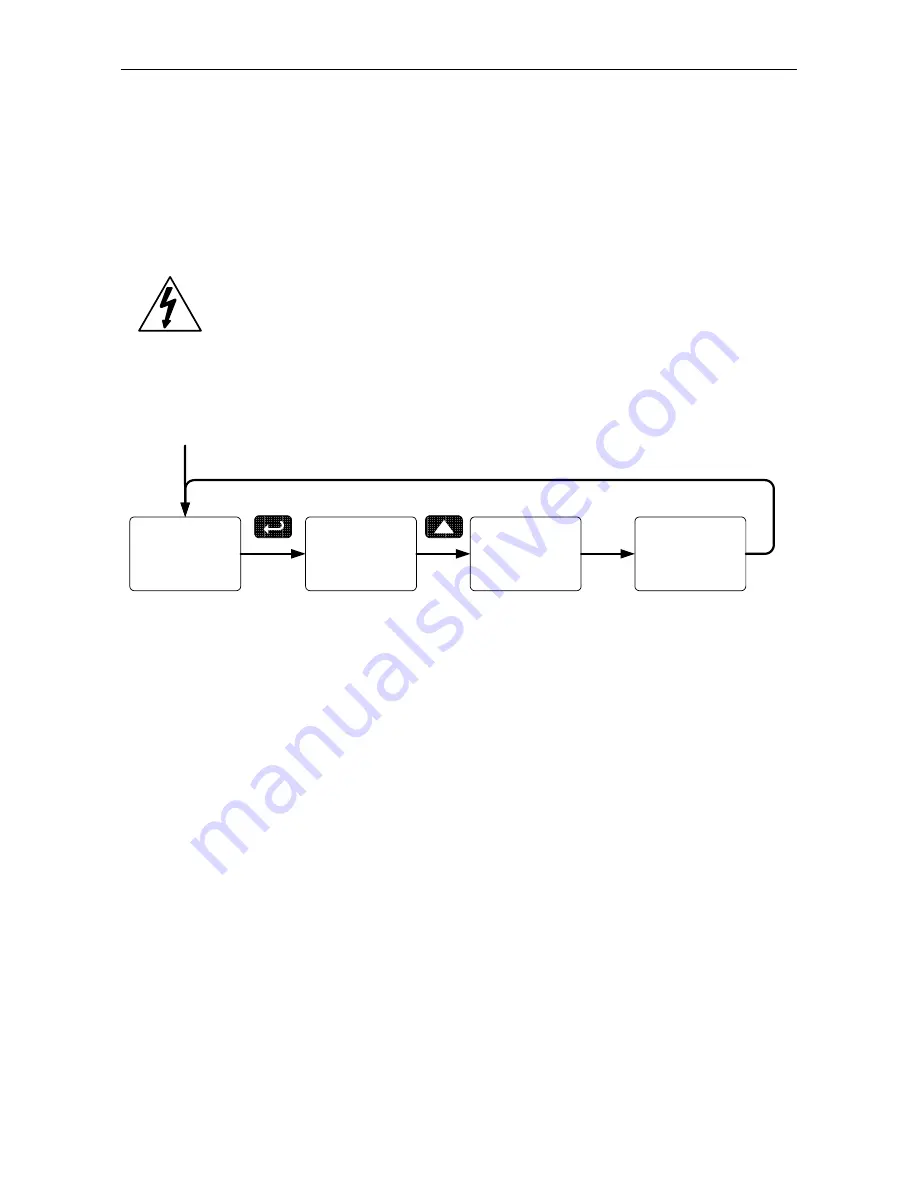
Page 70: ...ecision Digital s expansion modules cables or meters to the RJ45 M LINK connector Otherwise damage will occur to the equipment and the meter Note More detailed instructions are provided with each optional serial communications adapter baud Serial Address Serial tr dly Serial serial When using more than one meter in a multi drop mode each meter must be provided with its own unique address The addre...

Page 71: ... Prog E Functn rHt Functn Program cutoff value Linear Functn Math Function Selection Functn The Function menu is used to select the math function applied to the input linear square root programmable exponent or round horizontal tank volume calculation The multi point linearization is part of the linear function selection Meters are set up at the factory for linear function with 2 point lineariza t...

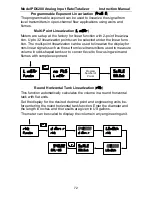
Page 72: ...ignals such as those from level transmitters used to measure volume in odd shaped tanks or to convert level to flow using weirs and flumes with complex exponent Program Number of Points Linear Functn no Pts Linear scALE Select Round Horizontal Tank Linearization rHt This function automatically calculates the volume in a round horizontal tank with flat ends Set the display for the desired decimal p...

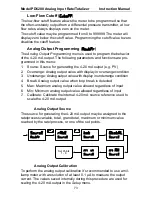
Page 73: ...verrange condition 3 Underrange Analog output value with display in underrange condition 4 Break Analog output value when loop break is detected 5 Max Maximum analog output value allowed regardless of input 6 Min Minimum analog output value allowed regardless of input 7 Calibrate Calibrate the internal 4 20 mA source reference used to scale the 4 20 mA output Analog Output Source The source for ge...

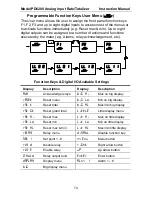
Page 74: ... F3 user F2 user Function Keys Digital I O Available Settings Display Description Display Description Ack Acknowledge relays Big Hi Max on big display Reset Reset menu Big Lo Min on big display Rst t Reset total Big HL Max min big display Rst Gt Reset grand total Little Little display menu Rst Hi Reset max Lit Hi Max on little display Rst Lo Reset min Lit Lo Min on little display Rst HL Reset max ...

Page 75: ...ths Each input must be recalibrated separately Notes If meter is in operation and it is intended to accept only one input type e g 4 20 mA re calibration of other input is not necessary Allow the meter to warm up for at least 15 minutes before performing the internal source calibration procedure The Internal calibration menu is part of the Advanced Features menu 1 Press and hold the Menu button fo...

Page 76: ...e Right arrow button to move to the next digit 6 Set the display value to correspond to the input signal being cali brated typically 4 000 mA 7 The display moves to the high input calibration C Hi Apply the high input signal and press Enter 8 Set the display for the high input calibration in the same way as it was set for the low input calibration typically 20 000 mA For instructions on how to pro...

Page 77: ...s to input 2 during calibration or scaling and to input 1 during internal calibration allowing the appropriate input signal to be applied or programmed The error message might be caused by any of the following conditions 1 Input signal is not connected to the proper terminals or it is con nected backwards 2 Wrong signal selection in Setup menu 3 Minimum input span requirements not maintained Minim...

Page 78: ...ng Only the PDA1200 meter copy cable must be used for meter to meter interfacing The PDA1200 is a special eight conductor flat cable with two wires swapped Using standard CAT5 or other cable will cause dam age to both meters Figure 19 Meter Copy Connection Copy Function Requirements To successfully copy settings from one meter to another both meters must have 1 Same software version 2 Same baud ra...

Page 79: ...n Mode 4 Enter the Advanced Features menu of the Master meter see Ad vanced Features Menu page 66 5 Scroll to the Copy function using the Up arrow button then press Enter 6 The meter displays the message Send Press Enter the display flashes while sending data The message done is displayed when copying is completed Send Copy done Copy Display flashes while sending data Copy 7 The Clone meter displa...

Page 80: ...splay is used engineering units custom legend or set point indication Front Panel Buttons Operation Button Symbol Description Press to enter or exit Programming Mode view settings or exit max min readings Press to reset max min readings or other parameter function assigned through the User menu Press to display max min readings or oth er parameter function assigned through the User menu Press to a...

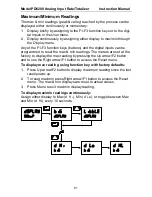
Page 81: ...n readings The meters are set at the factory to display the max reading by pressing the Up arrow F2 button and to use the Right arrow F1 button to access the Reset menu To display max reading using function key with factory defaults 1 Press Up arrow F2 button to display maximum reading since the last reset power up 2 To reset max min press Right arrow F1 button to access the Reset menu The max min...

Page 82: ...nostics menu see Advanced Features Menu page 66 It provides an easy way to view the programmed parameter settings for troubleshooting purposes Press the Enter button to view the settings and the Menu button to exit at any time For a description of the diagnostic messages see Advanced Features Menu Display Messages page 67 Determining Software Version To determine the software version of a meter 1 ...

Page 83: ...res menu See Advanced Features Menu page 66 2 Press Up arrow to go to Diagnostics menu 3 Press and hold Right arrow for five seconds press Enter when display flashes reset Note If Enter is not pressed within three seconds the display re turns to the Diagnostics menu 4 The meter goes through an initialization sequence similar as on power up and loads the factory default settings 996000 GPd Run Mode...

Page 84: ...tal enabled Filter filter 10 Bypass bypass 0 2 Function Functn Linear Number of points No Pts 2 Programming prog Scale Input 1 InP 1 4 000 mA Display 1 Dis 1 4 000 Input 2 InP 2 20 000 mA Display 2 Dis 2 20 000 Decimal point ddd ddd 3 places Cutoff value CutofF 0 000 disabled Display assignment dSPLAY Big display Main big Rate Process Little display Small Little Total value Display intensity d Int...

Page 85: ...atic Relay 3 set point Set 3 3 000 Relay 3 reset point RSt 3 2 500 Relay 4 action Act 4 Automatic Relay 4 set point Set 4 4 000 Relay 4 reset point RSt 4 3 500 Fail safe relay 1 Fls 1 Off Fail safe relay 2 Fls 2 Off Fail safe relay 3 Fls 3 Off Fail safe relay 4 Fls 4 Off On delay relay 1 On 1 0 0 sec Off delay relay 1 Off 1 0 0 sec On delay relay 2 On 2 0 0 sec Off delay relay 2 Off 2 0 0 sec On d...

Page 86: ...n 0 000 mA Serial address addres 001 Baud rate baud 2400 Transmit delay Tr dly 10 ms F1 function key F1 Reset max min F2 function key F2 Big display Max Hi F3 function key F3 Acknowledge relays Logic level input 1 LL I 1 Menu Logic level input 2 LL I 2 Right arrow Logic level input 3 LL I 3 Up arrow Logic level input 4 LL I 4 Enter Logic level output 1 LL O 1 Alarm 1 Logic level output 2 LL O 2 Al...

Page 87: ...low Check filter and bypass values Display reading is not accurate Check 1 Math function selected Linear square root etc 2 Scaling or calibration Display does not respond to input changes reading a fixed number Check 1 Display assignment it might be displaying max min or set point Display alternates between 1 Hi and a number 2 Lo and a number Press Menu to exit max min display readings Relay opera...

Page 88: ... lays assigned to rate A man Auto manual Set relay for automatic manual reset any time Aout Analog output Analog output scaling Aoutpr Analog output programming Analog output programming Asign1 Assign 1 Relay 1 assignment Assign Assignment Assign relays to rate total or grand total Auto Automatic Press Enter to set meter for automatic op eration Auto Automatic For automatic reset baud Baud rate Se...

Page 89: ...l point Set decimal point for rate total grand total DeLAY Delay Enter relay Time Delay menu Diag Diagnostics Display parameter settings diamr Diameter Enter the tank s diameter in inches d Inty Display intensity Set display intensity level from 1 to 8 Dis 1 Display 1 Program display 1 value Dis 2 Display 2 Program display 2 value disabl Disable function key DLY 1 Delay 1 Enter relay 1 time delay ...

Page 90: ...ion Enter internal source calibration used for scaling the meter without a signal source Ignore Ignore Ignore loop break condition Info Information Display software and S N information Inp 1 Input 1 Calibrate input 1 signal or program input 1 value Inp 2 Input 2 Calibrate input 2 signal or program input 2 value up to 32 points Input Input Input selection LatCH Latching Set relay for latching opera...

Page 91: ...owed menu Menu button Assign digital input to Menu button min Minimum Program minimum mA output allowed No PtS Number of points Set meter for 2 to 32 point linearization nonrst Non resettable Non resettable grand total set after entering 050873 for Gtotal password O Hold Relay output hold OFF Off Fail safe off Off Disable relay and front panel status LED Disable fail safe operation Relay goes to n...

Page 92: ... Relay 1 Relay 1 setup RLY 2 Relay 2 Relays 2 8 setup Note Relays 5 8 are shown only if expan sion relay module is installed Rly d Disable relay Rly E Enable relay RSt 1 Reset 1 Program reset point 1 Rst Gt Reset grand total To reset grand total Rst Hi Reset high Press Enter to reset max display Rst HL Reset high low Press Enter to reset max min displays Rst Lo Reset low Press Enter to reset min d...

Page 93: ...anual T tb Total time base Program total time base Total Total Enable or disable totalizer features Tr dLY Transmit delay Set transmit delay for serial communication unloc Unlocked Program password to lock meter up Up arrow button To assign digital input to up arrow button u rang Underrange Program mA output for display underrange user User I O Assign function keys and digital I O v CAL Voltage ca...

Page 94: ...Model PD6200 Analog Input Rate Totalizer Instruction Manual 94 NOTES ...

Page 95: ...Model PD6200 Analog Input Rate Totalizer Instruction Manual 95 NOTES ...

Page 96: ...ital For Technical Support please Call 800 610 5239 or 508 655 7300 Fax 508 655 8990 Email support predig com For Sales Support or to place an order please con tact your local distributor or Call 800 343 1001 or 508 655 7300 Fax 508 655 8990 Email sales predig com For the latest version of this manual please visit www predig com ...

Reviews: