background image

PORTED ENCLOSURE

4

Building A Ported Enclosure:

     1.

Build a sealed box with internal dimensions of LxWxD as specified for
your woofer. Use 3/4” thick material (preferably medium density fiber
board or equivalent) for box construction. Be sure to use wood glue and
silicone to ensure your enclosure is sealed properly, as air leaks will
affect the performance of a subwoofer. (The use of an air stapler will help
to achieve the nicest results for constructing the enclosure.)

     2.

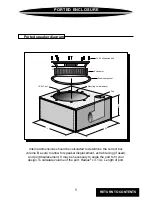
Using the supplied template, trace the appropriate circle and mounting
hole pattern for your 

PrecisionPower subwoofer on the proper side for

mounting the woofer. Be sure to offset the woofer to one side to allow
for the port to fit comfortably.(See Diagram)

     3.

Cut the speaker hole out of the box with a router. Use a guide or
template whenever possible for a clean, accurate job; use a jig saw only
if a router is not available. Drill out the mounting holes with a 7/32” drillbit.

     4.

Locate the port material which you are going to use. Trace the pattern
of the appropriate hole needed for the port, then cut the hole out. When
installing the port, make sure you have a distance of at least the diameter
of the port from the end of the port to the wall inside the box. To best
seal off any air leaks use silicone around the inside edge. Also, bevel
the inside edge of both ends of the port to cut down on port noise.

     5.

Place the woofer into the hole which you have cut into the box to check
the fit. Make sure that the T-nut holes line up.

     6.

Install the 10-24 T-nuts (supplied) into the 7/32” holes from the
backside of the mounting board.

     7.

Run an appropriate length of wire into the box, leaving enough length to
comfortably install the wires to the terminals on the woofer before
placing the speaker into its mounting hole. Use a terminal cup whenever
possible.

    8.

Vacuum out any shavings and dust that could find it's way into your
woofer from the inside of the box. Line the box with a polyester fiberfill
blanket or fiberglass insulation about 1” thick.

    9.

Apply the included foam gasket to the speaker to ensure a sealed fit.
Be sure that the mounting holes line up on the gasket.

   10.

Connect the wires to the woofer observing the proper polarity,
positive and negative terminals. Strip away the insulation of
the wire about a 1/4" and install the wires into the terminal posts.

   11.

Install the woofer into the box using the provided 10-24 bolts.

   12.

Once the box is completed it is time to connect the speaker wire coming
from the subwoofer enclosure to your amplifier. Check that you use the
proper wire for consistent polarity, positive and negative.
(Refer to amplifier owner’s manual.)

   13.

Finally, sit back and enjoy to the incredible enhancement your new
PrecisionPower subwoofer brings to your audio system.

RETURN TO  CONTENTS

Summary of Contents for PC PRO10

Page 1: ...view Congratulations PC PRO8 Response Graphs Introduction PC PRO10 Specifications Sealed Enclosure PC PRO10 Response Graphs Sealed Enclosure PC PRO12 Specifications Ported Enclosure PC PRO12 Response...

Page 2: ...rts of your PrecisionPower gear are custom built to our specifications Our factory parts are not made available to anyone else nor are they for sale Our goal is to make sure that your PrecisionPower p...

Page 3: ...ion components together with the finest quality rubber roll surround The most unique feature is the use of a flat diaphragm instead of a conical structure The diaphragm is constructed from a combinati...

Page 4: ...upplied into the 7 32 holes from the backside of the face board 6 Run an appropriate length of wire into the box leaving enough length to comfortably install the wires to the terminals on the woofer b...

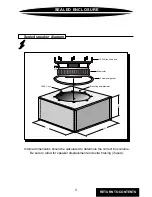
Page 5: ...am seal gasket Subwoofer 10 24 Allen head bolt 10 24 T nut Internal dimensions should be calculated to determine the correct box volume Be sure to allow for speaker displacement and extra bracing if u...

Page 6: ...e edge Also bevel the inside edge of both ends of the port to cut down on port noise 5 Place the woofer into the hole which you have cut into the box to check the fit Make sure that the T nut holes li...

Page 7: ...head bolt Port Internal dimensions should be calculated to determine the correct box volume Be sure to allow for speaker displacement extra bracing if used and port displacement It may be necessary to...

Page 8: ...aterial carbon fiber Nomex honeycomb Basket Material cast aluminum Net Weight 14 44lb Dimensions 8 375 dia X 4 125 H Mounting Diameter 7 25 dia Due to the very small box size and the very large port n...

Page 9: ...RO8 IMPEDANCE CURVE 7 100 0 30 0 10 0 3 0 1 0 30 50 70 100 200 300 500 700 20 10 1000 OHMS Frequency Hz PC PRO8 INPUT IMPEDANCE MAGNITUDE Sealed ACTUAL IN CAR RESPONSE CURVE WILL VARY BASED ON CAR TYP...

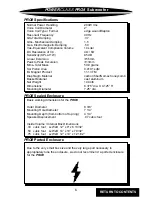
Page 10: ...acement 092 cubic foot Inside Volume 1 0 cubic foot Internal Box Dimensions LxWxD 20 1 4 x 12 1 2 x 7 3 4 Port Length 10 1 16 Port Diameter 3 ID Port Displacement 04 cubic foot Normal Power Handling 3...

Page 11: ...S PRO10 Subwoofer PRO10 Ported RESPONSE CURVE PRO10 Sealed RESPONSE CURVE PRO10 IMPEDANCE CURVE ACTUAL IN CAR RESPONSE CURVE WILL VARY BASED ON CAR TYPE WOOFER LOADING AND ENCLOSURE DESIGN 9 RETURN TO...

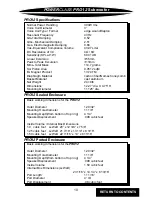
Page 12: ...ement 098 cubic feet Inside Volume 1 50 cubic feet Internal Box Dimensions LxWxD 23 1 16 x 14 1 4 x 8 13 16 Port Length 11 1 16 Port Diameter 4 ID Port Displacement 08 cubic foot Normal Power Handling...

Page 13: ...PRO12 Subwoofer PRO12 Ported RESPONSE CURVE PRO12 Sealed RESPONSE CURVE PRO12 IMPEDANCE CURVE 11 ACTUAL IN CAR RESPONSE CURVE WILL VARY BASED ON CAR TYPE WOOFER LOADING AND ENCLOSURE DESIGN RETURN TO...

Page 14: ...llent results in sealed enclosures from 33 cubic foot to over 75 cubic foot The PowerClass PRO10 subwoofer will give you excellent results in enclosures from 5 cubic foot to over 1 cubic foot ported o...

Page 15: ...fer to original packaging for the serial number of your component speakers 5 The provisions of this warranty shall not apply to any PrecisionPower product used for a purpose for which it is not design...

Reviews: