background image

Owner’s Manual: Workout Options

26

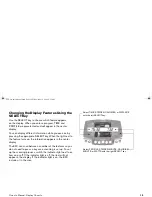
Pausing During a Workout or the 
Cool-Down Period

Stop pedaling to pause anytime during a workout or during a 
cool-down period. The pause mode is limited to ten minutes. 
If you do not resume pedaling during that time, the display 
returns to the banner.

Press the RESET key to view the workout summary. Press 
RESET again to return to the Precor banner.

Note: 

To resume exercising from pause mode, press SPEED 

. If password protection is enabled, you are prompted for 

the password.

Ending a Workout

CAUTION: Hold on to the stationary handrail when you 
near the end of a workout.

You can stop pedaling when you complete the automatic 
cool-down period, or end your workout by pressing the 
RESET key. 

The WORKOUT SUMMARY shows your cumulative 
workout statistics including warm-up and cool-down periods. 
Other information including strides per minute, calories per 
minute, and watts reset to zero. You can review your workout 
statistics for ten minutes before the display resets to the 
banner. 

To return to the banner before the ten minutes elapse, press 
RESET.

EFX_Owners Manual.book  Page 26  Friday, June 16, 2006  9:25 AM

Summary of Contents for 5.33

Page 1: ...ULCPQ LS J JJGNRGA J GRLCQQ PMQQRP GLCPQ...

Page 2: ......

Page 3: ...peration on or near the EFX Do not leave children unsupervised around the unit Never leave the EFX unattended when it is plugged in Unplug the EFX from the power source when it is not in use before cl...

Page 4: ...long hair back Use care when getting on or off the EFX Use the stationary handrail whenever possible Keep your body and head facing forward Never attempt to turn around on the EFX Do not rock the unit...

Page 5: ...could void the Precor Limited Warranty Improper connection of the equipment grounding conductor can result in a risk of electric shock Check with a qualified electrician or service person if you are i...

Page 6: ...r relocate the receiving antenna for your TV radio VCR etc Increase separation between the unit and the receiver TV radio etc Connect the EFX into a different power outlet on a dedicated circuit diffe...

Page 7: ...egarding Customer Support numbers or a list of Precor authorized Service Centers visit the Precor website at www precor com You will need the model and serial numbers whenever you contact Precor Custo...

Page 8: ...sRamp Display on the EFX5 23 16 Keypad 17 Changing the Display Features Using the SELECT Key 19 Workout Options 21 Choosing QUICKSTART 22 Selecting a User ID 23 Selecting a Program 24 Cooling Down Aft...

Page 9: ...ming Tips 42 Selecting a U S Standard or Metric Display 43 Informational Displays 44 Troubleshooting Error Codes 47 Troubleshooting Heart Rate 47 Maintenance 48 Inspection 48 Cleaning the Equipment 48...

Page 10: ...roller arm when the EFX is not in use The locking pin secures the roller arm to keep it from traveling up or down the ramp Before beginning your workout pull firmly on the pin to slide it out of the r...

Page 11: ...foot pedals and when you use the keypad Turning the Unit ON and OFF To turn the unit ON and OFF use the I O power switch located at the rear of the unit near the power cord receptacle Refer to Diagra...

Page 12: ...your physician before engaging in any vigorous exercise Do not use the heart rate features until authorized by your physician Know your heart rate pulse and your physician recommended heart rate targ...

Page 13: ...rate is in either weight loss or cardiovascular The 15 LEDs in the SmartRate display are color coded A pulsating red LED indicates you are outside the recommended heart rate target zone Yellow LEDs in...

Page 14: ...rt Rate display To use this program select HRC You must also wear the chest strap so the program can monitor your heart rate throughout the workout For more information refer to Heart Rate Control HRC...

Page 15: ...termine which display features appear Prematurely end a program Adjust the resistance or ramp incline LEDs Light and clarify what appears on the display CrossRamp display EFX5 23 Target specific muscl...

Page 16: ...to a distance that you might run or walk using the same amount of energy PROFILE appears on the display and corresponds to the program you selected As you continue your workout a blinking column indic...

Page 17: ...rograms with a workout time limit the TIME display shows the amount of time remaining For programs without a workout time limit the TIME display indicates the amount of time you have been exercising U...

Page 18: ...and Quadriceps indicator lights on when the ramp incline is set between 10 and 12 To target a specific muscle group adjust the ramp incline to the levels shown in the table below Table 2 Muscle groups...

Page 19: ...SET During pause mode press the RESET key to display a WORKOUT SUMMARY Press RESET again to return to the Precor banner No workout statistics are saved QUICKSTART Press QUICKSTART to bypass the setup...

Page 20: ...of incline and the CrossRamp setting Table 3 shows the degree of incline for each CrossRamp setting Table 3 Incline movement The incline setting affects the column height in the program profile as sho...

Page 21: ...the information appears in the center display The EFX can scan between a number of the features so you do not need to press a key once scanning is set up To set up the scanning process switch the ind...

Page 22: ...he next scan the LED lights and the associated information appears To turn off an indicator light and remove the item from the scanning process When the indicator light next to the item is lit press a...

Page 23: ...oosing QUICKSTART Option 2 Use the USER 1 or USER 2 key Select USER 1 or USER 2 to personalize your workout session Preferences are stored with your user ID and reapplied the next time you select the...

Page 24: ...CKSTART after your age is displayed Note To retrieve information about your workout session select USER 1 or USER 2 at the Precor banner and then press QUICKSTART Refer to Selecting a User ID 2 Use th...

Page 25: ...ur preferences for a program workout time weight age and other information specific to the chosen program Workout preferences are saved with your user ID and reapplied to your workout session the next...

Page 26: ...then press ENTER Table 4 Available programs Requires the chest strap Program EFX5 23 EFX5 33 Manual MANL MANL CrosstrainingTM XCTR XCTR Gluteal GLUT Hill Climb HILL Interval Course 1 INT1 INT1 Interv...

Page 27: ...aintain a consistent stride rate while exercising Find a comfortable stride rate between 100 and 150 strides per minute Cooling Down After a Workout Incorporate a cool down period into your workout to...

Page 28: ...bled you are prompted for the password Ending a Workout CAUTION Hold on to the stationary handrail when you near the end of a workout You can stop pedaling when you complete the automatic cool down pe...

Page 29: ...and feel that you have an intermediate or advanced fitness level you probably have established goals The Precor web site www precor com can give you many ideas about fitness workouts and advice from...

Page 30: ...erences MANL XCTR GLUT HILL INT n RAND WTLS FITN HRC CST CALS DIST Preset incline X X X Preset resistance X X X X Goal based X X Backward Forward intervals X Rest Work intervals X X Fixed time limit X...

Page 31: ...he amount of time remaining Maintain your stride rate between 100 and 150 strides per minute Dropping below 20 strides per minute places the EFX in pause mode A blinking column tracks the progress tha...

Page 32: ...Program the EFX5 23 ramp incline defaults to level 9 Crosstraining XCTR Program This program consists of alternating forward and backward pedaling movements in 1 minute segments to focus on working th...

Page 33: ...profile columns change accordingly You can adjust the resistance by pressing the RESISTANCE arrow keys Unlike the ramp incline settings the resistance changes made while using the program are not sav...

Page 34: ...ramp incline for the first rest and work intervals The settings are repeated throughout the program To change the settings press the appropriate arrow key and continue The changes are applied to the...

Page 35: ...ne or resistance Weight Loss WTLS Program With the Weight Loss Program the workout time is fixed at 28 minutes and consists of seven 4 minute intervals You are not prompted for a workout time Use the...

Page 36: ...ormation about the SmartRate display refer to Using SmartRate Fitness Test FITN The Fitness Test Program provides a 5 minute test You cannot adjust the resistance or ramp incline levels When you compl...

Page 37: ...he arrow keys is ignored Warm up Period When you access the fitness test the following occurs A gender prompt appears Use the arrow keys to toggle between gender selection and then press ENTER The EFX...

Page 38: ...ollowing occurs You stop pedaling Your heart rate increases and remains for one minute above 85 of the maximum allowable heart rate 220 minus your age You press RESET You complete the test Important T...

Page 39: ...or below 32 or below 32 34 35 37 38 41 42 or above 30 39 30 or below 30 32 33 35 36 39 40 or above 40 49 28 or below 28 30 31 32 33 36 37 or above 50 59 25 or below 25 27 28 29 30 32 33 or above 60 an...

Page 40: ...refer to Heart Rate Features Important Consult your physician to determine the appropriate target heart rate for your age and fitness level If your physician recommends a different target heart rate t...

Page 41: ...ility to maintain your target heart rate in the preferred zone It takes time for the EFX to readjust the resistance so that your heart rate remains on target When you complete the program remember to...

Page 42: ...ing steps to clear delete any resistance or incline settings stored in a custom program 1 At the Precor banner press USER 1 or USER 2 and then press ENTER 2 Use any arrow key to specify the custom pro...

Page 43: ...press ENTER to begin Distance DIST Program This program lets you designate a fixed distance When you reach your goal the program ends and the automatic 5 minute cool down period begins After selecting...

Page 44: ...numbers Check the error log Display the serial number Advanced Programming Tips Always start at the Precor banner The advanced programming and diagnostic mode is accessed by pressing the RESET key at...

Page 45: ...5 33 Use the RESISTANCE key on the left side of the keypad As shown in Diagram 10 numbers are associated with the keypad The numbers 5 6 7 1 appear on the display as you press the associated key Diagr...

Page 46: ...resents the unit s total strides 3 When you are ready press ENTER to move to the next display hour meter Viewing the Hour Meter HOUR METER appears on the display followed by the number of hours that t...

Page 47: ...y in the error log if there are any errors Up to ten error codes can be retrieved Diagram 11 Error log If there are no errors in the log you will see three dash lines appear in the display The followi...

Page 48: ...splay indicating that the error messages have been deleted 11 When you are ready press ENTER to move to the next display serial number Displaying the Serial Number SERIAL NUMBER appears The serial num...

Page 49: ...ration of salts in a person s perspiration provides enough conductivity to transmit a signal to the receiver in the display console However because of body chemistry or erratic heartbeats some people...

Page 50: ...e Cleaning the Equipment Most of the working mechanisms are protected inside the casing However for efficient operation the EFX relies on low friction To keep the friction low the EFX rollers rails an...

Page 51: ...strap use a sponge or soft cloth dampened in mild soap and water Dry the surface thoroughly with a clean towel Servicing the EFX Do not attempt to service the EFXyourself except for the maintenance ta...

Page 52: ...able for inspection by Precor or its service representative Precor s obligations under this warranty are limited and set forth below Warranty Periods and Coverage All residential products and commerci...

Page 53: ...that has been altered or defaced 4 Service calls to correct installation of the equipment or instruct owners on how to use the equipment 5 Pickup delivery or freight charges involved with repairs 6 A...

Page 54: ...TY TORT INCLUDING ACTIVE PASSIVE OR IMPUTED NEGLIGENCE AND STRICT LIABILITY OR OTHERWISE FOR DAMAGE TO THE EQUIPMENT PROPERTY DAMAGE LOSS OF USE REVENUE OR PROFIT COST OF CAPITAL COST OF SUBSTITUTE EQ...

Page 55: ...your warranty registration YOU MAY ALSO REGISTER ONLINE AT www precor com warranty If you have questions or need additional information contact your local dealer or call Precor Customer Support at 800...

Page 56: ...nt brand Friend relative Addition to equipment currently owned Physician Fitness club What factors MOST influenced your decision to Internet purchase your Precor product choose up to three News report...

Page 57: ...stance levels 1 20 1 20 Frame Powder coated steel Powder coated steel Regulatory Approvals FCC ETL CE FCC ETL CE EFX5 23 EFX5 33 CSAFE Compatible Heart Rate Telemetry QuickStartTM SmartRate Touch Sens...

Page 58: ...ecor is widely recognized for its innovative award winning designs of exercise equipment Precor aggressively seeks U S and foreign patents for both the mechanical construction and the visual aspects o...

Page 59: ...her side of this card Depending on your level of fitness consider maintaining a pedaling speed between 100 and 150 strides per minute Do not drop below 20 strides per minute during a workout or you en...

Page 60: ...and is centered in the middle of your chest Diagram C When these steps are complete you are ready to view your heart rate SmartRate and Heart Rate Features The SmartRate and heart rate displays provid...

Page 61: ...EFX 5 33 Assembly Guide Eliptical Fitness CrosstrainerTM...

Page 62: ...and assemble the EFX Required Tools Wire tie cutter Phillips head screwdriver Two inch wrenches crescent and combination SAE Standard socket set with socket extension Installation Requirements Follow...

Page 63: ...tity A Phillips head screw inch 4 B Hex head bolt 2 inch x inch 2 C Washer inch x 1 00 OD 6 D Hex head screw 1 inch x inch 18 E Washer inch x 812 OD 18 F Hex head screw 1 inch x inch 6 G Washer inch 6...

Page 64: ...tube Plug the cable connector into its receptacle Important Important If the plastic grommet pops out of the base replace it immediately The grommet covers the metal edges so the cables are not cut o...

Page 65: ...on of both stabilizers to the base frame using eight hex head screws D and eight washers E Wrench tighten Return to the upright support bracket Wrench tighten the eight screws that secure the stabiliz...

Page 66: ...shers G Wrench tighten using a inch socket wrench For ease of installation slide the foot pedal to the top of the ramp and attach the handlebars to the pivot arms Use two hex head bolts B six washers...

Page 67: ...acket cover with the mounting holes Reinstall the screws and tighten securely Push the cables behind the height adjuster threads Make sure that the cable connections are intact Press the end cap into...

Page 68: ...side or front to back Ask a capable person for help to make adjustments Important If the unit is placed on a slightly uneven surface adjusting the rear pads can help but will not compensate for extrem...

Reviews: