905E, 9.1, 9.10 Treadmills
Page 40
Procedure 6.7 - Replacing the Lift Potentiometer
Removing the Lift Potentiometer
1.
Place the magnetic safety key in the OFF position, then unplug the treadmill from the wall
outlet.
WARNING
Before continuing with this procedure, review the Warning and Caution statements listed in
Section One of the Residential Treadmill Service Manual
.
2.
Remove the electronic console and crank handle as described in Procedure 6.1 of this
appendix.
3.
Cut the cable tie that binds the potentiometer wires to the potentiometer bracket.
4.
Using the tape, uniquely mark the three wires soldered to the potentiometer (i). Make a note
of which wire goes to each of the terminals.
5.
Cut the three wires from the potentiometer terminals.
6.
Slide the pin wheel from the potentiometer shaft. If necessary, deflect the potentiometer
bracket to allow the pin wheel to clear the end of the potentiometer shaft. Set aside the pin
wheel.
7.
Remove the jam nut and star washer securing the potentiometer to the potentiometer
bracket (see Diagram 6.8). Discard the potentiometer.
Replacing the Lift Potentiometer
8.
Position the new potentiometer at its mounting location.
9.
Thread the star washer and jam nut onto the potentiometer shaft. Tighten the washer and
the nut with your fingers.
10. Slide the pin wheel onto the potentiometer shaft.
11. Strip 1/4” of insulation from each of the three wires cut from the old potentiometer.
Caution
Using the marking code you established above, make sure each wire is connected to the correct
terminal when you perform the following step.
12. Place a 1/2” piece of heat shrinkable tubing onto each wire before wrapping the bare end of
each wire around the terminals on the new potentiometer.
Summary of Contents for 9.10
Page 5: ...905E 9 1 9 10 Treadmills Page 5 9 1 Electronic Console 9 10 Electronic Console...
Page 15: ...905E 9 1 9 10 Treadmills Page 15 Diagram 4 2 Upper Lift Column Assembly...
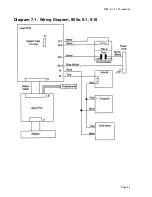
Page 44: ...905E 9 1 9 10 Treadmills Page 44 Diagram 7 1 Wiring Diagram 905e 9 1 9 10...
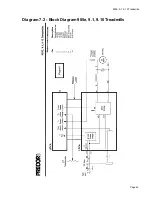
Page 45: ...905E 9 1 9 10 Treadmills Page 45 Diagram 7 2 Block Diagram 905e 9 1 9 10 Treadmills...

