9.45, 9.45i Treadmill
Page 23
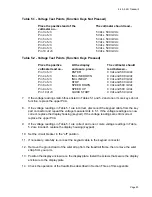
Table 5.1 - Voltage Test Points (Function Keys Not Pressed)
Place the positive lead of the
The voltmeter should read...
voltmeter on...
Pin 3 of J3
5 Vdc ± 500 mVdc
Pin 4 of J3
5 Vdc ± 500 mVdc
Pin 5 of J3
5 Vdc ± 500 mVdc
Pin 7 of J3
5 Vdc ± 500 mVdc
Pin 8 of J3
5 Vdc ± 500 mVdc
Pin 9 of J3
5 Vdc ± 500 mVdc
Pin 10 of J3
5 Vdc ± 500 mVdc
Table 5.2 - Voltage Test Points (Function Keys Pressed)
Place the positive
At the display
The voltmeter should
voltmeter lead on...
enclosure, press...
read between...
Pin 3 of J3
ENTER
0 Vdc and 500 mVdc
Pin 4 of J3
INCLINE DOWN
0 Vdc and 500 mVdc
Pin 5 of J3
INCLINE UP
0 Vdc and 500 mVdc
Pin 7 of J3
STOP
0 Vdc and 500 mVdc
Pin 8 of J3
SPEED DOWN
0 Vdc and 500 mVdc
Pin 9 of J3
SPEED UP
0 Vdc and 500 mVdc
Pin 10 of J3
QUICK START
0 Vdc and 500 mVdc
7.
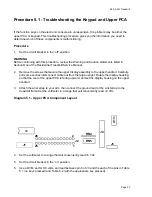
If the voltage readings match those listed in Tables 5.1 and 5.2 and one or more keys do not
function, replace the upper PCA.
8.
If the voltage readings in Table 5.1 are incorrect, disconnect the keypad cable from the key
pad connector and repeat the voltage measuremnts in 5.1. If the voltage readings are now
correct, replace the display housing (keypad). If the voltage readings are still incorrect,
replace the upper PCA.
9.
If the voltage readings in Table 5.1 are correct and one or more voltage readings in Table
5.2 are incorrect, replace the display housing (keypad).
10. Set the circuit breaker in the “off” position.
11. If necessary, carefully re-connect the keypad cable to the keypad connector.
12. Remove the ground lead of the wrist strap from the treadmill frame, then remove the wrist
strap from your arm.
13. Position the display enclosure on the display plate. Install the screws that secure the display
enclosure to the display plate.
14. Check the operation of the treadmill as described in Section Three of this appendix.
Summary of Contents for 9.45
Page 55: ...9 45 9 45i Treadmill Page 55 Wiring Diagram 7 1 9 45 1L Unit...
Page 56: ...9 45 9 45i Treadmill Page 56 Block Diagram 7 2 9 45 1L Units...
Page 57: ...9 45 9 45i Treadmill Page 57 Wiring Diagram 7 3 9 45 2P 3Y Units...
Page 58: ...9 45 9 45i Treadmill Page 58 Block Diagram 7 4 9 45 2P 3Y Units...

