page 12
C
O
M
M
E
R
C
I
A
L
P
R
O
D
U
C
T
S
D
I
V
I
S
I
O
N
CAUTION: To avoid injury and ensure your safety, get assistance before
lifting the treadmill off the pallet and rolling it onto the floor. Do not
drop the unit.
2.
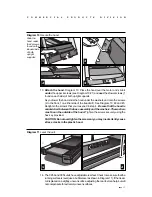
Remove the treadmill from its shipping pallet. Eight fasteners secure the
treadmill to its pallet. Use a socket and crescent wrench to loosen and remove
the 4 lag bolts that hold the treadmill to the pallet and the 4 screws (2 on each
side) that thread through the bracket and into the unit. Discard the fasteners. Once
the fasteners have been removed, obtain several assistants to lift the treadmill off
the shipping pallet.
3.
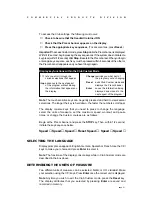
Make sure that the power is OFF. Check the ON/OFF power switch on
the front of the base assembly. Place the switch in the O (OFF) position.
Make sure that the treadmill is not plugged into a power source.
4.
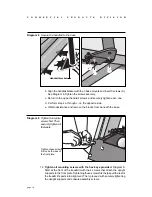
Loosen the screws that attach the hood to the base. With the supplied hex
key, loosen the 2 screws on the front panel and the 2 screws on the side (1 on
each side). To detach the hood from the base, stand at the side of the treadmill.
Lift the hood up slightly and slide it toward the rear of the unit. Refer to Diagram
10.
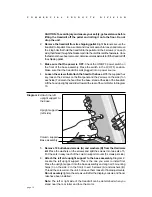
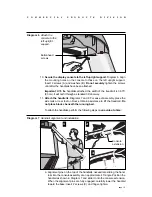
Diagram 2
Attach the left
upright support to
the base.
5.
Remove 10 buttonhead screws (A) and washers (B) from the Hardware
kit. Place the washers on the screws and split the screws into two sets of 5.
Put the sets in easy reach of the column support mounts (5 screws per side).
6.
Attach the
left side upright support to the base assembly. Diagram 2.
Locate the
left upright support. This is the one you want to install first.
Place the upright support into the base assembly and align all 5 mounting
holes (3 on the side, 2 in the front). Insert 5 screws (A) and washers (B).
Thread the screws into the unit, but leave them loose for final adjustments.
Do not securely tighten the screws until after the display console and hand-
rails have been installed.
Note: The left or right side of the treadmill can be determined when you
stand near the rear roller and face the motor.
Base assembly
Upright support
(left side)
Column support


