background image

Assembly Instructions, POWER RAIL

TM

 ‒ Two-Tier Tilt Kit 

9

10

Install the Modules (con’t.)

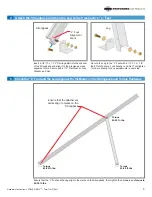
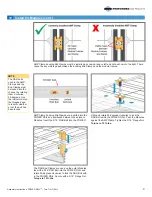
AMP Clamp bonding Mid Clamps must be installed as shown at above left and not as shown to the right. There 

cannot be any visible gaps between the bonding Mid Clamps and the module frames.

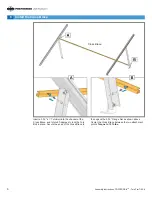
The RAD End Clamps are used on the outer Modules. 

Insert the 5/16” RAD Bolt into the POWER RAIL and 

rotate 90-degrees clockwise to lock the RAD Bolt with-

in the POWER RAIL. Secure with a 5/16” Flange Nut. 

Torque to 15 ft.-lbs.

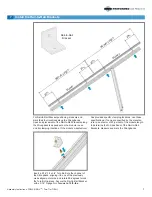
AMP Clamp bonding Mid Clamps are inserted into the 

POWER RAIL and positioned between the adjacent 

Modules. Insert the 5/16” RAD Bolt into the POWER 

RAIL and rotate 90-degrees clockwise to lock the 

RAD Bolt within the POWER RAIL. Push the Modules 

against the AMP Clamp. Tighten the 5/16” Flange Nut. 

Torque to 15 ft.-lbs.

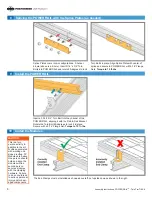
NOTE

The RAD bolts 

used in the AMP-

Clamps and the 

End Clamps must 

be locked into the 

channel by rotating 

them clockwise 

90-degrees. Use 

the indicator slot on 

the threaded end 

to identify whether 

or not the bolt has 

been locked.

Summary of Contents for POWER RAIL 60 Cell

Page 1: ...Assembly Instructions step by step assembly and installation Assembly Instructions SP3504 POWER RAILTM TWO TIER TILT KIT...

Page 2: ...is product is intended for use by trained technicians only This product should not be used by anyone who is not familiar with and not trained to use it When working in the area of energized lines extr...

Page 3: ...ssist in the assembly process and or to draw attention to the fact that certain assembly steps may be dangerous and could cause serious physical injury and or damage to components Follow the procedure...

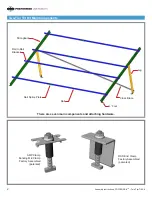
Page 4: ...Tier Tilt Kit Main Components There are seven main components and attaching hardware Strongback Rail to Rail Bracket Rail Rail Splice Plate Leg Cross Brace L Foot AMP Clamp Bonding Mid Clamp Factory A...

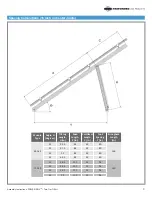
Page 5: ...Joists Module Type Angle degrees Tilt Leg Length H in Span Length X in Cantilever Length C in Foot Spacing Y in Strongback Length in 60 Cell 15 23 3 84 42 80 126 25 37 2 84 42 80 35 51 84 42 80 45 64...

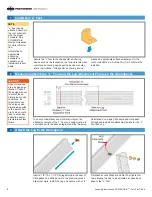
Page 6: ...13 x 1 1 2 Carriage Bolt into channel of Strongback and slide it down to the previously made alignment mark Install the Leg and secure with a 1 2 Flat Washer Lock Washer and Nut Tool tighten for now...

Page 7: ...que 45 50 ft lbs Ensure that the attachment points align to marks on the Strongback Insert a 1 2 13 x 1 1 2 Carriage Bolt into the channel of the Strongback and align it to the previously made alignme...

Page 8: ...t a 5 16 x 1 Turn Bolt into the channel of the Cross Brace and rotate 90 degrees to lock the Turn Bolt in place Secure the ends of the Cross Brace to the Legs with a 5 16 Flange Nut as shown above Cen...

Page 9: ...ific clamping locations use those specifications if none are specified by the manufac turer use a factor of 20 percent of the module length to determine the N S positions of the Rail to Rail Brackets...

Page 10: ...annel of the POWER RAIL aligning it with the Rail to Rail Bracket Rotate the Turn Bolt 90 degrees to lock it in place Secure with a 5 16 Flange Nut Torque to 15 ft lbs 9 Install the POWER RAIL CAUTION...

Page 11: ...lt with in the POWER RAIL Secure with a 5 16 Flange Nut Torque to 15 ft lbs AMP Clamp bonding Mid Clamps are inserted into the POWER RAIL and positioned between the adjacent Modules Insert the 5 16 RA...

Page 12: ...Corporate Headquarters 660 Beta Drive Mayfield Village OH 44143 Telephone 800 260 3792 Fax 440 442 8816 preformed com Email info plpsolar com 2019 Preformed Line Products SP3504...

Reviews: