3
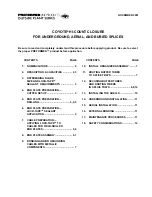
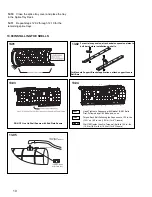
FIGURE 3 - END PLATE CAPACITY
(VIEW FROM INSIDE END PLATE)
NOTE:
An additional 3.0" (76.2 mm) of space is
available on each seam of the COYOTE
Hi-Count Closure. However provisions for
securing the L-Brackets are only provided for
six entries as shown in Figure 3.
3.00
DETERMINING BLADE SIZE AND
LOCK-TAPE SEALANT REQUIRE-
MENTS
3.01
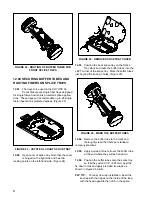
The CABLE Mea-SURE Tape is used to de-
termine the correct Power End Plate Cutter
blade size and the required layers of LOCK-TAPE
Sealant.
3.02
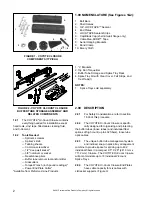
To use CABLE MeaSURE Tape:
— Wrap it around the cable tightly. (Figure 4)
— The index line will point to a letter and
number.
— The letter indicates the correct blade size.
— The number indicates the correct number
of layers of half-lapped LOCK-TAPE
Sealant. (Figure 4)
FIGURE 4 - WRAP CABLE MEA-SURE TAPE
AROUND CABLE
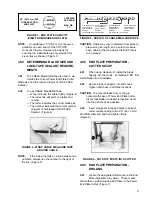
NOTE:
If the index line falls on a line between two
numbers, always use the number to the right of
the line. (Figure 5)
FIGURE 5 - SKETCH OF CABLE MEA-SURE TAPE
CAUTION: Cable may vary in diameter from place to
place along its length, so be sure to measure
each cable at the area where the End Plate is
to be placed.
4.00
END PLATE PREPARATION -
CUTTER SET-UP
4.01
When using blades A-D, install the blade
directly into the chuck. For blades E-DD, first
install blade into drill adapter.
4.02
Secure blade or adaptor into drill chuck.
Tighten drill chuck in all three locations.
CAUTION: To prevent blades from coming in
contact with base of Power End Plate Cutter,
insure that blade or adapter is inserted as far
into the drill chuck as possible.
4.03
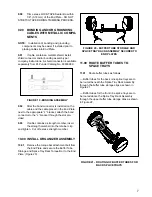
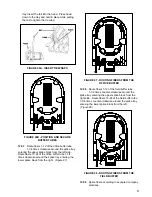
Insert stop-posts in tapped holes in base of
cutter corresponding to the 9.5" (241.3 mm)
End Plate diameter and hand tighten firmly.
(Figure 6)
FIGURE 6 - PUT STOP POSTS INTO CUTTER
5.00
END PLATE PREPARATION -
DRILLING
5.01
Locate the designated drill marks on the End
Plate (highlighted in yellow). These marks
should face up when placing End Plate in the Power
End Plate Cutter. (Figure 7)
9.5" (241.3 mm) DLX
THREE-SECTION
END PLATE
3 ENTRIES
PER SEAM
MAX. DIA.
1.1"
Use D blade and
one half-lap of
LOCK-TAPE
TM
Sealant.
Use D blade and
one half-lap of
LOCK-TAPE
TM
Sealant.
Use M blade and
two half-laps of
LOCK-TAPE
TM
Sealant.
Use O blade and
two half-laps of
LOCK-TAPE
TM
Sealant.
The shaded area = two half laps.
The clear area = one half lap.

