6
— For cables with metallic components, the cable
must be marked in two places. Measuring from the
opened cable end, make one mark at 1.5" (38.10
mm) and the second at 5.5" (139.7 mm).
— For cables without metallic components, only one
mark is required. Again measuring from the opened
cable end, make one mark at 4" (101.6 mm).
Now that the cable is marked, take the emery cloth
provided and scuff the cable between the marks for
cables with metallic components and from the open
end of the cable to the mark for dielectric cables.
Always scuff around the cable, never scuff length-
wise.
7.04
Coat the scuffed area of the cable with C-
Cement and allow to dry to tacky base.
7.05
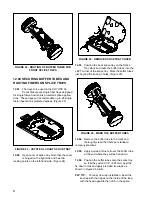
Apply required number of half lapped layers
of 3/4" (19.05 mm) LOCK-TAPE Sealant
around the cable in the area coated with C-Cement.
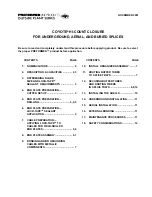
Stretch tape while applying. (Figure 15)
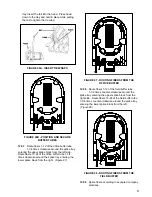
PLP TIP:
Stretch tape enough to reduce its width
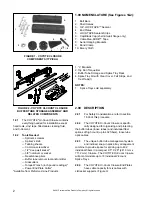
to 1/2" (12.7 mm). Figure 16 shows the com-
pleted application of one half-lapped layer of
LOCK-TAPE Sealant.
FIGURE 15 - APPLYING LOCK-TAPE SEALANT
FIGURE 16 - COMPLETED LOCK-TAPE SEALANT
APPLICATION
8.00
END PLATE ASSEMBLY
8.01
Using the hex bolts provided, fasten the “L”
bracket and retaining clip to the End Plate.
8.02
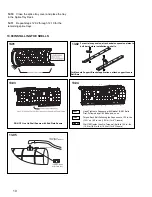
Before installing prepared cables into End
Plate halves, apply 1/4" (6.35 mm) wide bead
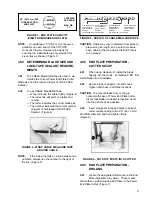
of C-Cement adjacent to the drilled hole. (Figure 17)
FIGURE 17 - BRUSH C-CEMENT OVER LOCK-
TAPE SEALANT
NOTE: If cables being placed in End Plate require
bonding and/or grounding, review Section 9.00
before installing End Plate.
8.03
Position prepared cables into lower End
Plate section, allowing 1/2" (12.7 mm) of the
LOCK-TAPE Sealant to extend beyond the inside of
the End Plate. THIS IS A CRITICAL MEASURE-
MENT.
8.04
For cables containing non-metallic strength
members, insert strength members into
retainer clip and tighten. Cut off excess strength
member.
8.05
Where applications dictate, position prepared
cables into upper End Plate seam per step
8.03 and insert End Plate bolts.
8.06
Using a socket and ratchet, tighten each bolt
evenly in rotation 2 to 3 turns at a time.
CAUTION: Do not use power tools for this operation.
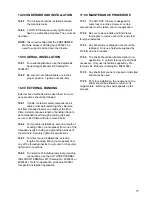
8.07
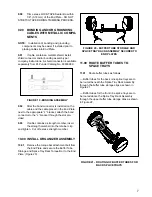
While tightening, the excess LOCK-TAPE
Sealant extending from the End Plate section
will fold back. When the LOCK-TAPE Sealant stops
moving (folds back), the bolts are sufficiently tight.
(Figure 18)
FIGURE 18 - TAPE FOLDING BACK
CAUTION: DO NOT OVER TIGHTEN!

