background image


P-5 

 
Operating Instructions: 

1.


Connect with Sound Source

: To play music, connected this equipment with sound source first, 

via a RCA audio cable, insert the terminal of the audio cable into AUX jacks, the other terminal 
connected with sound source device.  While playing by U-disk or SD card, just insert U-disk into 
the USB slot or SD card into the SD slot.  Press key SLECET INPUT, it will switch between AUX 
and USB. 

2.


PLAY

: While playing with AC100~240V, press the key POWER switch to AC position, and please 

be sure power is connected properly; While playing with DC12V built-in, press the key POWER 
switch  to  DC  position,  and  make  sure  AC  power  is  disconnected  at  this  moment.  To  turn  the 
volume knobs according to one’s own favorite sound.  

3.


KARAOKE  CONCERT

:  To  connect  Microphone  first,  to  turn  the  Microphone  and  ECHO  to  the 

best sound performance, then, start your concert.  The best distance for receiving signal between 
the device and the wireless microphone is within 10 meters. 

4.


CHARGE

:  To connected the power cable, insert the power plug into AC outlet, then press key 

POWER to OFF position. 
 

GUIDELINES FOR BUILT-IN BATTERY 

1.


To use this device for the first time, please charge for the device 2 hours before using it to play 
music. 

2.


While short of voltage under DC playing mode, UNDERVOLTAGE light will be on, at this moment, 
please  charge  for  the  device  immediately.  In  the  process  of  charging,  CHARGE  light  will  keep 
flashing,  while  it  not  flash  any  more  and  keep  light  on,  charging  finished  and  stop  charging 
please. 

3.


While short of power or without power with the built-in battery found, please charge for the device 
within 24 hours, cause it will incur the capacity of electric power storage down for a long time no 
charging. 

4.


If not a well-trained person, it is forbidden to dismount the device, in case of electric-shock. Do 
not connect the battery built-in with any other device. 

5.


To change the battery built-in, please make sure the new one’s specification is same as the old 
one. 
Otherwise, the device may refuse to work or even lead to damaged. 


GUIDELINES FOR WIRELESS MICROPHONE 

1.


Before using the wireless microphone, please be sure AA battery installed. While short of power, 
it will lead to shorter receiving distance, noise, distortion, even without voice, under this condition, 
please change battery for it. 

2.


To  strengthen  the  receiving  signal,  please  keep  the  microphone  cable  straight  to  the  greatest 
extent while the wireless microphone works. 
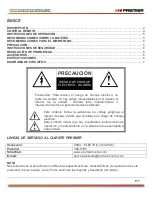
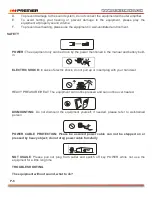
 

CAUTION 

A

  The equipment only works with AC100V~240V power supply or DC12V battery built-in, do not 

use any other power supply to drive the device. 

B

  Do  not  expose  this  equipment  to  rain,  moisture,  strong  sunlight  or  high  temperature 

environment. 

C

  To  prevent  damage,  do  not  place  the  equipment  on  objects,  like  vases,  objects  containing 

liquid, and so on. 

Summary of Contents for BB-5123USBTB

Page 1: ...STIMADO CLIENTE Con el fin de que obtenga el mayor desempeño de su producto por favor lea este manual de instrucciones cuidadosamente antes de comenzar a utilizarlo y guárdelo para su futura referencia Si necesita soporte adicional no dude en escribir a info premiermundo com ...

Page 2: ... mantenimiento o intervención técnica a personal técnico calificado Este símbolo indica la existencia de voltaje peligroso al interior de esta unidad que constituye un riesgo de choque eléctrico Este símbolo indica que hay importantes instrucciones de operación y mantenimiento en la literatura que acompaña a esta unidad LÍNEAS DE SERVICIO AL CLIENTE PREMIER Venezuela 0800 ELECTRIC 353 2874 Panamá ...

Page 3: ...OLTAJE Indica el estado de la batería 5 INDICADOR DE FALTA Este bombillo LED indica al estar apagado que la batería debe ser recargada 6 INDICADOR DE CARGA Este bombillo LED se enciende cuando la carga está completa y permanece apagado mientras se está cargando 7 INDICADOR DE ENCENDIDO APAGADO Se enciende cuando la unidad está encendida y se apaga cuando la unidad está apagada 8 ANTENA Antena del ...

Page 4: ...unción Repetir Uno o Repetir Todo 14 ANTERIOR En el modo USB SD presione este botón para ir a la pista anterior En el modo de radio FM presione este botón para ir a la estación radial anterior 15 PLAY PAUSE En el modo USB SD presione este botón para iniciar y pausar la reproducción En el modo de radio FM presione este botón para cambiar al proceso automático de búsqueda de estaciones radiales 16 S...

Page 5: ...men 5 REPETICIÓN Utilice este botón para activar esta función Repetir Uno o Repetir Todo 6 BOTONES NUMÉRICOS Presione los botones para ir directamente a las pistas o estaciones radiales 7 ECUALIZADOR Presione este botón para ajustar el efecto del sonido 8 VOLUMEN Presione este botón para disminuir el volumen 9 ESCANEO En el modo de radio FM presione este botón para que la unidad haga una búsqueda ...

Page 6: ...ndicador de Carga permanecerá parpadeando de manera lenta y terminará de parpadear al terminar la carga Si la batería tiene muy poco o ninguna energía se recomienda hacer una carga de 24 horas No conecte la batería a ningún otro dispositivo Al cambiar la batería asegúrese de que la nueva sea exactamente igual RECOMENDACIONES PARA EL MICRÓFONO Antes de utilizar el micrófono inalámbrico asegúrese de...

Page 7: ...léctrica y que el volumen no esté en la posición mínima El sistema karaoke emite sonidos fuertes Sintonice el micrófono adecuadamente Aleje el micrófono para evitar el feedback pitido RUIDO DEL EQUIPO La unidad cuenta con la característica de bajo ruido Sin embargo el ruido a veces puede venir de la fuente del sonido Al verificar desconecte el cable de entrada de audio primero y luego escuche si a...

Page 8: ... DIAGRAMA DE CIRCUITOS Las personas y o Marcas registradas en este manual de instrucciones no están afiliadas a Premier Electric Japan Corp y aparecen en este Manual con propósitos ilustrativos únicamente ...

Page 9: ...AKER 6 5 BB 5123USBTB DEAR CUSTOMER In order to achieve the best performance of your product please read this instruction manual carefully before using and keep it for future reference If you need extra support please write to info premiermundo com ...

Page 10: ...the unit which states a risk of electric shock This sign means that there are important instructions of operation and handling in the manual that comes with this device CUSTOMER SERVICE Venezuela 0800 ELECTRIC 353 2874 Panama 300 5185 Website www premiermundo com E mail servicioalcliente premiermundo com NOTE This unit may be submitted to changes in specifications characteristics and or operation ...

Page 11: ...giving out light indicating the battery is short of power severely 6 CHARGE The CHARGE LED will not light while charging having not fully finished While charging fully accomplished the CHARGE LED will keep light 7 POWER Power on off indicator The light on while Powered on the light off while powered off ANTENNA FM Radio ANTENNA 9 POWER POWER ON OFF key A The device will work with battery power whi...

Page 12: ... the key to pause play back or to play On FM radio palying mode press the key to switch to channel automatic searching process 16 NEXT On USB SD play mode Press the key to select next song On FM radio palying mode press the key to select the channel 17 MIC INPUT Signal input jacks for microphone 18 AUX INPUT Sound signal input jack for DVD or AUX 19 BLUE CONNECT Blue connect working indicator whil...

Page 13: ...manual channel adjusting 4 VOL Press the key to adjust the volume up 5 REPEAT BUTTON Press the key to single repeat or repeat all 6 NUMBER KEY Press the corresponding number key you want to play 7 EQ Press the key to adjust sound effect 8 VOL Press the key to adjust the volume down 9 SCAN KEYY On FM radio mode press the key to channel AUTO SEARCH and SAVING status 10 MUTE BUTTON 11 NEXT function k...

Page 14: ...ll be on at this moment please charge for the device immediately In the process of charging CHARGE light will keep flashing while it not flash any more and keep light on charging finished and stop charging please 3 While short of power or without power with the built in battery found please charge for the device within 24 hours cause it will incur the capacity of electric power storage down for a ...

Page 15: ... built in ELECTRIC SHOCK In case of electric shock do not pull up or insert plug with your hand wet HEAVY PREASURE HEAT The equipment can not be pressed and can not be over heated DISMOUNTING Do not dismount the equipment yourself if needed please refer to well trained person POWER CABLE PROTECTION Please be assured power cable can not be stepped on or pressed by heavy object do not drag power cab...

Page 16: ...noise however occasionally with noise may it come from sound source While checking please pull up audio input cable first then to listen if there s still noise or not at the distance about 80 centimeters away from the equipment ANTIMAGNETIC As the speaker unit adopted with strong magnetism please don t place the equipment to close to such as CRT Monitor TV and so on in case of disturbance of magne...

Page 17: ...P 8 ...

Reviews: