background image

3

11

10

12

8

13

14 15 16 17 18 19

20

21

1.POWER & 
2.VOLUM button
3.MODE button
4.Memory card slot
5.Speaker
6.Telescopic antenna
7.Handle
8.Function indicator
9.Band indicator
10.Dial scale
11.TUNING regulator
12.BASS ON/OFF button
13.USB port

Function switch

6

7

5

14.EQ button
15.REPEAT button
16.PREV /       


button

17.NEXT/        


button

18.PLAY/PAUSE button
19.STOP button
20.
21.LCD 

IR sensor

Display

22.Power cord socket
23.Battery options
24.Phone socket
25.AUX/MP3-IN

Not indicated: battery compartment (bottom)

9

1

3

2

4

5

Control elements

22

23

24 25

1

2

3

4

5

6

7

8

9

0

10+

EQ

MODE

PREV

NEXT

PLAY/PAUSE

VOL+

VOL-

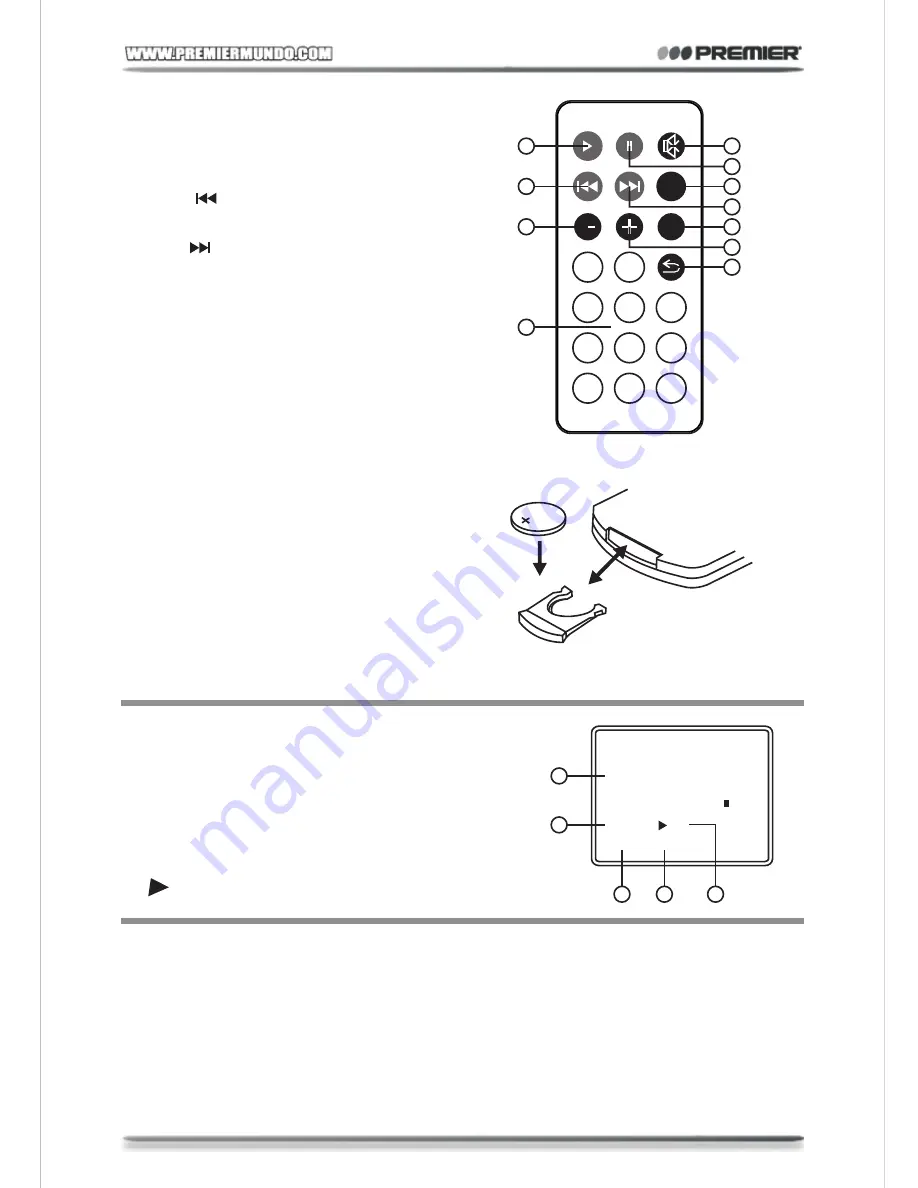
Remote controller (RC) 

1

4

7

11

2
3

6

9

5

8

10

1.

button

2.
3.
4.PREV/       button
5.
6.NEXT

PLAY 
AUDIO MUTE button
PAUSE button

MODE button

/       button

7.VOLUME LEVEL- button
8.EQ button
9.VOLUME LEVEL+ button
10.REPEAT button
11. NUMERIC KEYS

Changing the battery

      When the battery becomes weak, the 
operating distance of the Remote Control is 
greatly reduced and you will need to replace 
the Lithium battery.  
1. Remove the battery compartment from 

bottom of the Remote Control. 

2. Install 1 “CR2025” Lithium battery with the 

positive side facing up.

3. Replace the battery compartment. 
Note: O

nly playback of MP3 is available.

4

RADIO


operation

1. By factory default, RADIO starts once power is on, 
2. Push AM/FM/SW1/SW2 to switch between AM/FM/SW1/SW2 band.
3. Extend the length of the telescopic and to enhance FM reception, turn the unit 

horizontally to enhance AM reception.

4. Rotate TUNING to tune to a desired frequency.

:

88 88

  REP         
USB   CARD 

1

2

3

4

5

LCD Display

1. 

(Title, Chapter, playing time or other information) 

2. REP1: Repeat one track/ chapter indicator.

REP All: Repeat full disc/ title indicator.

3. USB play indicators.
4. SD/MMC/MICRO SD Card play indicators.
5.

: MP3 play indicators.

Message or number indicators.

Summary of Contents for SX-4457USD

Page 1: ...MICRO SD CARD READER In order to achieve the best performance of your product please read this instruction manual carefully before using and keep it for future reference If you need extra support please write to info premiermundo com ...

Page 2: ...e at the inside of the unit which states a risk of electric shock This sign means that there are important instructions of operation and handling in the manual that comes with this device 0800 ELECTRIC 353 2874 01 900 331 PEJC 7352 300 5185 www premiermundo com servicioalcliente premiermundo com PREMIER CUSTOMER SERVICE NOTE This unit may be submitted to changes in specifications characteristics a...

Page 3: ...pliance check that voltage indicated on the rating label corresponds to the mains voltage in your home 2 Plug the corresponding end of cord into the power socket on the rear of the set 3 Insert the plug into power supply Battery operation Insert 4 pcs of C type UM2 batteries Please observe correct battery polarities or the set will not work Recharging the Battery Built in Rechargeable Battery 1 Pl...

Page 4: ...ator 10 Dial scale 11 TUNING regulator 12 BASS ON OFF button 13 USB port Function switch 6 7 5 14 EQ button 15 REPEAT button 16 PREV button 17 NEXT button 18 PLAY PAUSE button 19 STOP button 20 21 LCD IR sensor Display 22 Power cord socket 23 Battery options 24 Phone socket 25 AUX MP3 IN Not indicated battery compartment bottom 9 1 3 2 4 5 Control elements 22 23 24 25 ...

Page 5: ...2 Install 1 CR2025 Lithium battery with the positive side facing up 3 Replace the battery compartment Note Only playback of MP3 is available 4 RADIO operation 1 By factory default RADIO starts once power is on 2 Push AM FM SW1 SW2 to switch between AM FM SW1 SW2 band 3 Extend the length of the telescopic and to enhance FM reception turn the unit horizontally to enhance AM reception 4 Rotate TUNING...

Page 6: ...d to the next track Press and hold to fast backward and to fast forward of the current playing track 4 Connect the unit s USB to a PC s USB socket under MS Windows OS the PC automatically configures to work as a Sound Card and speaker Playing MP3 audio from a SD MMC TF MICRO SD card 1 Insert a Card playback starts automatically 2 MODE button Press MODE button to switch between the mode of SD TF US...

Page 7: ...y Range 530 1600KHz SW Frequency Range 5 8 20 5MHz FM SW Telescopic antenna AM Built in ferrite bar antenna Storeage Media USB Flash Drive SD Card MMC Card Micro SD Card Speaker 66mm cone type 2 3 5mm Headphone Socket For 32 ohm Impedance Headphones Power output 1 8W 1 8W EIAJ 4OHM x 2 Power requirements DC 6V using 4 size C R14 batteries or AC 110V 220V 60 50Hz Power consumption 9W Dimensions LxW...

Page 8: ...7 ...

Page 9: ...8 ...

Page 10: ...9 ...

Reviews: