background image


P-8 

confirm. 

2.  To stop or change the settings of an application, select 

RUNNING

 or 

ALL

, then select an item and 

tap the option you need. 


Security 

You can protect your device and data by setting a screen lock or encrypting your tablet. 

u


Set a screen lock  

To set a screen lock, tap 

Settings

Ê

Security

Ê

 Screen lock

 from application list. 

l


None

Deactivate the screen lock. 

l


Slide

Slide to unlock the screen. 

l


PIN

Enter a numeric PIN to unlock. When prompted, enter the PIN to unlock the screen. 

l


Pattern

Draw a pattern to unlock. Follow the instructions to draw your lock pattern. When 

prompted, draw the pattern to unlock the screen. 

l


Password

Enter a passcode to unlock. When prompted, enter the passcode to unlock the 

screen. 

u


Screen time-out 

Select 

Settings

Ê

Display

Ê

Sleep 

from application list, you can set the time before the screen times out 

and goes into lock mode. 

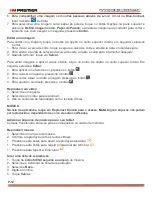
( you have not entered any characters or made other selections). 


RESET TABLET 

You can reset system and desktop settings to their original values by the following steps: 
1.  Select 

Settings

Ê

Backup & reset 

from application list. 

2.  Tap

 Factory data reset.


3.  If you want to erase all data on your tablet, such as music, pictures and any other data, tap 

Erase SD 

card

 checkbox to create a checkmark. 

4.  Tap

 Reset tablet

The device resets to the factory default settings automatically. 

Warning!

:  Factory  data  reset  will  erase  all  data  from  your  device  and  SD  card,  including  your  google 

account, system and application data and settings and any other downloaded applications. 


WEB 

Email 

To receive and send mail, you must have a remote mailbox service. This service may be offered by a 

service provider. Your device is compliant with applicable intern

et standards for POP3/IMAP/Exchange.


Before you can send or receive mail on your device, you need to set up an email account and define the 

email settings correctly. 

You can define more than 1 mailbox.


u


Set up your email 

1. 

Tap

 Email

 from application list. 

2.  You can use mailbox guide to set up your mailbox, tap 

Next

 until it’s done.


3. 

If  you  need  to  add  another  email  account,  tap  the  option  button  at  the  upper 
right

Ê

Settings

Ê

ADD ACCOUNT

,


then set up the email account with the mailbox guide. 

When you are finished setting up the email account, the email messages will be downloaded to your 
device. If you have created more than two accounts, you can switch between email accounts. Select 
an  account  name  at  the  top  left  of  the  screen  and  select  the  one  you  want  to  retrieve  messages 
from. 

u


Delete your email account 
Summary of Contents for TAB-5446-8G

Page 1: ...ENTE Con el fin de que obtenga el mayor desempe o de su producto por favor lea este manual de instrucciones cuidadosamente antes de comenzar a utilizarlo y gu rdelo para su futura referencia Si necesi...

Page 2: ...MENZAR 3 DESCRIPCI N 4 PANTALLA de inicio 5 PERSONALIZACI N DE LA TABLETA 8 ADMINISTRAR APLICACIONES 8 Web 9 TIENDA DE JUEGOS 11 ENTRETENIMIENTO 11 HERRAMIENTAS 14 CONECTIVIDAD 15 INSTRUCCIONES DE SEG...

Page 3: ...de esta unidad que constituye un riesgo de choque el ctrico Este s mbolo indica que hay importantes instrucciones de operaci n y mantenimiento en la literatura que acompa a a esta unidad L NEAS DE SE...

Page 4: ...e otro tipo de dispositivos puede generar mal funcionamiento de la unidad TARJETA DE MEMORIA Utilice la tarjeta para guardar archivos multimedia 1 Inserte la tarjeta de memoria con los conectores de c...

Page 5: ...P 4 DESCRIPCI N...

Page 6: ...plicaciones y otros elementos 1 Iconos indicadores 2 Barra de b squeda 3 Deslice a la derecha o izquierda para ver los otros paneles 4 Acceder a la lista de aplicaciones 5 Barra de tareas AGREGAR TEMS...

Page 7: ...uego arr strelo al rea Remover en la parte superior de la pantalla BARRA DE TAREAS La barra de tareas aparece en la parte inferior Muestra los botones utilizados normalmente el indicador de nivel de b...

Page 8: ...a bater a PANEL DE NOTIFICACIONES Para mostrar la lista de notificaciones recientes arrastre el rea izquierda de la barra de notificaciones hacia abajo Activa o desactiva esta conexi n Activa o desact...

Page 9: ...stalar una aplicaci n seleccione DESCARGAS seleccione el tem y presione Desinstalar presione OK para confirmar 2 Para detener o cambiar la configuraci n de una aplicaci n seleccione CORRER o TODOS lue...

Page 10: ...ilice la gu a de email para crearlo Toque Siguiente hasta terminar 3 Si necesita agregar otra cuenta de email toque el bot n de opci n en la parte superior derecha Configuraci n Agregar Cuenta y cree...

Page 11: ...nta sep relas con comas Tambi n puede enviar copias utilizando CC BCC 3 Para agregar archivos toque el cono Adjuntar Archivo 4 Escriba el tema y el texto 5 Toque el bot n Enviar para enviar el correo...

Page 12: ...d puede leer la descripci n de cada aplicaci n Nuestra compa a no se hace responsable por el uso de estas aplicaciones y da os que puedan generar ENTRETENIMIENTO VIDEO Selecci n Video del listado de a...

Page 13: ...Para compartir una imagen con otras personas a trav s del correo electr nico Gmail o Blue Connect toque la barra en t tulo 7 Para seleccionar una imagen como fondo de pantalla toque el bot n Opci n en...

Page 14: ...iente al archivo de m sica 2 Seleccione Agregar a la lista de reproducci n 3 Seleccione Nuevo 4 Ingrese un nombre 5 Toque Guardar Borrar una lista de reproducci n 1 Toque el bot n Musica en la parte s...

Page 15: ...video 2 Toque el bot n para comenzar a grabar La longitud del video depende del espacio disponible para almacenar 3 Toque para detener la grabaci n El video se guardar en la carpeta DCIM 4 Despu s de...

Page 16: ...mover copiar archivos Usted tambi n puede enviar archivos a dispositivos compatibles Nota Algunos formatos de archivos pueden no tener soporte dependiendo del software o del dispositivo Algunos archi...

Page 17: ...den variar dependiendo del tipo de VPN 3 Toque Guardar al terminar Conectarse a una red privada 1 Seleccione Configuraci n VPN 2 Seleccione una red privada para conectarse 3 Ingrese el nombre de usuar...

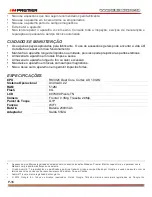
Page 18: ...x A9 1 0GHz Sistema Operativo Android 4 2 2 RAM 512M Flash 8G LCD 800 480 Pixeles TN C mara Frontal 0 3Mp Posterior 2 0Mp P nel T ctil G P Funci n WIFI Bater a Bater a 2500mAh Adaptador Salida 5V 2A L...

Page 19: ...O CLIENTE A fim de obter o melhor desempenho de seu produto por favor leia este manual do usu rio cuidadosamente antes de come ar a us lo e mant lo para refer ncia futura Se voc precisar de suporte ad...

Page 20: ...DE MEM RIA 3 IN CIO 3 DESCRI O 4 TELA INICIAL 5 PERSONALIZA O DO TABLET 8 GERENCIAR APLICATIVOS 8 WEB 8 LOJA DE JOGOS 10 ENTRETENIMENTO 11 FERRAMENTAS 14 CONECTIVIDADE 14 INSTRU ES DE SEGURAN A 15 CU...

Page 21: ...r do aparelho podendo causar choques el tricos Este s mbolo indica que o manual que acompanha este equipamento cont m importantes instru es de opera o e manuten o LINHAS DE ATENDIMENTO AO CLIENTE PREM...

Page 22: ...as e carregadores originais O uso de outros dispositivos pode causar mau funcionamento do aparelho CART O DE MEM RIA Use o cart o para armazenar arquivos de m dia 1 Insira o cart o de mem ria com os c...

Page 23: ...P 4 DESCRI O...

Page 24: ...vos e outros elementos 1 cones Indicadores 2 Barra de pesquisa 3 Deslize para a direita ou para a esquerda para ver os outros pain is 4 Acesse a lista de aplicativos 5 Barra de tarefas ADICIONAR TENS...

Page 25: ...REFAS A barra de tarefas esta na parte inferior Mostra os bot es normalmente utilizados o indicador de n vel da bateria o tempo atual e outros indicadores 1 Reduzir o n vel de volume 2 Retorne tela an...

Page 26: ...tablet ao usar algumas fun es a tela gira automaticamente ficando na dire o certa Se voc n o quiser que a tela girar abra o painel de notifica es e selecione rota o autom tica da tela e desabilitar a...

Page 27: ...oqueio Senha Digite uma senha para desbloquear a tela Tempo de Desligado da Tela Selecione Configura o Tela Sono na lista de aplicativos Voc pode definir o tempo que deve decorrer antes que a tela se...

Page 28: ...ere o de e mail do remetente e se voc quer escrever mais de uma conta separe com v rgulas Voc tamb m pode enviar c pias usando CC BCC 4 Para adicionar arquivos toque no cone Anexar Arquivo 5 Digite o...

Page 29: ...Para abrir a janela toque no t tulo da janela 3 Para fechar a janela clique no X na barra de t tulo Definir P gina de In cio 1 Toque no bot o de op o no canto superior direito 2 Selecione Configura o...

Page 30: ...faste os ou toque no bot o no canto superior esquerdo da tela Pressione o cone do bloco para bloquear a tela toque o novamente para desbloque lo GALERIA Para ver ou organizar suas imagens e clipes de...

Page 31: ...aplicar um efeito de cor pressione o bot o 2 Para colocar um quadro pressione o bot o 3 Para cortar alisar ou rodar a imagem pressione o bot o 4 Para ajustar o contraste pressione o bot o Reproduzir u...

Page 32: ...oloque dois dedos na tela e leve eles para fora Para fazer Zoom Out Mova os dedos para dentro cone Defini o Alternar para o modo panorama para tirar uma fotografia de paisagem Toque para alternar entr...

Page 33: ...especificado toque 4 Para cancelar o alarme remova a sele o na caixa de sele o 5 Para apagar um alarme toque e segure o alarme selecione Apagar e em OK GERENCIADOR DE ARQUIVOS Muitos dos recursos do a...

Page 34: ...RIVADA VIRTUAL VPN Voc pode criar uma rede privada virtual e se conectar a sua rede privada atrav s de uma rede p blica como a internet Nota Voc deve criar um PIN de desbloqueio de tela antes de utili...

Page 35: ...sivo N o deixe o aparelho em locais com campos magn ticos N o o deixe cair o aparelho nem permitir impactos fortes ESPECIFICA ES CPU RK3026 Dual Core Cortex A9 1 0GHz Sistema Operacional Android 4 2 2...

Page 36: ......

Page 37: ...B 5446 8G DEAR CUSTOMER In order to achieve the best performance of your product please read this instruction manual carefully before using and keep it for future reference If you need extra support p...

Page 38: ...INSTALL THE MEMORY CARD 3 GETTING STARTED 3 DEVICE LAYOUT 4 HOME SCREEN 5 MANAGE APPLICATIONS 7 RESET TABLET 8 WEB 8 PLAY STORE 10 ENTERTAINMENT 10 CAMERA 12 TOOLS 13 CONNECTIVITY 14 SAFETY PRECAUTIO...

Page 39: ...t which states a risk of electric shock This sign means that there are important instructions of operation and handling in the manual that comes with this device PREMIER CUSTOMER SERVICE Venezuela 080...

Page 40: ...charge the device with a travel adapter or by connecting the device to a PC with a USB cable 2 Battery full icon is shown when finished if your device is off Warning Use only original batteries and ch...

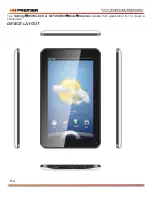
Page 41: ...P 4 Tap Settings WIRELESS NETWORKS More Airplane mode from application list to create a checkmark DEVICE LAYOUT...

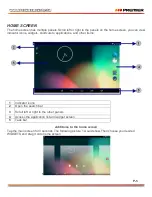
Page 42: ...hortcuts to applications and other items 1 Indicator icons 2 Open the search bar 3 Scroll left or right to the other panels 4 Access the application list and widget screen 5 Task bar Add items to the...

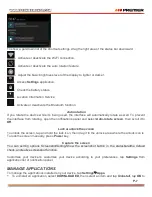
Page 43: ...level indicator current time and other indicator icons 1 Adjust the device volume to lower 2 Return to previous screen 3 Return to home screen 4 View the applications you have accessed recently 5 Adju...

Page 44: ...tating open the notifications panel and select Auto rotate screen then scroll it to Off Lock unlock the screen To unlock the screen tap and hold the lock icon then drag it to the unlock area where the...

Page 45: ...et such as music pictures and any other data tap Erase SD card checkbox to create a checkmark 4 Tap Reset tablet The device resets to the factory default settings automatically Warning Factory data re...

Page 46: ...you are finished setting up the email account the email messages are downloaded to your device u View email messages 1 When you open the email account the amount of unread email messages is displayed...

Page 47: ...ollow the on screen instructions Note l All applications offered by Play Store are developed by third party To get the information about the developers you can read the descriptions of each applicatio...

Page 48: ...t a picture 1 To crop the image tap the option button at the upper right then select Crop l To move the crop box tap and hold the crop box and drag it to the desired location l To add or subtract from...

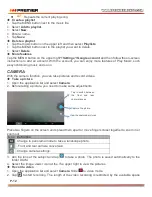
Page 49: ...record videos u Take a picture 1 Open the application list and select Camera 2 Before taking a picture you need to make some adjustments Place two fingers on the screen and spread them apart or move f...

Page 50: ...reset alarm set the alarm to ON l To cancel an alarm set the alarm to OFF 2 When the alarm sounds to stop the alarm drag the alarm icon to To repeat the alarm after a specified length of time drag the...

Page 51: ...t VPN You can create virtual private networks and connect to your private network securely through a public network such as the internet Note You need to set a lock screen PIN or password before you c...

Page 52: ...ts Do not place your device in the air bag deployment area Use the device only in its normal operating positions as explained in the product documentation Always switch off your device when its use is...

Reviews: