background image

1-2 

Alarm Cards

Model No.

Running Head

Alarm Card Descriptions

Alarm Cards

Each outbound "floating" relay has normally open contacts and normally closed contacts. It 
responds to major, critical, minor, and informational alarms, and activates an external device. 
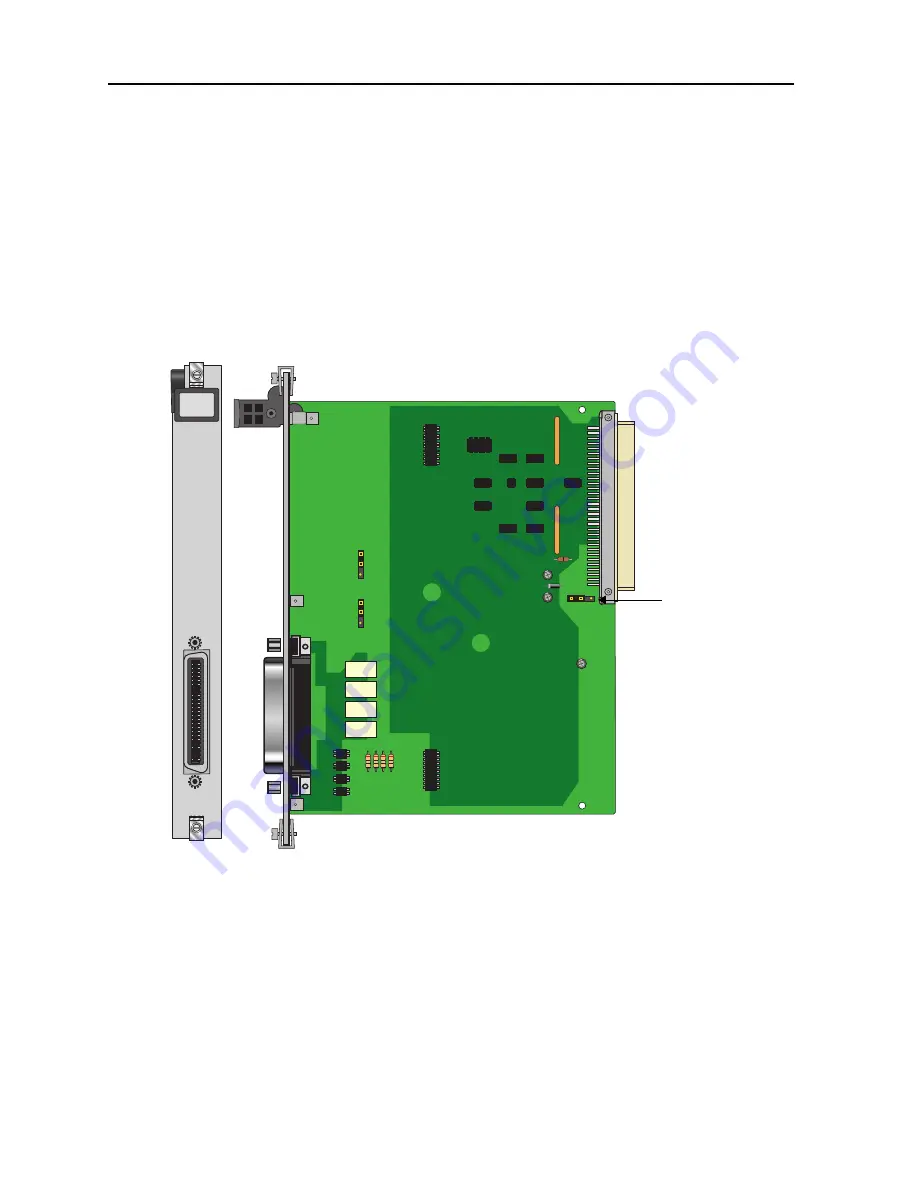
Two relays are provided for each Alarm Card port. The relays are dual-pole, double-throw. See 
Figure 1-1.

1.2.1.1

Card Jumpers/Switch Settings

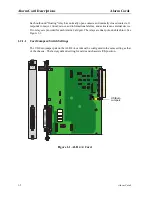
The US/Euro jumper pair on the ALR 4+4 card must be configured to the same setting as that 
of the chassis.  The factory default setting for cards and chassis is US position.

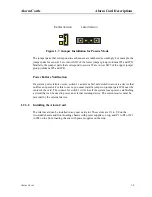
Figure 1-1. ALR 4+4 Card

ALR

4+4

P
1

US/Euro
Jumpers

Summary of Contents for ALR 28+14

Page 1: ...Alarm Cards Reference Guide Publication 999 001967 Revision A1 Release 3 9 October 1999 ...

Page 2: ... 1459 Second Edition Third Edition CSA listed to C22 2 No 950 M89 COPYRIGHT 1992 1999 Premisys Communications Inc All rights reserved This publication is protected by federal copyright law No part of this publication may be copied or distributed transmitted transcribed stored in a retrieval system or translated into any human or computer language in any form or by any means electronic mechanical m...

Page 3: ...ch card has switches for outbound alarms and sensors that detect incoming alarms from the external equipment Alarm Cards ALR ALR 4 4 8401 ALR 4 3PF 8402 ALR 28 14 8403 Using this Alarm Card Reference Guide This Alarm Card Reference Guide assists technicians with switch settings connector pinouts configuration and troubleshooting information for the Alarm Cards Chapter 1 Alarm Card ...

Page 4: ...Model No Running Head ...

Page 5: ... 2 1 2 3 ALR 28 14 Card Description 8403 1 4 1 2 3 1 Card Jumpers Switch Settings 1 4 1 2 3 2 Installing the Alarm Card 1 9 1 3 Alarm Card User Screens and Settings 1 10 1 3 1 Alarm Filter Screen Sensor Setting 1 10 1 3 2 ALR 4 4 and ALR 4 3PF Card Main Screens 1 12 1 3 3 ALR 28 14 Card Screens and Settings 1 14 1 3 4 Alarm Sensor Screen 1 14 1 3 5 Alarm Switch Screen 1 16 1 3 6 Voice Screen 1 18 ...

Page 6: ...ii Alarm Cards Model No Running Head Contents ...

Page 7: ...or Modes 1 7 1 4 Jumper Pair Assignments 1 8 1 5 Jumper Installation for Active Mode 1 8 1 6 Jumper Installation for Passive Mode 1 9 1 7 Alarm Filter Screen 1 11 1 8 ALR 4 4 and ALR 4 3PF Card Main Screen 1 12 1 9 ALR 28 14 Alarm Sensor Screen 1 14 1 10 ALR 28 14 Alarm Switch Screen 1 16 1 11 ALR 28 14 Voice Screen 1 18 ...

Page 8: ...iv Alarm Cards Model No Running Head Figures ...

Page 9: ...gs and Defaults 1 13 1 3 ALR 28 14 Alarm Sensor Screen Actions 1 15 1 4 ALR 28 14 Alarm Sensor Option Settings and Defaults 1 15 1 5 ALR 28 14 Alarm Switch Screen Actions 1 17 1 6 ALR 28 14 Alarm Switch Option Settings and Defaults 1 17 1 7 ALR 28 14 Voice Screen Actions 1 19 1 8 ALR 28 14 Voice Option Settings and Defaults 1 19 ...

Page 10: ...vi Alarm Cards Model No Running Head Tables ...

Page 11: ... sensors on the card 1 2 Alarm Card Descriptions 1 2 1 ALR 4 4 Card Description 8401 The ALR 4 4 Card has four outbound alarm switches and four inbound alarm sensors The outbound switches report internal alarms to external devices by triggering form C relay contact closures 120 VAC 0 5A The inbound sensors report external alarms to the system All external alarms reported by sensors are listed in t...

Page 12: ...tional alarms and activates an external device Two relays are provided for each Alarm Card port The relays are dual pole double throw See Figure 1 1 1 2 1 1 Card Jumpers Switch Settings The US Euro jumper pair on the ALR 4 4 card must be configured to the same setting as that of the chassis The factory default setting for cards and chassis is US position Figure 1 1 ALR 4 4 Card ALR 4 4 P 1 US Euro...

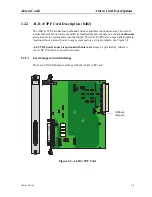
Page 13: ...outbound alarm to show the system power unit has failed The ALR 4 3PF Card is especially helpful in locations where a loss of power to any system units is a critical problem See Figure 1 2 A 48 VDC power source is optional with this card It may be provided by either an AC to DC Converter or an external source 1 2 2 1 Card Jumpers Switch Settings There are US EURO jumper settings with the ALR 4 3PF...

Page 14: ...trol switch on the alarm card Detailed instructions for sensor control are provided later in this chapter The switches allow the card to control up to 14 external devices As with the sensors the switches are divided between the two Amphenol connectors into two groups of seven switches each Twelve of the switches are Form C open or closed based on user input one is Form A always open and one is For...

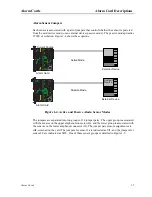
Page 15: ...dible alarms You can set the buzzer to activate when a particular sensor detects an incoming alarm The buzzer volume is set by a control dial marked VOL which you can adjust with a small screwdriver US Euro Jumper Voltage Control Switches Alarm Sensor Jumpers for Connector J4 Onboard Buzzer Buzzer Volume Control Alarm Sensor Jumpers for Connector J3 ALR 28 14 P 1 P 2 P 3 ...

Page 16: ... to work properly The factory default jumper setting is US Voltage Control Switches Use switches S1 and S2 to control the voltage supplied to each group of active sensors When either switch is set to SYS the board supplies 12 and 12 VDC power to the sensor group associated with that Amphenol connector When a switch is set to BAT the ALR 28 14 Card supplies external telco power to the sensors in th...

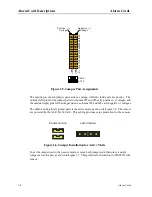
Page 17: ...The jumpers are separated into two groups of 14 jumper pairs The upper group is associated with the sensors on the upper amphenol connector J4 and the lower group is associated with the sensors on the lower amphenol connector J3 The jumper pair sensor assignments are silk screened on the card The jumpers for sensor 1 are indicated as SI1 and the jumpers for sensor 28 are indicated as SI28 One of t...

Page 18: ...ry negative voltages The default setting for all jumper pairs is the active mode as shown in Figure 1 6 The sensors are powered by the ALR 28 14 Card This setting provides surge protection for the sensors Figure 1 6 Jumper Installation for Active Mode To set the jumper pair to the passive mode remove both jumpers and then place a single jumper across the pair as shown in Figure 1 7 This provides f...

Page 19: ... act as a fail safe switch to activate a device that notifies an operator For this to occur you must install a jumper on jumper pair JP63 near the center of the card The contact for switch 1 will close if the system loses power establishing a circuit that can be used to power an external warning device The current source must be provided by the external device 1 2 3 2 Installing the Alarm Card The...

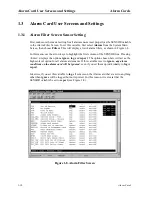
Page 20: ...ure 1 8 In this menu use the arrow keys to highlight the first column of the SENSOR line Pressing Enter displays the options ignore log and report The option chosen here will act as the highest level option for all alarm card sensors If this variable is set to ignore any alarm conditions on the alarm card will be ignored even if you set them up individually to log or report Likewise if you set thi...

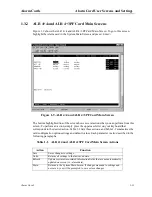
Page 21: ...he uppercase letter on your keyboard that corresponds to the desired action Table 1 1 lists these actions and Table 1 2 summarizes the card configuration option settings and default values Each parameter is also described in the following paragraphs Table 1 1 ALR 4 4 and ALR 4 3PF Card Main Screen Actions Action Function Save Saves changes to settings Undo Returns all settings to the last saved st...

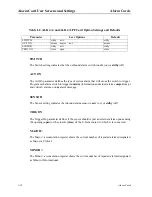
Page 22: ... any alarm message SENSOR The Sensor setting indicates the inbound alarm sensor is actv on or stdby off TRIG ON The Trigger On parameter defines if the sensor should report an external alarm upon sensing the opening open or the closure close of the C form contact to which it is connected MAJOR The Major accumulation register shows the current number of reported alarms designated as Major or Critic...

Page 23: ... that corresponds to the incoming alarm then set each variable for every sensor as described in this section Figure 1 10 ALR 28 14 Alarm Sensor Screen The bottom highlighted line of the screen shows several actions that you can perform from this screen To perform an action simply press the uppercase letter on your keyboard that corresponds to the desired action For example to go to the next screen...

Page 24: ...ion should be taken in the event of an alarm for each individual sensor This variable may be set to log the alarm in the alarm register or to report the alarm Reported alarms are also logged by the system The default value is ignore Action Function Refresh Redraws the screen dEfault Returns all settings to the default state pgUp Returns to the previous screen page pgDn Goes to the next screen page...

Page 25: ...larm Switch Screens Each screen page lists seven switches To go to this screen press w sWitches command in the Alarm Sensor Screen Figure 1 11 ALR 28 14 Alarm Switch Screen The bottom highlighted line of the screen shows several actions that you can perform from this screen To perform an action simply press the uppercase letter on your keyboard that corresponds to the desired action For example to...

Page 26: ...ch may be either open or closed one is Form A always open and one is Form B always closed In the event of system power failure switch 1 can be used as a fail safe switch to activate a device that notifies the user In order for this to occur a jumper must be set on jumper pair JP63 located towards the center of the card The contact for switch 1 will close if the system loses power establishing a ci...

Page 27: ...cate the number of the sensor that will trigger the alarm The default value is major SENSOR When the ACT ON field is set to sensor you can enter a value from 1 to 28 indicating the number of the sensor that will trigger the switch The default value is n a STATUS This is a display only field you cannot edit it 1 3 6 Voice Screen An RJ 11 FXS voice port is located on the ALR 28 14 Card between the t...

Page 28: ...1 7 lists these actions and Table 1 8 summarizes the configuration option settings and default values These parameters are described in the following paragraphs Table 1 7 ALR 28 14 Voice Screen Actions Action Function Save Saves changes to settings Undo Returns all settings to the last saved state Refresh Updates certain time related information fields that are not automatically updated on the scr...

Page 29: ...r a display of the available time slots refer to your cross connect map for the WAN link The default value is n a See Chapter 4 System Configuration and Operation for more information regarding cross connect maps MODE The Mode setting should be determined by the type of equipment to which you are connecting the port All options use two wire balanced connections The fxs Foreign Exchange Station opt...

Page 30: ...d to 3 dBm by setting RX TLP to 2 dB Acceptable values range from 10 0 dB to 2 0 dB The default value is 5 0 Tx TLP The Transmit Transmission Level Point setting controls the amount of gain or attenuation added to signals after they are received from the local analog port and before they are encoded to digital PCM signals To increase the signal level set the TX TLP setting to a negative number i e...

Page 31: ...ttings RINGBK The ringback setting specifies whether a ringback tone is generated by the system and sent towards the network This option should be turned on when the network does not provide an audible ringing tone to the calling party The default value is off ...

Page 32: ...ter key Use the arrow keys to highlight a new filter setting and press the Enter key again If you are satisfied with your selections remember to Save before exiting the screen If you make any changes and then attempt to exit the screen without saving you will be prompted Ok to lose changes y n You must select y or n If you select y any changes will be lost and all selections will revert to the las...

Page 33: ...st Connect a short across the Alarm card sensor input in question A SENSOR alarm should be reported If no alarm is reported the sensor port may be defective 7 If the Alarm card is determined to be faulty replace it and return the faulty unit for repair to the location specified by your distributor Note Refer to the Alarm Card Filters table located in the System Configuration and Operation Chapter ...

Page 34: ...1 24 Alarm Cards Model No Running Head Alarm Card Troubleshooting Alarm Cards ...

Reviews: