DESCRIPTION OF CONTROL KEYS & CONNECTORS
01
02
Cleaning
Dust the set by wiping the screen and the cabinet with a
soft, clean cloth or some special liquid cleaner.
Do not apply excessive force to the screen when cleaning.
Do not use water or other chemical cleaner to clean the
screen as this may damage the surface of the LCD screen.
Product
Read all of the instructions before operating the set. Keep
these instructions well for future use.
Do not block or cover the ventilation openings on the back
cover.
Do not push objects of any kind into this unit through the
cabinet slots as they could touch the current carrying parts
or short-circuit parts, resulting in fire, electric shock, or
damage to the unit.
Do not attempt to open the cabinet
as this may cause
damage
. There are no parts inside you can service by
yourself. Refer all servicing to qualified personnel.
Do not touch the screen surface with fingers as this may
scratch or mar the LCD screen.
Do not impact the LCD screen with hard pressure as this
may damage the LCD screen severely.
Unplug the set under the following conditions:
- If the set will not be used for a long period of time.
- If the power cord or the power outlet/plug is damaged.
- Follow the instructions to install and adjust the product.
Adjust those controls that are covered in this operating
instructions as improper adjustment of other controls
may result in damage. If this happens, unplug the set
and
refer to the service personnel.
- If the set is subject to impact or has been dropped to
Have the cabinet damaged.
Where an all-pole mains switch is used as the disconnect
device, the switch shall remain readily operable.
Power and Plug
Do not allow anything to rest on or roll over the power
cord and the signal cable.
Protect the power cord and the signal cable from being
trampled.
Do not overload the power cord or the power outlet.
Do not expose the power cord and the signal cable to
moisture.
Power Cord and Signal Cable
Do not place the set on an unstable cart, stand, or table.
Place the set on a place that allows good ventilation.
Do not use the set near damp, and cold areas. Protect
the set from overheating.
Keep the set away from direct sunlight.
Apparatus shall not be exposed to dripping or splashing
and no objects filled with liquids, such as vases, shall be
placed on the apparatus.
Do not use the set near dust place.
Use Environment
Hanging the TV Set on the Wall
Warning:
Warning
:The batteries shall not be exposed to excessive
heat such as sunshine, fire or the like.
This operation requires two people.
To ensure a safe installation, observe the following safety
notes:
Check that the wall can support the weight of the TV set
and wall mount assembly.
Follow the mounting instructions provided with the wall
mount.
The TV set must be installed on a vertical wall.
only screws suitable for the material of
TV set cables are placed so that there
is not danger of tripping over them.
instructions about our TV sets are also
Make sure to use
the wall.
Make sure that the
All other safety
applicable here.
Precautions
72-D20MDL-E00
Note
Graphics contained within this publication are presentation
only.
Design and specifications are subject to change
without notice.
If there is any difference between the
descriptions in our manual and the actual operation,
refer to the actual operation as a standard.
Most problems you encounter with your TV can be corrected
by consulting the following troubleshooting list.
No picture, no sound
1. Check if the fuse or circuit breaker is working.
2. Plug another electrical device into the outlet to make sure
it is working or turned on.
3. Power plug is in a bad contact with the outlet.
4. Check the signal source.
No color
1. Change the color system if it is available.
2. Adjust the saturation.
3. Try another channel. Black-white program may be received.
Remote control does not work
1. Change the batteries.
2. Batteries are not installed correctly.
3. Main power is not connected.
No picture, normal sound
1. Adjust the brightness and contrast.
2. Broadcasting failure may happen.
Normal picture, no sound
1. Press the
Vol+
button to increase volume.
2. Volume is set to mute, press the mute button to restore
sound.
3. Change the sound system if it is available.
4. Broadcasting failure may happen.
Unorderly ripples on the picture
It is usually caused by local interference, such as cars,
daylight lamps and hair driers. Adjust the antenna to minimize
the interference.
Blank screen in VGA mode
Perhaps the TV can not recognize the resolution set by the PC.
Suggest to change to the best resolution or other standard
resolutions of the Windows system.
Snowy dots and interference
If the antenna is located in the fringe area of a television
signal where the signal is weak, the picture may be marred
by dots. When the signal is extremely weak, it may be necessary
to install a special antenna to improve the reception.
1. Adjust the position and orientation of the indoor/outdoor
antenna.
2. Check the connection of antenna.
3. Fine tune the channel.
4. Try another channel. Broadcasting failure may happen.
Ignition
Black spots or horizontal streaks appear, or the picture flutters
or drifts. This is usually caused by interference from car ignition
system, neon lamps, electric drills, or other electrical appliance.
Ghost
Ghosts are caused by the television signal following two paths.
One is the direct path, the other is reflected from tall buildings,
hills, or other objects. Changing the direction or position of the
antenna may improve the reception.
Radio frequency interference
This interference produces moving ripples or diagonal streaks,
and in some case, loss of contrast in the picture. Find out and
remove the radio interference source.
Troubleshooting
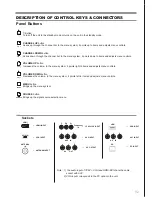
Panel Buttons
Sockets
HDMI INPUT
HDMI
VGA INPUT
VGA IN
ANTENNA
IN
ANTENNA INPUT
Note: 1) the audio input of YPbPr , VGA and HDMI-DVI share the same
socket with AV2.
2) VGA input corresponds to the PC option in the unit.
CHANNEL UP
button
Scans up through the channel list. In the menu system, it points up to items and adjusts menu controls.
CH.
MENU
button
Brings up the menu system.
MENU
SOURCE
button
Brings up the signal source selection menu.
SOURCE
Button
Turns off the unit to the standby mode or turns on the unit in the standby mode.
CHANNEL DOWN
button
Scans down through the channel list. In the menu system, it points down to items and adjusts menu controls.
CH.
VOLUME UP
button
Increases the volume. In the menu system, it points right to items and adjusts menu controls.
VOL.
VOLUME DOWN
button
Decreases the volume. In the menu system, it points left to items and adjusts menu controls.
VOL.
V
L
R
AV2 IN
Y
Pb
Pr
Component
IN
V
L
R
AV IN
YPbPr/YUV INPUT
AV2 INPUT
AV1 INPUT
USB INPUT
USB
DC INPUT
DC
V
L
R
AV OUT
AV OUTPUT
Base Installation
1) Insert the support into the unit.(as fig1)
2) Fix the base by three screws.(as fig2)
Fig1
Fig2
Note: Align withe the center of the three holes.
OPERATION MANUAL
LCD TV
Summary of Contents for TV-4593LED
Page 1: ...OPERATION MANUAL LCD TV...

