background image


www.prentrom.com


NuPoint User’s Guide 

Acknowledgements 

Copyright/Trademark Information 

© 2015-2017 Prentke Romich Company. All rights reserved. 
Accent, NuPoint, and NuVoice are trademarks of Prentke Romich Company. 
MINSPEAK®, SEMANTIC COMPACTION®, and UNITY® are trademarks under license from Semantic Compaction Systems, Inc. in the United States and/or other countries. 
PIXON® brand products are trademarks under license from Semantic Compaction Systems, Inc. in the United States and/or other countries. 
Microsoft and Windows are registered trademarks of Microsoft Corporation in the United States and/or other countries. 
17529v1.3 ∙ 12/08/2017 

Electronic Interference Information 

This device complies with Part 15 of the FCC Rules. Operation is subject to two conditions: (1) this device may not cause harmful interference, and (2) this device 

must accept any interference received, including interference that may cause undesired operation. 

Warning!

  Changes or modifications to this product which are not authorized by Prentke Romich Company could exceed FCC limits and negate your authority to use 

this product.   
This equipment has been tested and found to comply with the limits for a Class B digital device, pursuant to Part 15 of the FCC Rules. These limits are designed to 

provide reasonable protection against harmful interference in a residential installation. This equipment generates, uses and can radiate radio frequency energy and, 

if not installed and used in accordance with the instructions, may cause harmful interference to radio communications. However, there is no guarantee that 

interference will not occur in a particular installation. You can determine whether this product is causing interference in your radio or television by turning this 

product off. If the interference stops, it was probably caused by this product or one of its accessories. You can attempt to correct the interference by using one or 

more of the following measures: 


Turn the television or radio antenna until the interference stops. 


Move this product to one side or the other of the television or radio. 


Move this product farther away from the television or radio. 


Plug this product into an outlet that is on a different circuit from the television or radio; that is, this product should be controlled by different circuit 

breakers/fuses from the television or radio.   


If necessary, contact a Prentke Romich Company service technician for assistance. 


This Class B digital apparatus meets all requirements of the Canadian Interference-Causing Equipment Regulations. Cet appareil numérique de la classe B respect 

toutes les exigences du Règlement sur le matériel brouiller du Canada. 


Summary of Contents for NuPoint

Page 1: ...17529v1 3 User s Guide...

Page 2: ...Rules These limits are designed to provide reasonable protection against harmful interference in a residential installation This equipment generates uses and can radiate radio frequency energy and if...

Page 3: ...ccordance with local state and or federal electronic recycling laws Implantable Medical Devices A minimum separation of six 6 inches should be maintained between a handheld wireless mobile device and...

Page 4: ...hlighting 10 Configuring the Off Screen Keys 11 Configuring Windows Access 13 Configuring Mouse Post Select Settings 15 Using Target Dots 16 Recommended Positioning and Settings 16 Positioning the Use...

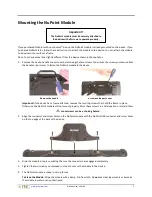
Page 5: ...e device has a frame attached remove the two top screws that hold the frame in place Otherwise the NuPoint module will not mount properly Store these screws in a safe location or discard them Loose sc...

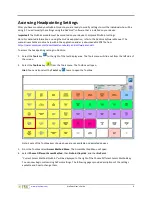
Page 6: ...bulary and software manuals To access the headpointing settings in NuVoice 1 Select the Tools key to the right of the text display area The Tools menu will slide out from the left side of the screen 2...

Page 7: ...of time it takes for your device to accept a location you have selected and to select the key The device beeps when your key is accepted For example if you set acceptance time for 50 seconds you must...

Page 8: ...he cursor movement A high Averaging value e g 5 combined with a high Horizontal or Vertical Adjustment e g 10 results in a significant dampening effect on head movement Turning Predictive Selection On...

Page 9: ...cursor speed The cursor is visible at all times unless the user shifts its position off the screen Showing or Hiding the Cursor The cursor on your device is a hand Show Cursor should be set to ON If y...

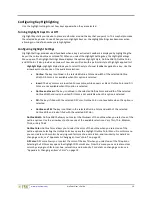
Page 10: ...black Outline Color and Fill Color are not available when this option is selected Outline and Invert The key is outlined in the selected Outline Color and width of the selected Outline Width and is a...

Page 11: ...key Use the arrow keys to select Thick Medium or Thin You can also select Off Turning Off Screen Tools Key On or Off When Off Screen Tools Key is turned on you can select the Tools key by focusing jus...

Page 12: ...as hue saturation and luminosity For details on changing a color see Appendix A Changing an Item s Color on page 19 Turning Bottom Off Screen Keys On or Off When Bottom Off Screen Keys is turned on yo...

Page 13: ...in your application Adjusting the Magnification Factor Magnification Factor allows you to set how you want an area to be magnified 2 times larger 2x 3 times larger 3x 4 times larger 4x or 5 times lar...

Page 14: ...Inner Radius and Outer Radius Windows only Windows Access Inner Radius and Windows Access Outer Radius affect how broadly time is accumulated and thus how quickly or readily selections are made when u...

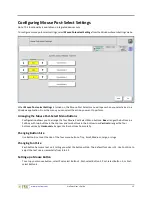
Page 15: ...n allows you to arrange the four Mouse Post Select Menu buttons Box arranges the buttons in a 2x2 box with two buttons in the top row and two buttons in the bottom row Vertical arranges the four butto...

Page 16: ...er the user is to the system the faster the cursor will move on the screen The optimal distance is 18 to 24 inches It is recommended that the user sit parallel to the screen or as nearly parallel as p...

Page 17: ...s looking The user can use the device look away and come back and NuPoint should be tracking as it had from the beginning No more bobbing around to get the cursor aligned For users who have significan...

Page 18: ...above the top edge middle of the screen Paused will be displayed on a red off screen key or Active will be displayed on a green off screen key Using the Pause Resume Key You can also select Pause Res...

Page 19: ...he color currently selected Use the Up and Down arrows to the left of the color box to adjust the lightness and darkness of the selected color As you use the arrows the pointer between the arrows move...

Page 20: ...olor 1 6 To save a color you create to apply to other items select Save New Custom Color and then select Custom Color 1 Custom Color 2 Custom Color 3 Custom Color 4 Custom Color 5 or Custom Color 6 Th...

Reviews: