background image

Optical Headpointer for the

Liberator, DeltaTalker, AlphaTalker, AlphaTalker II, Light Talker and IntroTalker

Optical Headpointer

Mounting Instructions

PRENTKE ROMICH COMPANY

World Headquarters:

1022 Heyl Rd. • Wooster, Ohio 44691

Telephone:  (330) 262-1984

Fax:  (330) 263-4829

E-Mail Address:  info@prentrom.com

Web Site Address:  www.prentrom.com

European Headquarters

Prentke Romich Europe Ltd

Whitegates • Swinstead • Grantham • Lincs.• NG33 4PA • UK.

Fax:  44 1476 550357

E-Mail Address: preltd@aol.com

Summary of Contents for Optical Headpointer

Page 1: ...nstructions PRENTKE ROMICH COMPANY World Headquarters 1022 Heyl Rd Wooster Ohio 44691 Telephone 330 262 1984 Fax 330 263 4829 E Mail Address info prentrom com Web Site Address www prentrom com European Headquarters Prentke Romich Europe Ltd Whitegates Swinstead Grantham Lincs NG33 4PA UK Fax 44 1476 550357 E Mail Address preltd aol com ...

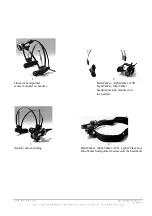
Page 2: ...r DeltaTalker AlphaTalker ATII center mounted on headset LightTalker IntroTalker headpointer side mounted on the headset 3 4 Another side mounting DeltaTalker AlphaTalker ATII Light Talker and IntroTalker headpointer mounted on the headband ...

Page 3: ...ointer in illustrations 2 3 and 4 on the facing page The longer thin round end points toward the keyboard on your device Both kinds of headpointers can be mounted on either the headset or the headband On the headset the headpointer can be mounted either on one of the sides or on the top center In illustrations 2 and 3 the headpointer is mounted to the side of the headset In illustration 1 it is mo...

Page 4: ...Clamp Side mounting Cable holder bracket with nut and screw Mounting screw for cable strain relief and Mounting plate for Center Mount Attach bracket to earpiece Attach clamp to bracket and tighten screw ...

Page 5: ...e of the headset and the top screw attaches to the clamp Attach the Bracket Attach the bracket to the earpiece on either side of the headset Place the shaft of the screw that is on the bottom side of the bracket into the hole that is designed for it on the earpiece see illustration on facing page Turn the screw until it is tight against the bracket Later you can loosen the screw a few turns if you...

Page 6: ... Mounting plate Mounting screw Cable Holder Nut and screw ...

Page 7: ... shaft of the screw will now be poking up through the holes in the mounting plate Find the clamp Place the hole in the clamp on top of the mounting screw Using the Phillips screwdriver tighten the black screw until the clamp and the mounting plate are secure on the metal band You can also attach the cable holder now The cable holder is designed to work with the center mount It holds the cable and ...

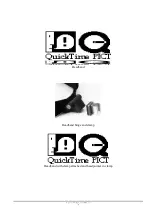
Page 8: ... Connect cable to regular headpointer Cable is already connected to Liberator headpointer ...

Page 9: ...ration on facing page into the back of the headpointer Plug the other end of the cable aid in the connector labeled either DUAL or HEADPOINTER on your communication aid For the Liberator The Liberator headpointer already has the cable attached to it Just plug the other end of the cable into the connector marked INFRARED SENSOR on the left side panel of your Liberator 1 Recommendation We recommend ...

Page 10: ... Regular headpointer mounted in clamp on headband long thin end points toward keyboard Gray dot on Liberator headpointer must always point down towards the floor ...

Page 11: ...ward the keyboard For the Liberator The Liberator headpointer has a small gray dot on the back of the fat round end of the pointer See bottom illustration on facing page When you snap the headpointer into the clamp this dot must be pointing toward the floor When the headpointer is in the clamp correctly you will not be able to see the dot unless you look underneath the headpointer 1 Recommendation...

Page 12: ... Headband Headband hinge and clamp Headband with clamp attached and headpointer in clamp ...

Page 13: ... it can rest on the head of the person using the headpointer Use the Velcro strap to loosen or tighten the headband You can position the headband so that the headpointer is almost anywhere on the head Just remember that the pointing end of the headpointer must face the keyboard of the communication aid You can remove the clamp and re position it by prying the two dual lock squares apart Pull gentl...

Page 14: ...me with your headband Screw these screws in from the back of the headband so the shaft of the screw is not against the user s head Place the nuts over the end of the screws and tighten them Place the mount vertically over the mounting plate Screw the remaining 2 screws into the hole on each end of the mount Remember put the screws in from the back of the headband Screw an acorn nut over each screw...

Page 15: ... headband to a vertical mount You will need a common screwdriver to remove the flathead screws in the mount You will remove the mount turn the adapter plate from horizontal to vertical attach the screws and then replace the mount vertically on the adapter plate The pictures on the facing page show how to change the mount ...

Page 16: ... Liberator headpointer Headpointer stem unscrewed and connector removed from stem Unplugged connector discard this part Plug new cable into remaining connector ...

Page 17: ...ires are attached to the bottom of this connector The rest of the headpointing wires are attached to the top of the connector Using your fingernails pull the very bottom part of the connector away from the top part of the connector See bottom illustration on facing page The cable should now be disconnected from the connector Throw the old cable away Plug the white connector end of the new cable in...

Page 18: ... ...

Reviews: