background image


LAUNDRY CABINET 
WITH ABS SINK

GABINETE PARA 
FREGADERO EN ABS

INSTALLATION GUIDE 
AND USER MANUAL

GUÍA DE INSTALACIÓN 
Y MANUAL OPERATIVO

Model No. QL058

Rev. 20200416

Summary of Contents for QL058

Page 1: ...LAUNDRY CABINET WITH ABS SINK GABINETE PARA FREGADERO EN ABS INSTALLATION GUIDE AND USER MANUAL GUÍA DE INSTALACIÓN Y MANUAL OPERATIVO Model No QL058 Rev 20200416 ...

Page 2: ...ing installation 5 All holes drilled into the unit must be done from the finished surface side with extreme care and caulked very carefully to form a watertight barrier MANUFACTURER S REQUIRED MINNESOTA DISCLOSURE IMPORTANT HEALTH NOTICE SOME OF THE BUILDING MATERIALS USED IN THIS HOME OR THESE BUILDING MATERIALS EMIT FORMALDEHYDE EYE NOSE AND THROAT IRRITATION HEADACHE NAUSEA AND A VARIETY OF AST...

Page 3: ...his product costs incurred for labour or materials removal and installation of replacement units or any other incidental or consequential damages Costs relating to obtaining access for repair or replacement are the responsibility of the user Our obligation shall be limited to the repair or replacement of a unit at our discretion that may prove by our sole examination to be defective under normal u...

Page 4: ...S MATERIALS REQUIRED NOT SUPPLIED Adjustable wrench Needle nose pliers Phillips screwdriver Utility knife Pipe wrench Sealant Carpenter s level Hacksaw Safety gloves Safety goggles PARTS REQUIRED NOT SUPPLIED Tail Pipe P Trap Supply lines ...

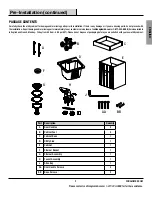
Page 5: ...rt damage and or missing parts immediately to our customer service team at cs conglomkb com or 1 877 333 0098 Service available in English and French Monday Friday from 8 30 am 5 00 pm EST Please do not dispose of packaging before you are satisfied with your new utility cabinet AA A B C D E F H G BB J Part Description Quantity A Door Handles 2 B Cabinet Feet 4 C Cabinet Base 1 D Utility Sink 1 E C...

Page 6: ...NDLE INSTALLATION Insert the door handle screws AA into the pre drilled holes on each door Attach the door handles A and hand tighten the door handle screws AA Repeat on other door A AA CAUTION Do not place side load onto feet when rotating the cabinet E B BB C DOOR POSITION ADJUSTMENT If the doors need to be repositioned the hinges can be adjusted to ensure a precise fit with the cabinet 1 The la...

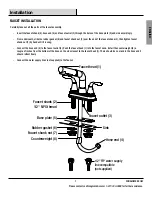
Page 7: ...aucet shank 2 then tighten faucet shank nut 7 by hand until it is snug Connect the hose end 4 to the faucet outlet 3 Push the faucet head 1 into the faucet neck Install the counterweight 8 a couple of inches from the bottom of the hose on the side closest to the faucet head 1 There should be no slack in the hose and it should retract freely Connect the water supply lines not supplied to the faucet...

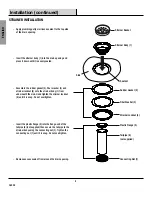
Page 8: ...y 1 from underneath the sink Hand tighten the strainer locknut 4 until it is snug Do not overtighten Insert the plastic flange 5 into the flange end of the tailpipe 6 not supplied then secure the tailpipe to the strainer body using the connecting nut 7 Tighten the connecting nut 7 until it is snug Do not overtighten Remove excess sealant from around the drain opening Strainer Body 1 Sealant Sink R...

Page 9: ...the wall using hardware best suited for your wall type Failing to do so could result in property damage or personal injury Use silicone sealant to seal the sink to the wall and any adjacent surfaces to keep those surfaces dry Failing to do so could result in moisture damage DRAINAGE The tailpipe not supplied previously installed to the drain can now be connected to your household plumbing In some ...

Page 10: ...g 2 remain in the faucet Click in the new cartridge Place the washer 5 back in its original position Screw on the cartridge cover 6 Do not over tighten Place the handle 9 over top and secure the screw 8 with an hex key reinsert the water indicator 7 Turn the water supply to the faucet back on Operate the faucet to make sure everything works correctly and check for leaks Faucet body 1 Spring 2 Gask...

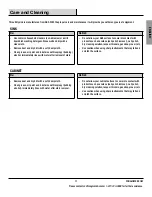
Page 11: ...water after removal of stain Do not allow your ABS surface to come into contact with products such as acetone nail polish remover nail polish dry cleaning solution lacquer thinners gasoline pine oil etc Use caution when using sharp instruments that may fall and scratch the surface CABINET Do Do Not Remove dust and dry dirt with a soft damp cloth Clean grease oil paint and ink stains with isopropyl...

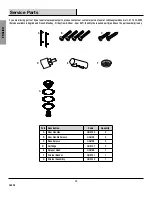
Page 12: ...3 0098 Service available in English and French Monday Friday from 8 30am 5pm EST Identify the required part s and have the part number s ready A D G E F B C Part Description Code Quantity A Door Handles QHS158 2 B Door Handle Screws QHL104 4 C Base Screws QHL108 2 D Cartridge QHS137 2 E Sprayer Head QHL160 1 F Strainer Basket QHS101 1 G Strainer Assembly QHS149 1 ...

Page 13: ...instalación para evitar daños 5 Todos los agujeros perforados deben ser hechos por la parte superior externa con extremo cuidado y calafatear cuidadosamente para formar una barrera impermeable DIVULGACIÓN REQUERIDA POR EL FABRICANTE DE MINNESOTA IMPORTANTE AVISO DE SALUD ALGUNOS DE LOS MATERIALES DE CONSTRUCCIÓN UTILIZADOS EN ESTA VIVIENDA O ESTOS MATERIALES DE CONSTRUCCIÓN EMITEN FORMALDEHÍDO SE ...

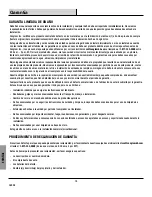
Page 14: ...azo ni ningún otro daño incidental o consecuente Los costos relacionados con la reparación o el reemplazo son la responsabilidad del usuario Nuestra obligación se limita a la reparación o reemplazo de una unidad a nuestra discreción que pueda comprobarse únicamente al examinarla por nosotros que tiene defectos bajo un uso y servicio normal durante el periodo de garantía Cualquier fallo de este pro...

Page 15: ...Preinstalación HERRAMIENTAS MATERIALES REQUERIDOS NO SUMINISTRADOS Llaves Alicates Desarmador en cruz Cuchillo de uso general Llave de tubos Sellador de silicona Nivel de carpintero Sierra de mano Guantes de seguridad Gafas de seguridad PIEZAS REQUERIDAS NO SUMINISTRADAS Tubo final P Trampa Mangueras de alimentación ...

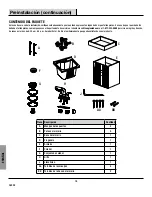
Page 16: ...rvicio al cliente vía cs conglomkb com o al 1 877 333 0098 servicio en inglés y francés de lunes a viernes de 8 30 a m A 5 p m hora del Este No tire el embalaje hasta que quede satisfecho con el producto AA A B C D E F H G BB J Pieza Descripción Cantidad A Manijas de las puertas 2 B Patas del armario 4 C Base del armario 1 D Fregadero 1 E Armario 1 F Colador 1 G Conjunto de colador 1 H Grifo 1 J L...

Page 17: ...ado INSTALAR LAS MANIJAS DE LAS PUERTAS Inserte los tornillos de las manijas AA en los orificiosde cada puerta Coloque las manijas A y apriete los tornillos AA Repita la misma operación en la otra puerta A AA PRECAUCIÓN No ponga todo el peso sobre las patas laterales cuando lo coloque su lugar E B BB C AJUSTE DE LA POSICIÓN DE LAS PUERTAS Si necesita reubicar las puertas ajuste las bisagras para g...

Page 18: ... quede bien justada Conecte el extremo de la manguera 4 a la salida del grifo 3 Empuje la cabeza del grifo 1 dentro del cuello del mismo Instale el contrapeso 8 a un par de pulgadas respecto a la parte inferior de la manguera en el lado más cercano al cabeza del grifo 1 No debe haber holgura en la manguera y debe retraerse libremente Conecte la línea de abastecimiento de agua no incluida al grifo ...

Page 19: ...ción 3 y la contratuerca 4 en el cuerpo del colador 1 por debajo del fregadero Ajuste la contratuerca 4 del colador manualmente No la apriete demasiado Inserte la brida de plástico 5 en el extremo de la brida del tubo de escape 6 no incluido y luego asegure el tubo de escape al cuerpo del colador con la tuerca de conexión 7 Ajuste la tuerca de conexión 7 manualmente No la apriete demasiado Retire ...

Page 20: ...na para sellar el fregadero a la pared y cualquier superficie adyacente y así mantener dichas superficies secas No hacerlo podría provocar daños por humedad DRENAJE Ahora puede conectar a la tubería doméstica el tubo de escape no incluido instalado previamente en el drenaje En algunos casos la plomería de su hogar tendrá que ser modificada para que el drenaje sea adecuado De ser así contrate a un ...

Page 21: ...nta 3 y el resorte 2 permanezcan en el grifo Haga clic en el nuevo cartucho Coloque la junta 5 y coloque a su posición inicial Enrosque la tapa del cartucho 6 No apriete en exceso Coloque la manija 9 en la parte superior y asegure el tornillo 8 con una llave hexagonal vuelva a colorcar el indicador de agua 7 Abra nuevamente el suministro de agua del grifo Opere el grifo para asegurarse de que todo...

Page 22: ...tre en el contacto con productos como la acetona quitaesmalte esmalte de uñas solución de limpieza en seco thinners gasolina aceite de pino etc Tenga precaución cuando utilice instrumentos afilados que puedan caer y rasguñar la superficie ARMARIO Hacer No hacer Elimine el plvo y la suciedad seca con un paño suave y húmedo Limpie la grasa aceite pintura y manchas de tinta con isopropílico alcohol p...

Page 23: ... llamé al 1 877 333 0098 de 8 30 am 5 pm hora del este de lunes a viernes Identifique la s parte s requerida s y tenga el número s de pieza a la mano A D G E F B C Pieza Descripción Código Cantidad A Manijas de las puertas QHS158 2 B Tornillos de las manijas QHL104 4 C Tornillos de la base del armario QHL108 2 D Cartucho de cerámica QHS137 2 E Difusor del grifo QHL160 1 F Colador QHS101 1 G Conjun...

Page 24: ...tado por St Laurent Québec H4S 2C3 1 877 333 0098 cs conglomkb com Service available in English and French Monday Friday from 8 30am 5pm EST servicio disponible en inglés y francés de lunes a viernes de 8 30 am a 5 00 pm hora del Este www conglomkb com ...

Reviews: