background image

12

2. PERFORMING A TEST with your Presidium Multi Tester III 

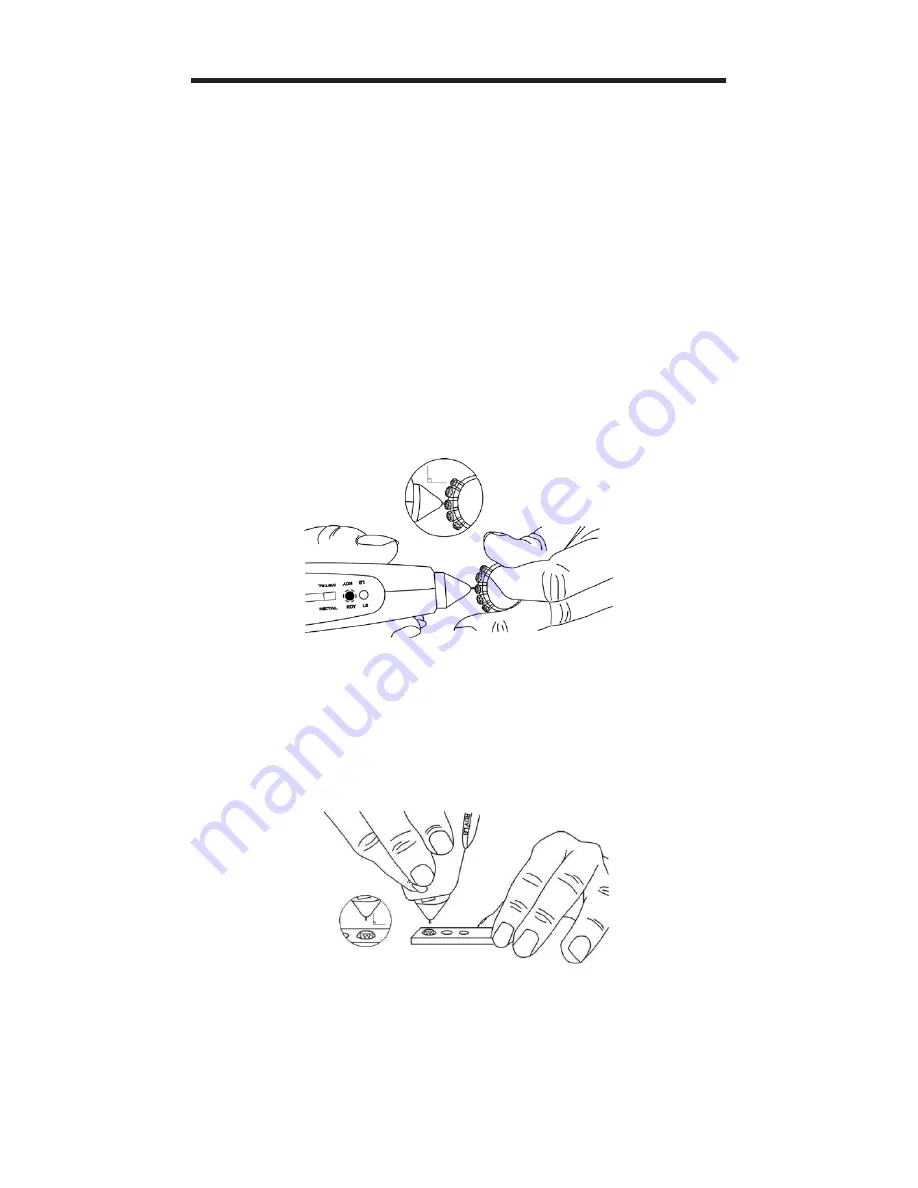
Place the tip of the probe pen against the gemstone and 

press the test button. Apply sufficient pressure on the tip 

for correct reading.

For mounted jewelry or gemstones: 

Hold the jewelry or gemstone with one hand and the  

tester with the other hand 

(Fig. 2.1).

 For proper 


operation of the tester, the thumb and index finger must 

always be placed on the metal-plated serrated part  

located on both sides of the tester at all times. Care 

should be taken when testing mounted jewelry. User 

must ensure that the stones are securely mounted before 

conducting a test as gap between stone and setting might 

lead to inaccurate reading.

Fig. 2.1

Fig. 2.2

For testing loose gemstones: 

Place the gemstone on the metal stone rest and hold the 

metal stone rest with one hand while holding the tester 

with the other hand 

(Fig. 2.2). 

Tips for using your Presidium Multi-Tester III

The probe tip must be placed at a right angle or 

perpendicular to the facet of the gemstone for an 

accurate reading. 

Summary of Contents for Multi-Tester III

Page 1: ...1...

Page 2: ...1 Presidium Multi Tester III PMuT III User Handbook English...

Page 3: ...lti Tester III pg 05 IV IMPORTANT NOTICE pg 07 1 GETTING STARTED with your Presidium Multi Tester III pg 08 2 PERFORMING A TEST with your Presidium Multi Tester III pg 12 3 READING TEST RESULTS on you...

Page 4: ...sponsible for any damage or loss resulting from the use of this tester or handbook and under no circumstances shall Presidium its manufacturer or any of its subsidiaries licensors distributors reselle...

Page 5: ...ou need to know about how to use your tester accurately and take care of it in line with its requirements Please read these instructions carefully and keep them handy for future reference This book al...

Page 6: ...orting tests This tester was designed with the following objectives Help in the identification of diamonds and moissanite with a single instrument Provide fairly consistent and reliable test results u...

Page 7: ...tor LED 3 Display Panel 4 Battery Compartment 5 Adaptor Inlet 6 ON OFF Switch 7 Ergonomic Grip 8 Probe Protective Cap Included in your package Presidium Multi Tester III Metal stone rest User handbook...

Page 8: ...can damage or shorten the life of the tester damage batteries and warp or melt certain plastics Do not use store or expose the tester in cold areas When the tester returns to its normal temperature mo...

Page 9: ...ig 1 1 and the other end directly into an electrical outlet Please ensure that only the adaptor supplied by Presidium is used If batteries are used 3 x AAA batteries take note of the positive and nega...

Page 10: ...ocated at the back of the tester Fig 1 4 and wait for about 20 seconds to warm up the instrument Fig 1 3 Fig 1 4 Fig 1 5 While in this preparation mode a Green light will blink continuously The light...

Page 11: ...ting conditions The gemstone should be clean and dry before testing However elaborate cleaning procedures are not normally necessary Fig 1 6 Fig 1 6 The recommended testing temperature is 18 C 27 C or...

Page 12: ...e with new batteries as soon as the low battery indicator lights up or starts to blink A test should not be performed when the battery power is low or weak Batteries do not have to be removed when the...

Page 13: ...plated serrated part located on both sides of the tester at all times Care should be taken when testing mounted jewelry User must ensure that the stones are securely mounted before conducting a test a...

Page 14: ...To achieve optimum accuracy for tests involving very small gemstones 10 points and below it is important to allow the gemstone to cool down before subsequent tests It is advisable to take multiple re...

Page 15: ...bic zirconia will not give any reading on the tester 2 Yellow LED lights up Moissanite is detected 3 Green LED lights up Diamond is detected with a continuous audible beep Metal is detected with an in...

Page 16: ...batteries in the battery compartment as the batteries may corrode leak or damage the tester Batteries should be removed when the tester is expected to be stored for an extended period of time Your tes...

Page 17: ......

Page 18: ......

Reviews: