background image


62 Prestigio 

Aero 

1214


ENG 

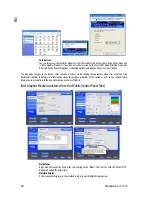
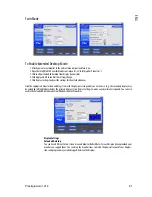
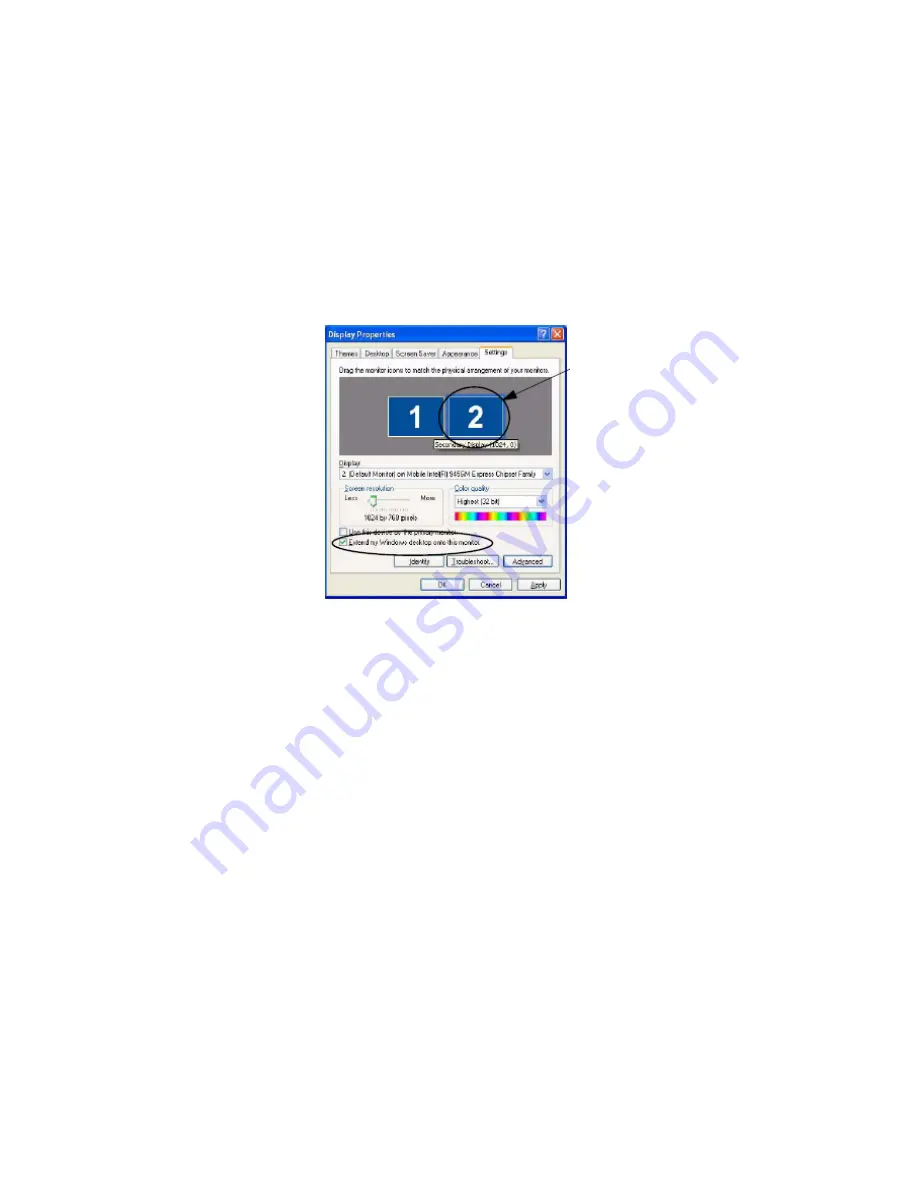
To Enable Extended Desktop (Display Properties) 

1. Attach your external monitor to the external monitor port (or TV to the 7-Pin SVideo-Out Jack), and turn it on. 
2. Click Start, point to Settings (or click Control Panel) and click Control Panel (if you are in Category View choose Appearance 
and Themes). 
3. Double-click Display (icon). 
4. In the Display Properties dialog box, click Settings (tab). 
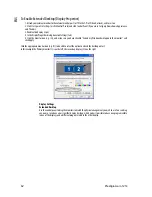
5. Click the monitor icon (e.g. (2)), and make sure you have checked “Extend my Windows desktop onto this monitor.” and 
click Apply. 

 
Click the appropriate monitor icon (e.g. (2)) to be able to select the option to extend the desktop on to it. 
In this example the Primary monitor (1) is on the left, the secondary display (2) is on the right. 


Display Settings   
Extended Desktop   

Use the control panel to drag the monitors to match the physical arrangement you wish to use. You can drag 
any icons or windows across to either display desktop, which makes it possible to have one program visible 
in one of the displays, and a different program visible in the other display. 

Summary of Contents for Aero 1214

Page 1: ...Corporation and other rights owners Use of this copyright protection technology must be authorized by Macrovision Corporation and is intended for home or other limited viewing uses only unless otherw...

Page 2: ...or modifications not expressly approved by the manufacturer for compliance with the above standards could void your authority to operate the equipment Caution Always disconnect all telephone lines fro...

Page 3: ...r adapter approved for use with this computer Your AC DC adapter may be designed for international travel but it still requires a steady uninterrupted power supply If you are unsure of your local powe...

Page 4: ...he battery is recyclable At the end of its useful life under various state and local laws it may be illegal to dispose of this battery into the municipal waste stream Check with your local solid waste...

Page 5: ...ing blocks the vent s fan intake s outlet s while the computer is in use On the Road In addition to the general safety and maintenance suggestions in this preface and Chapter Troubleshooting keep thes...

Page 6: ...it straight so that your knees hips and elbows formapproximately 90 degree angles when you are working Take periodic breaks if you are using the computer for long periods of time Remember to Alter you...

Page 7: ...jacks see Chapter Interface Ports Jacks Warning Boxes No matter what your level please pay careful attention to the warning and safety information Also please note the safety and handling instruction...

Page 8: ...cord into an outlet and connect the AC power cord to the AC DC adapter 5 Raise the lid LCD to a comfortable viewing angle and press the power button to turn the computer on 6 Adjust the LCD panel to a...

Page 9: ...chip and the fingerprint reader with Protector Suite Software provides a high level of security for your computer See Chapter Security Modules Fingerprint TPM Wireless Device Operation Aboard Aircraft...

Page 10: ...Keyboard Hot Keys The keyboard has a numerical keypad for easy numeric data input and features function keys to allow you to change operational features instantly The touchpad button and WLAN switch...

Page 11: ...is installed see Hot Key Utility Key Function Fn F1 Sleep Toggle Suspend Fn F2 Bluetooth Power Toggle Fn F5 F6 Decrease Increase LCD Brightness Fn F7 Display Toggle Fn F8 Mute Toggle Fn F9 F10 Decreas...

Page 12: ...ter Moving the battery or exposing it to shock or vibration may interrupt the battery contacts and cause the computer to shutdown System Map Left View Overheating To prevent your computer from overhea...

Page 13: ...next to DVD CD ROM drives Double click on the DVD ROM device to bring up the Properties dialogue box and select the DVD Region tab to bring up the control panel to allow you to adjust the regional cod...

Page 14: ...ovided To see all controls it may be necessary to toggle off Category View Video Features Your computer has built in Intel on board video You can switch display devices and configure display options f...

Page 15: ...splays are treated as separate devices and act as a virtual desktop Power Management Features The Power Options control panel icon in Windows allows you to configure power management features for your...

Page 16: ...VD device 9 5mm height The actual device will depend on the module you purchased see Storage The optical device is usually labeled Drive D and may be used as a boot device if properly set in the BIOS...

Page 17: ...or subject the CD or DVD to shock CD Emergency Eject If you need to manually eject a CD e g due to an unexpected power interruption you may push the end of a straightened paper clip into the emergency...

Page 18: ...n the card reader when not is use This will help prevent foreign objects and or dust getting in to the card reader PC Card Slot The computer is equipped with a PCMCIA 3 3V 5V slot for one type II PCMC...

Page 19: ...river If you are using an external mouse your operating system may be able to auto configure your mouse during its installation or only enable its basic functions Be sure to check the device s user do...

Page 20: ...the printer s USB cable to one of the USB ports on the computer 5 Windows will identify the printer and either load one of its own drivers or ask you to supply one Follow the on screen instructions P...

Page 21: ...e AC DC adapter see sidebar if you are using the optional Port Replicator 3 Raise the lid LCD to a comfortable viewing angle 4 Press the power button to turn On Battery The battery allows you to use y...

Page 22: ...n the computer is powered from an AC power source Choose the Max Battery scheme bear in mind that this scheme may slow down the overall performance of the computer in order to save power for maximum p...

Page 23: ...e battery power is almost depleted You will need to enable Hibernate mode from the Hibernate tab in the Power Options control panel The system will resume from Hibernate mode by pressing the power but...

Page 24: ...ill be lost when the power is depleted Recharging the Battery with the AC DC Adapter The battery pack automatically recharges when the AC DC adapter is attached and plugged into an electrical outlet I...

Page 25: ...the battery contacts and cause the computer to shutdown Battery FAQ How do I completely discharge the battery Use the computer with battery power until it shuts down due to a low battery Don t turn of...

Page 26: ...it is assigned to Drive D In addition all file extensions can be seen In this case D is the drive specified for your CD device Not all computers are setup the same way and some computers have the CD...

Page 27: ...se click Yes to choose to keep the existing newer version Updating Reinstalling Individual Drivers If you wish to update reinstall individual drivers it may be necessary to uninstall the original driv...

Page 28: ...rivers manually click the Exit button to quit the Drivers Installer application and then follow the manual installation procedure for each driver The manual installation procedure begins with instruct...

Page 29: ...6 Install CardReader Driver Yes OR Click Start menu Run and navigate Browse to D Drivers CardReader setup exe and click OK 2 Click Next 3 Click Finish TPM Trusted Platform Module 1 Click 7 Install TP...

Page 30: ...OR Click Start menu Run and navigate Browse to D Drivers Hotkey Setup EXE and click OK 2 Click Next Install 3 Click Finish Finish to restart the computer Bluetooth See install procedure in Bluetooth D...

Page 31: ...ct settings can cause your system to malfunction To correct mistakes return to Setup and restore the Setup Defaults with F9 The Power On Self Test POST Each time you turn on the computer the system ta...

Page 32: ...F2 again If you have enabled Intel On Screen Branding see Intel On Screen Branding Advanced Menu you can still click the mouse or press Enter and then choose Launch System Setup from the menu to acces...

Page 33: ...anges System Memory Main Menu This item contains information on the system memory and is not user configurable The system will auto detect the amount of memory installed Advanced Menu IDE Channel 0 Ma...

Page 34: ...e automatic external CRT display detection from this menu Disabling this item will reduce power consumption however you will need to enable the item if you want to attach an external CRT display Secur...

Page 35: ...y Menu Press Enter to create a password for access to the computer s hard disk when the computer boots up Password Protection Note that you should set a supervisor password in the BIOS to protect the...

Page 36: ...y Once the computer has turned off the battery will be fully discharged Plug in the AC DC adapter and allow the computer to fully recharge the battery You may work on your computer as the battery char...

Page 37: ...nges or Exit Discarding Changes will wipe out any changes you have made to the Setup You can also choose to restore the original Setup defaults that will return the Setup to its original state and era...

Page 38: ...pgrade These procedures involve opening the system s case adding and sometimes replacing parts You should not perform any of these upgrades if Your system is still under warranty or a service contract...

Page 39: ...tion may interrupt the battery contacts and cause the computer to shutdown Upgrading the Hard Disk Drive The hard disk drive can be taken out to accommodate other 2 5 or 1 8 Parallel PATA hard disks w...

Page 40: ...the case 8 6 Reverse the process to install any new hard disk however if you are replacing your hard disk with a hard disk of a different size from that originally provided in the bay then see overle...

Page 41: ...er and screws If you are replacing a 2 5 hard disk with a 1 8 hard disk Place the foam bottom cover inside the bay Stick the 1 8 protective gasket in the location illustrated 6 see picture below as pe...

Page 42: ...ry for details of supported module types The total memory size is automatically detected by the POST routine once you turn on your computer 1 Turn off the computer and turn it over and remove the batt...

Page 43: ...about a 30 angle and fit the connectors firmly into the memory slot 7 The module s pin alignment will allow it to only fit one way Make sure the module is seated as far into the slot as it will go DO...

Page 44: ...ircraft The use of any portable electronic transmission devices aboard aircraft is usually prohibited Make sure the module s are OFF if you are using the computer aboard aircraft Use the Fn F2 key com...

Page 45: ...oth Device User Guide View the BlueSoleil User Guides from the Help Menu or press the F1 key in the IVT Corporation BlueSoleil Main Window The Manual in Adobe pdf format is on the Device Drivers Utili...

Page 46: ...e WLAN module and check the indicator to see if the module is powered on or not Intel WLAN Driver Installation 1 Make sure the module is powered on and then insert the Device Drivers Utilities User s...

Page 47: ...fingerprint and security system Make sure you have administrator s rights to your computer and have a Windows password enabled for full security protection Before beginning the enrollment process it i...

Page 48: ...see over 23 After Initializing the TPM and setting up a user you can then initialize the TPM for use with the Protector Suite Software Help Manual Right click the taskbar icon to bring up the menu to...

Page 49: ...select Launch System Setup 3 Use the arrow keys to select the Security menu 4 Select TPM Protection and set the item to Disabled 5 Select TPM Function and set the item to Enabled or Clear Enabled if y...

Page 50: ...save your Recovery Password Reset Tokens to a removable medium e g a USB flash memory drive and that you backup this these token s and save it them in a safe location 13 Click Next you can now create...

Page 51: ...Basic User Password and click Next 5 Save a location for a Basic User Password reset file and click Next 6 Click Next to confirm the settings 7 Select the Security Platform Features you require Note M...

Page 52: ...art Programs All Programs Protector Suite QL Control Center or select the Control Center from the Biomenu or right click the taskbar icon and select Start Control Center 2 Click Settings System Settin...

Page 53: ...hen you start up your machine this is a common cause of the message Invalid system disk Replace the disk and then press any key Remove disks or other media Press any key to restart Backup and General...

Page 54: ...ly the design of the battery only allows it to go in one way Make sure there s nothing interfering with the battery contacts The battery LED power indicator is blinking orange Low Battery Plug in the...

Page 55: ...en Num Lock is turned ON see LED Indicators Other Keyboards If your keyboard is damaged or you just want to make a change you can use any standard USB keyboard The system will detect and enable it aut...

Page 56: ...his jack to record on your computer Mini IEEE 1394 Port This port allows a high speed connection to various peripheral devices e g external disk drives and digital cameras see note below Mini IEEE 139...

Page 57: ...d DVMT returns whatever memory is no longer needed to the operating system DVMT Notes DVMT is not user configurable DVMT is not local video memory DVMT will not function in MS DOS DOS uses the legacy...

Page 58: ...hemes Hot Keys etc by clicking the appropriate menu item or button Click Information button to obtain useful information about the graphics properties of the computer and see the Support tab in Inform...

Page 59: ...xe You will need to locate the actual application executable exe file not just the shortcut To find the application rightclick its shortcut on the desktop click Properties Click the Shortcut tab and s...

Page 60: ...may use Windows Display Properties control panel to configure the relative size and position Function Key Combination You can use the Fn F7 key combination to toggle through the display options Notebo...

Page 61: ...ick the appropriate monitor icon and drag it to match the physical arrangement you wish to use e g the secondary display may be extended left right above below the primary display Click Display Settin...

Page 62: ...or icon e g 2 and make sure you have checked Extend my Windows desktop onto this monitor and click Apply Click the appropriate monitor icon e g 2 to be ableto select the option to extend the desktop o...

Page 63: ...nt ID Support TPM1 2 BIOS Password HDD Password Lock BIOS One 8Mb Flash ROM Phoenix BIOS LCD Options 12 0 XGA 1024 768 Flat Panel TFT LCD Video Adapter Intel 945GMS Integration Intel Graphics Media Ac...

Page 64: ...ry Pack 5200mAH 38 48W 10 Cell Smart Lithium Ion Battery Pack 13000mAH 96 2W Environmental Spec Temperature Operating 5 C 35 C Non Operating 20 C 60 C Relative Humidity Operating 20 80 Non Operating 1...

Reviews: