background image

14

PRESTIGIO CAVALIERE 143

ENG

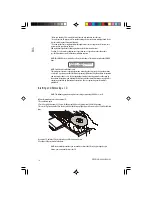
* Make sure that the CD is correctly inserted into the tray, and then close the tray.
* Do not leave the CD tray open. Also, avoid touching the lens in the tray with your hand. If the
lens becomes dirty, the CD may malfunction.
* Do not wipe the lens using materials with rough surface (such as paper towel). Instead, use a
cotton swab to gently wipe the lens.
FDA regulations require the following statement for all laser-based devices:
“Caution, Use of controls or adjustments or performance of procedures other than those
specified herein may result in hazardous radiation exposure.”

NOTE: The CD/DVD drive is classified as a Class 1 laser product. This label is located on the CD/DVD
drive.

NOTE: For DVD and Combo drives only.
This product incorporates copyright protection technology that is protected by method claims
of certain U.S. patents and other intellectual property rights owned by Macrovision Corporation
and other rights owners. Use of this copyright protection technology must be authorized by
Macrovision Corporation, and is intended for home and other limited viewing uses only unless
otherwise authorized by Macrovision Corporation. Reverse engineering or disassembly is
prohibited.

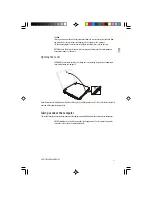
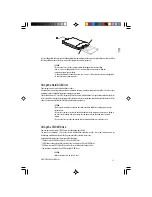
Inserting and Removing a CD

NOTE: The following procedure applies to inserting or removing a DVD disc as well.

Follow this procedure to insert or remove a CD:
1. Turn on the computer.
2. Press the eject button and the CD tray will slide out partially. Gently pull on it until it is fully extended.
3. To insert a CD, place down the CD in the tray with its label facing up. Slightly press the center of the CD until it clicks into
place.

To remove a CD, hold the CD by its outer edge and lift it up from the tray.
4. Gently push the tray back into the drive.

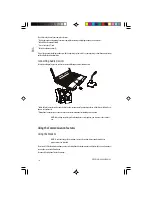
NOTE: In the unlikely event that you are unable to release the CD tray by pressing the eject
button, you can manually release the CD.

Summary of Contents for Cavaliere 143

Page 1: ...G Prestigio Cavaliere 143 Notebook Computer User s Manual August2004 TRADEMARKS Allbrandandproductnamesaretrademarksorregisteredtrademarksoftheirrespectivecompanies NOTE Theinformationinthismanualissu...

Page 2: ...Ferritecore s option ThisUser sManual Inspectalltheitems Ifanyitemisdamagedormissing notifyyourdealerimmediately Keeptheshippingcartonandpackingmaterialsincaseyouneedtoshiporstorethecomputerinthefutur...

Page 3: ...using battery power see Chapter 3 Opening the Cover CAUTION Be gentle when opening and closing the cover Opening it vigorously or slamming it shut could damage the computer Openthetopcoverbyslidingthe...

Page 4: ...ide Components Ref Component Description 1 VGAPort Connects an external monitor 2 Ventilation Openings Do not cover or block the ventilation openings for air circulation thus preventing overheating 3...

Page 5: ...as a scanner printer DVCAM VCR and more 3 Audio Output Connector Connects a set of headphones external speakers with amplifier or an audio recording device 4 Microphone Connector Connects an external...

Page 6: ...ce of the computer 6 Wireless LAN Indicator Glows green when system is ready for WLAN connection 7 Battery Charge Indicator Glows green when the battery is fully charged and connected to AC power Glow...

Page 7: ...cific functions The Backspace key moves the cursor left one space and deletes the character in that space Pressing Fn and this key toggles the Num Lock on and off When on light on the Num Lock activat...

Page 8: ...means any character typed will overwrite the text in the current cursor position Deletes the character to the right of the cursor and moves the following text left one space Numeric Keypad A15 keynume...

Page 9: ...functionsareassignedtoF1 F3 F4 F5 F6 F7 F8 F10 F11 andF12byyourcomputer See HotKeys laterinthis chapterforinformation Fn Key TheFnkey atthelowerleftcornerofthekeyboard isusedwithanotherkeytoperformthe...

Page 10: ...UTION Do not use a sharp object such as a pen on the touchpad Doing so may damage the touchpad surface NOTES Be sure to enable the touchpad on the BIOS Setup see Advanced Menu in Chapter 5 The touchpa...

Page 11: ...croll To scroll is to move up and down or left and right in the working area on the screen Use the scroll button located between the left and right buttons to press on the four corners to move in the...

Page 12: ...2DD 720 KBfloppy disksorhigh density 2HD 1 44 MBfloppydisks Noticethatbothtypesoffloppydiskhaveanarrowimprintedonthefront upperleftcorner andaslidingwrite protecttabonthebottomleftcorner asillustrate...

Page 13: ...cuitrynecessaryforoperationdirectlyontothedriveitself This allowsthedrivemanufacturertocarefullyoptimizedriveperformance CAUTION Make regular backups of your data files from your hard disk drive to fl...

Page 14: ...protected by method claims of certain U S patents and other intellectual property rights owned by Macrovision Corporation and other rights owners Use of this copyright protection technology must be a...

Page 15: ...on in the Power Management Properties Thus the computer does not enter Standby or Hibernation mode when the LCD is closed Configuring the Display Modes NOTES To take advantage of the enhanced video ca...

Page 16: ...hexternalaudiodevices AudioOutputConnectorcanbeconnectedtotheline inconnectorofpoweredspeakerswithbuilt inamplifiers head phones orearphoneset MicrophoneConnectorcanbeconnectedtoanexternalmicrophonefo...

Page 17: ...fer from the one shown When using communication software you may have to disable power management Set the COM port of the modem to COM3 Set parameters such as modem speed baud rate and line type pulse...

Page 18: ...hecomputermanufacturer contactyourdealer forthecorrectdrivertouse Configuring the WLAN Afterdriverinstallation youcanusetheWLANutilitytoconfigureandmonitoryourWLANconnection Ifyouareusing WindowsXP yo...

Page 19: ...When you press the power button DependsonyoursettingsinWindows Hibernation NOTE Make sure that the hibernation feature is enabled in the Hibernate tab of the Power Options Properties from the Control...

Page 20: ...ctricaloutlet 4 Tousethemonitor turnonthemonitorbeforeturningonthecomputer 5 Themonitorshouldrespondbydefault Ifnot youcanswitchthedisplaytothemonitorortoboth simultaneousdisplay ortomulti displaybypr...

Page 21: ...devicecabletotheIEEE1394aportofthesystem Using PC Cards YourcomputerhasaPCcardslot PCcardsarecreditcard sizedperipheralproductsbasedonthestandardsdevelopedbyPCMCIA PersonalComputerMemory CardInternati...

Page 22: ...illslideoutslightly 4 Pullthecardoutoftheslot Internal Components Upgrade YoucanupgradeyourcomputerbychangingtheCPUoraddingmemory However toavoiddamageduringtheinstallation procedure pleaseaskyourdeal...

Page 23: ...neisthemenubarcontainingthetitlesoftheavailablemenus Eachmenutitlebringsaspecificmenu Thecenterleftcolumnofthemenucontainsinformationregardingthecurrentsettingsofthesystem Ifyouopenapull downmenuandse...

Page 24: ...MDrive andFloppyDiskDrive Thedefault settingisHardDisk FloppyDiskDrive thenCD ROMDrive NOTES If you enable the item LAN Boot under Advanced menu then system will boot from the LAN server first before...

Page 25: ...abled Defaultsettingisenabled LANBootenablesordisablessystemfrombootingfromtheLANserverfirst Acheckmarkindicatesenabledwhileunderline _ indicatesdisabled Defaultsettingisdisabled WakeonLAN Ring enable...

Page 26: ...erunningSCU SaveChangessavesthechangesyouhavemadewithoutexitingSCU Caring for the Computer Takinggoodcareofyourcomputerwillensureatrouble freeoperationandreducetheriskofdamagetoyourcomputer Protecting...

Page 27: ...Forexample donotplacethecomputeronabed sofa rug orothersimilarsurface Otherwise overheatingmayoccurthatresultsindamagetothecomputer Keepthecomputeratleast13cm 5inches awayfromelectricalappliancesthatc...

Page 28: ...ing Computerproblemscanbecausedbyhardware software orboth Whenyouencounteranyproblem itmightbeatypical problemthatcaneasilybesolved Preliminary Checklist Herearehelpfulhintstofollowbeforeyoutakefurthe...

Page 29: ...releasethetray 3 Pullthetrayoutuntilfullyextended andthenremovetheCD Display Problems Nothingappearsonthescreen Duringoperation thescreenmayautomaticallyturnoffasaresultofpowermanagement Pressanykeyto...

Page 30: ...rethatthereisenoughspaceleftonthefloppydisk Makesurethatthefloppydiskisnotphysicallydamaged Thediskdrivecannotreadafloppydisk Makesurethatthefloppydiskisformatted Makesurethatyouarereadingthecorrectdr...

Page 31: ...kesurethattheWLANfeatureisturnedon Transmissionqualityispoor Yourcomputermaybeinanout of rangesituation MoveyourcomputerclosertotheAccessPointoranotherWLANdevice itisassociatedwith Checkifthereishighi...

Page 32: ...ThecomputerdoesnotenterStandbyorHibernationmodeautomatically Ifyouhaveaconnectiontoanothercomputer thecomputerdoesnotenterStandbyorHibernationmodeiftheconnection isactivelyinuse MakesurethattheStandb...

Page 33: ...estartyourcomputer Themessage Operatingsystemnotfound appearsonthescreenafteryouturnonthecomputer Makesurethatthereisnofloppydiskinthefloppydiskdrive Ifthereis removeitandrestartthesystem Ifthismessag...

Page 34: ...ularly theprogrammaybeaccessingdataandpreventingyoufrom usingthekeyboard Ifyouaresuretheoperationhasstoppedandyoucannotusethe restart functionoftheoperating system resetthecomputer Resetthecomputerbya...

Page 35: ...utton Storage Floppy disk drive 3 5 inch 1 44 MB USB optional external device Hard disk drive 2 5 inch 9 5 mm high IDE Ultra DMA 66 100 support CD DVD CD RW 24xCD ROM DVD RW Combodrive 8xDVD ROM optio...

Page 36: ...36 PRESTIGIOCAVALIERE143 ENG Notes...

Reviews: