background image


Prestigio Nobile 1440W 

41 

РУС 

Модернизация системной памяти   

При увеличении объема динамической памяти компьютера многие программные приложения смогут «работать» гораздо 
быстрее. В Вашем компьютере имеются два разъема для памяти DDR2, расположенные под крышкой системного блока. 
Вы можете увеличить объем памяти, заменив имеющийся модуль модулем нового поколения (например, SODIMM) 
большей емкости. Модуль SODIMM может иметь объем в 256MB, 512MB или 1024MB. SODIMM является модулем типа 
DDR2 SDRAM с 200 контактами и напряжением в 2.5V. Модуль SODIMM должен соответствовать типу DDR2 SDRAM, иметь 
200 контактов и питание 1.8V. 


Предупреждение

: Модернизация модулей памяти достаточно сложный процесс. Следуйте 

приведенным инструкциям или обратитесь в сервисный центр. На любые неполадки, вызванные 
неверными действиями в ходе замены, гарантийные обязательства производителя не 
распространяются. 
 

Предупреждение

: Замена модуля памяти в момент, когда компьютер находится в режиме 

ожидания или режиме экономии электропитания может привести к повреждению его компонентов. 
Убедитесь, что питание компьютера отключено, а шнур питания отсоединен от розетки. 
 

Предупреждение

: При модернизации необходимо использовать только те модули, которые 

одобрены производителем или рекомендованы дилером. В противном случае могут иметь место 
сбои в работе системы. 

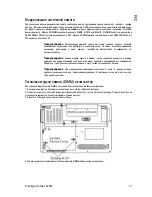
Установка модуля памяти (DIMM) в компьютер   

Для установки модуля памяти DIMM в системный блок следуйте приведенным инструкциям: 
1. Выключите компьютер. Отключите шнур питания и все кабели. Извлеките батарею. 
2. Поместите свою руку на любой крупный металлический объект для снятия статического заряда. Поместите ноутбук на 
устойчивую поверхность и полностью закройте крышку дисплея. 
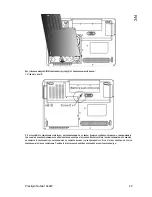
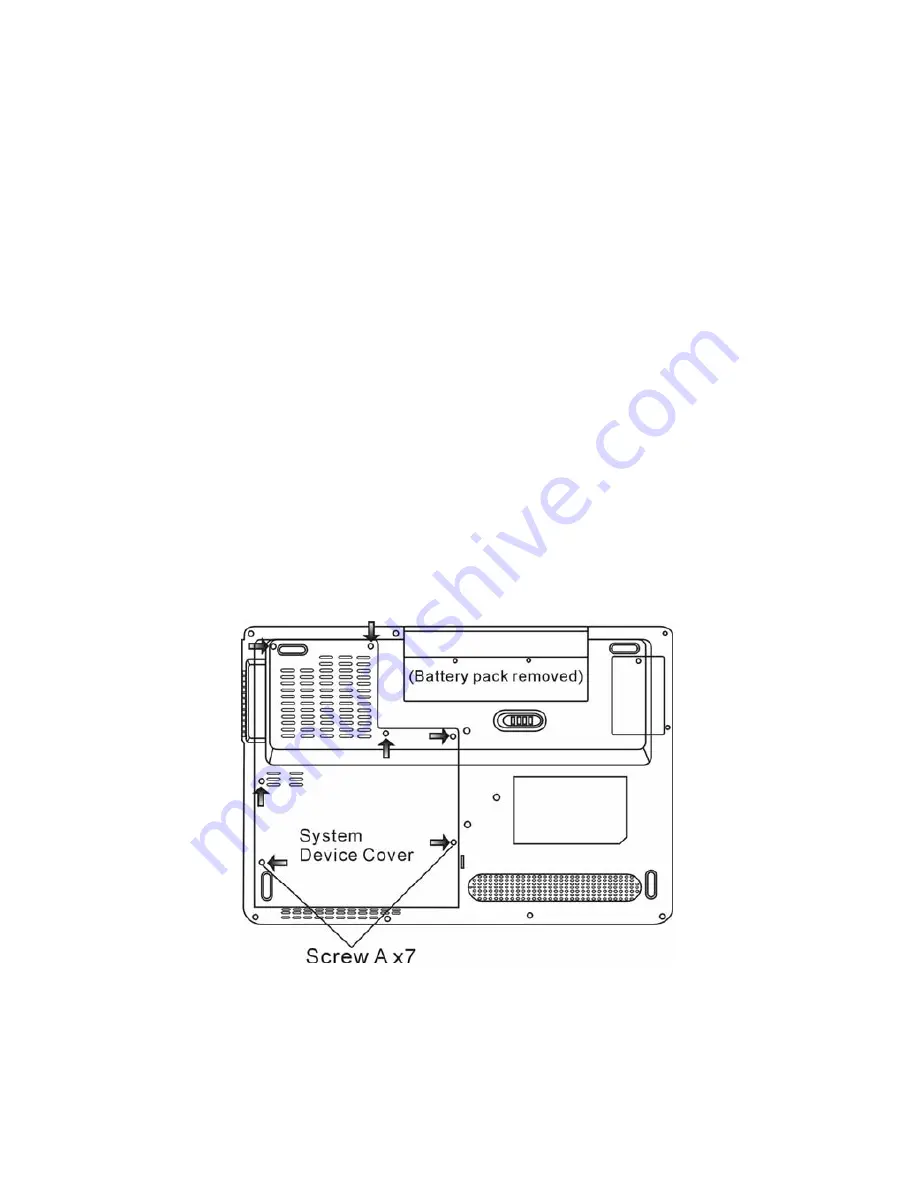
3. Отвинтите 7 винтов А на крышке системного блока. 


4. Снимите крышку системного блока. Разъемы памяти DIMM изображены на иллюстрации.   

Summary of Contents for Nobile 1440W

Page 1: ...Nobile 1440W...

Page 2: ...d Microsoft and Windows are registered trademarks of Microsoft Corporation DOS Windows 95 98 ME 2000 NT XP are trademarks of Microsoft Corporation Product names mentioned herein may be trademarks and...

Page 3: ...s specific instructions commentary sidelights or any additional information or notes that you should be aware of Warning Text in this format and symbol means that failures to comply with the given ins...

Page 4: ...l outletshould not exceed the fuse rating Do not connect other AC adapter to your notebook This Notebook uses exclusively the AC adapter Lishin 0335A2065 65W Lishin 0335C2065 65W Liteon PA 1650 01 65W...

Page 5: ...dule allows you to watch high quality digital broadcast TV on your notebook computer Instant On Multimedia Player Optional With a touch of the button you can quickly launch the unique Instant On multi...

Page 6: ...1394a and USB2 0 ports In addition to a full array of built in I O ports the computer offers IEEE1394 for ultra high speed connection to high bandwidth digital video devices and USB2 0 ports to connec...

Page 7: ...the system power state battery charging state Instant On Suspend state and the WLAN switch enabling and disabling See the LED Status Indicator Section for details 3 Keyboard The keyboard is used to en...

Page 8: ...e system is in Windows pressing the key enables the system to lower its power usage therefore the fan speed is reduced to achieve lowest operating noise When Silent Mode is enabled the LED status indi...

Page 9: ...age the display 1 Wireless On Off Switch Use the Switch to disable or enable the Wireless function When Wireless LAN function is enabled the LED status indicator shows steady green light 2 Ventilation...

Page 10: ...he DC out jack of the AC Adapter connects here and powers the computer 4 Modem Port Port or Antenna Connector for DVB T Digital Broadcast TV Optional Device This is where you plug the phone jack RJ 11...

Page 11: ...3 5 mm diameter is where you connect the headphones or external speakers Alternatively you may connect the S PDIF output to an external DTS AC3 or PCM sound processor decoder in your home stereo syst...

Page 12: ...urce for the notebook Slide the battery latch to release the battery pack 2 Ventilation Grill The fan grill is where air is exchanged to dissipate the internal heat Do not block this airway completely...

Page 13: ...lt in speakers output the sound in stereo 5 DVB T Receiver Module Cover The optional DVB T Receiver module is installed under the cover Please see the corresponding chapter if you are installing the D...

Page 14: ...stem Power Status Indicators LED Graphic Symbol Indication Blue light indicates the WLAN module is active Persistent green light indicates the Silent Mode is enabled Blinking green light indicates the...

Page 15: ...Volume Up Fn F6 Audio Volume Down Fn F7 Display Brightness Up Fn F8 Display Brightness Down Fn Num Lock Numeric Keypad Is On Caps Lock Capitalization is On Scroll Lock Scroll Lock is On Keyboard Featu...

Page 16: ...n For various system controls press the Fn Function key and the Fx key simultaneously Windows Keys Your keyboard also has two Windows keys 1 Start Key This key allows you to pull up the WindowsStart M...

Page 17: ...ight Button Equivalent Tapping Action Execution Click twice quickly Tap twice at the same speed as double clicking the mouse button Selection Click once Tap once Drag Click and hold to drag the cursor...

Page 18: ...ss power Extending the Life of the TFT Display Device Observe the following guidelines to maximize the life of the backlight in the display 1 Set the brightness to the lowest comfortable setting Fn F8...

Page 19: ...ay from the building for best reception If this is the first time you use the DVB T module to watch TV you need to scan the available channels first Follow the steps below to scan the channels 1 Launc...

Page 20: ...ams Audio Subsystem Your computer s audio subsystem is Sound Blaster Pro compatible Adjusting the Volume Manually To increase the volume press Fn F5 To decrease the volume press Fn F6 Adjusting the Au...

Page 21: ...nt Moves through the Menu Enter Selection Makes a selection Note Because Instant On does not support touch pad movement you need to use the keys on the keyboard to navigate to desired function In medi...

Page 22: ...Nobile 1440W 21 ENG Use the keys to select the Media Mode Use F1 to show the Instruction Menu for that Media Mode Shutting Down the Instant On Player Press the Instant On Player button to shut down th...

Page 23: ...EMI CORE to the phone line 2 Plug the other end of the line into the analog phone wall outlet Depending on where your computer is used you may need to change settings in the modem Correct setting will...

Page 24: ...le into the network connector until the connector snaps securely into the receptacle 2 Either connect the other end of the cable to an RJ 45 jack wall outlet or to an RJ 45 port on a UTP concentrator...

Page 25: ...rity feature Entering the BIOS Setup Screen First turn on the power When the BIOS performs the POST Power On Self Test press F2 key quickly to activate the AMI BIOS Setup Utility Note You may need to...

Page 26: ...CD brightness remains the same whether or not AC power is present Note The sub menu is not selectable Press enter to view information of the storage device Security Setup Boot Settings Configuration I...

Page 27: ...ystem will attempt to load boot sector from the Ethernet port 2nd Boot Device Set the type of device for the 2nd drive BIOS attempts to boot from 3rd Boot Device Removable Dev CD DVD Hard Drive Networ...

Page 28: ...t provides power when you don t have access to an AC outlet Note It is necessary that you charge the battery pack for at least 6 hours before using it for the first time Note In the Standby Suspend mo...

Page 29: ...the notebook bottom side up on a flat and secured surface 2 Push the latch andpull the battery s hard case away from the notebook To Install the Battery Pack 1 Place the notebook bottom side up on a...

Page 30: ...pter wherever AC wall outlet is available This willensure uninterrupted computing Purchase additional battery pack Store the battery pack in room temperature Higher temperature tends to deplete the ba...

Page 31: ...no power saving The other schemes control processor performance based on demand For example Max Battery mode lowers the processor s speed and voltage to conserve power as much as possible In this dial...

Page 32: ...how much RAM that have been installed on your computer the amount of time the system requires to restore all its previous contents can range from 5 to 20seconds For Windows XP users hibernation is han...

Page 33: ...Advanced tab In the pull down menu select how you wish the power button to work as Note Actual dialogue box shown above may appear slightly different Warning In the When I close the lid of my portabl...

Page 34: ...tly different Power Menu Quick Access Instead of making specific selections in the Power Options Properties box you can quickly and easily specify which pre set power saving function you desire by cli...

Page 35: ...capacity can increase the hard drive capacity of your computer The computer uses a 9 5mm height 2 5 inch Serial ATA type hard disk Be sure to make a backup copy of all your data before attempting this...

Page 36: ...lowing 1 Turn OFF the computer Unhook the AC cord and all cables devices attached to the notebook Remove the battery 2 Place your hand on a large metal object momentarily to discharge any static elect...

Page 37: ...restigio Nobile 1440W ENG 6 Push the HDD module to the right and separate it from the connector Lift the module away from the bay 7 Locate and remove 4 Screw C s from the HDD module Remove the metal c...

Page 38: ...e to the HDD connector And re attach Screw B 10 Put the System Device Cover back and re attach 7 Screw A s Congratulations You have now completed the hard drive upgrade When you boot up the PC you may...

Page 39: ...ling of this procedure are NOT covered by the manufacture s warranty Warning Changing memory while your computer is in suspend or power saving mode may cause permanent damage to the hardware Make sure...

Page 40: ...socket Store away the DIMM for the future use 6 Install the new DIMM module into the memory socket The DIMM will only fit in one orientation Insert the DIMM at an angle of approximately 30 degrees int...

Page 41: ...atches near the edges of the keyboard The latch is spring loaded It will retract when pressed and revert back to its original position when released Use a small blade to press the latch inward The key...

Page 42: ...Prestigio Nobile 1440W 41 ENG 3 Carefully lift up the top edge and position the keyboard out of the way and the following is revealed...

Page 43: ...below Pull the DIMM module out of the memory socket Store away the DIMM for the future use 6 Install the new DIMM module into the memory socket The DIMM will only fit in one orientation Insert the DIM...

Page 44: ...endor for a list of compatible DIMM for your computer Adding a Mini Card Wireless LAN Card Optional Device Your computer comes with a unique Mini Card socket which is located underneath the System Dev...

Page 45: ...the module with the socket on the connector and insert the card at an angle of approximately 30 degrees into the empty socket Then press it firmly so that the contact edge is driven into the receivin...

Page 46: ...you turn off the power and unplug the AC cord before proceeding with the upgrade Installing the DVB T Module into the System To install a new DVB T Module do the following 1 Power OFF the notebook Unp...

Page 47: ...e the DVB T Device Cover and re attach Screw G 7 Connect the Antenna to DVB T Antenna Connector on the left side of the computer Note You also need to install the NewSoft Presto PVR application from t...

Page 48: ...of the changes you made try to restore all the settings to factory defaults Be sure all the device drivers are installed properly For example without the audio driver properly installed the speakers...

Page 49: ...Programs Accessories System Tools Disk Cleanup The system will prompt you for what to do Archive files or programs that you had no longer used by moving them to an alternative storage medium floppy di...

Page 50: ...built in touch pad performs erratically Make sure there is no excess perspiration or humidity on your hand when using the touch pad Keep the surface of the touch pad clean and dry Do not rest your pa...

Page 51: ...l Panel Phone and Modem Options Go to Dialing Rules and Edit My Location In the Country Region pull down menu select the appropriate country setting Excessive line noise might cause the connection to...

Page 52: ...y applications Try to close some applications or increase system memory for higher performance The processor may have been overheated due to the system s inability to regulate its internal heat Make s...

Page 53: ...kers Modem Optional Chipset Intel ICH7 integrated Modem Controller with MDC card support 56K MDC Modem Card with Azalia standard Transmission Rate V 92 V 90 K56flex for download data speed up to 56Kbp...

Page 54: ...Slot One NewCard Slot type I Battery Pack AC Adapter Primary Battery Pack Li ion 6 Cell pack 10 8V 11 1 V x 4000 mAH or Li ion 6 Cell pack 10 8V 11 1V x 4400 mAH Feature Low battery state with low bat...

Page 55: ...otified that any changes or modifications made to this device that are not expressly approved by the Manufacture may void the user s authority to operate the equipment Connections to Peripheral Device...

Page 56: ...this equipment users should ensure that it is permissible to be connected to the facilities of the local telecommunications company The equipment must also be installed using an acceptable method of c...

Page 57: ...gs must bear the certification mark of the agency responsible for evaluation in a specific country Acceptable agencies are BSI UK OVE Australia CEBEC Belgium SEMKO Sweden FIMKO Finland DEMKO Denmark N...

Page 58: ...ng CAUTION Danger of explosion if battery is incorrectly replaced Replace only with same or equivalent type recommended by the manufacturer Discard used batteries according to the manufacturer s instr...

Page 59: ...x instructions du fabricant VORSICHT Explosionsgefahr bei unsachgemBen Austausch der Batterie Ersatz nur durch denselben oder einem vom Hersteller empfohlenem ahnlichen Typ Entsorgung gebrauchter Batt...

Page 60: ...Prestigio Nobile 1440W 1 Prestigio Nobile 1440W Copyright 4 2006 Microsoft Windows Microsoft Corporation DOS Windows 95 98 ME 2000 NT XP Microsoft Corporation Macrovision Macrovision Macrovision 1 0...

Page 61: ...2 Prestigio Nobile 1440W Fn F7 Fn F7 Windows Start Settings Control Panel Display Start Settings Control Panel Display 0oC 32oF 35oC 95oF AC...

Page 62: ...Prestigio Nobile 1440W 3 Lishin 0335A2065 65W Lishin 0335C2065 65W Liteon PA 1650 01 65W Liteon PA 1650 02 65W EPS F10653 A 65W 1 2 3...

Page 63: ...ore Solo Intel Napa Intel 945GM Express Intel Graphics Media Accelerator GMA950 14 1 TFT DTV DVB T DVB T Digital Video Broadcast Terrestrial Instant On Instant On Windows Mobile 3G Telecom 3G 3G Expre...

Page 64: ...Prestigio Nobile 1440W 5 Ethernet 10 100 1000 Ethernet Firewire IEEE1394 1394a USB2 0 IEEE1394 USB2 0 USB Wireless LAN Wireless LAN 802 11...

Page 65: ...6 Prestigio Nobile 1440W 1 2 Instant On WLAN 3 4 5...

Page 66: ...Prestigio Nobile 1440W 7 6 Instant On Instant On Windows Windows 7 4 Start Settings Control Panel Power Options Advanced...

Page 67: ...8 Prestigio Nobile 1440W 1 2...

Page 68: ...Prestigio Nobile 1440W 9 1 Combo DVD Dual Super Multi CD R CD RW DVD RW 2 VGA VGA 3 DC in DC in 4 DVB T RJ 11 DVB T DVB T DVB T 5 Kensington Kensington...

Page 69: ...and play 7 Firewire IEEE1394 1394 Firewire 8 4 1 4 1 SD Card MS Card MMC Card MS Pro Card 9 ExpressCard ExpressCard I 34 ExpressCard PCI Express USB2 0 10 SPDIF out 3 5 S PDIF DTS AC3 PCM 11 3 5 12 E...

Page 70: ...Prestigio Nobile 1440W 11 1 2...

Page 71: ...12 Prestigio Nobile 1440W 3 DDR 4 5 DVB T DVB T DVB T 1 DC out DC out DC in 2 3...

Page 72: ...Prestigio Nobile 1440W 13 WLAN...

Page 73: ...14 Prestigio Nobile 1440W Fn F3 Fn F5 Fn F6 Fn F7 Fn F8 Fn Num Lock Caps Lock Scroll Lock Fn F1 Fn F3 Fn F4 Fn F5 Fn F6 Fn F7 Fn F8...

Page 74: ...Prestigio Nobile 1440W 15 Fn Num Lock Caps Lock Caps lock Scroll Lock Scroll Lock Fn Function Fx Windows Windows 1 Start Start Windows 2 Fn NumLk Fn Num Lock...

Page 75: ...16 Prestigio Nobile 1440W PS 2 1 2 1 2 3 14 1 TFT Intel GMA 950 Microsoft DirectX 9 Fn F7 Fn F8...

Page 76: ...Prestigio Nobile 1440W 17 1 Fn F8 2 Fn F4 3 4 135...

Page 77: ...18 Prestigio Nobile 1440W DVB9T DVB T Digital Video Broadcast Terrestrial DVB T DVB T 1 NewSoft Presto PVR Settings Device 2 DVB T tuner 3 Program Settings Scan...

Page 78: ...Prestigio Nobile 1440W 19 4 OK Settings 5 DVB T NewSoft Presto PVR DVB T NewSoft Presto PVR Sound Blaster Pro Fn F5 Fn F6 Windows 1 Windows 2 3 Mute Microsoft Sound Recorder...

Page 79: ...nstant9On Instant On DVD DVB T Instant On Windows Instant On Instant On GIF Instant On M General Setup F1 Instruction Enter Instant On F1 Instant On C Documents and Settings All Users Documents My XXX...

Page 80: ...Prestigio Nobile 1440W 21 Instant On Instant On Windows F1 Instant On Instant On...

Page 81: ...22 Prestigio Nobile 1440W 56 V 92 RJ 11 1 EMI CORE 2 1 Start Settings Control Panel Phone and Modem Options Dialing Rules My Location Country Region 2 OK...

Page 82: ...Prestigio Nobile 1440W 23 Ethernet 10 100 1000 Base TX Fast Ethernet RJ 45 UTP Ethernet 1 UTP 2 RJ 45 RJ 45 UTP 10 100 1000BASE TX 100 328 100 1000 5 Windows Novell Netware...

Page 83: ...24 Prestigio Nobile 1440W BIOS BIOS Setup Utility BIOS BIOS BIOS BIOS BIOS POST F2 AMI BIOS Setup Utility F2 Windows BIOS BIOS BIOS ESC BIOS Enter F1 F9 F10 Tab...

Page 84: ...M Time MM Advanced Setup IDE Primary IDE Master Hard Disk Secondary IDE Master ATAPI CDROM ATAPI CD ROM TouchPad Support Enabled Disabled LCD Auto DIMM Function Enabled Disabled Security Setup Change...

Page 85: ...e Enabled Disabled Enabled Long Battery Life Mode Enabled Disabled Enabled Windows XP Start Control Panel Power Options Boot Setup Quiet Boot Enabled Disabled Enabled OEM POST Disabled POST 1st Boot D...

Page 86: ...Prestigio Nobile 1440W 27 BIOS POST F12 CD DVD Hard Drive Network USB Removable Disk...

Page 87: ...28 Prestigio Nobile 1440W Exit Setup Saves Changes and Exit BIOS BIOS F10 Discard Changes and Exit Discard Changes Load Optimal Defaults F9...

Page 88: ...Prestigio Nobile 1440W 29 2 6 12 1 2 1 6 16 2 3 4 3 5 0 32 F 60 140F Fn F3 1 2...

Page 89: ...30 Prestigio Nobile 1440W 1 2...

Page 90: ...show icon on the task bar Power Options Control Panel Windows 300 3 1 2 BIOS F2 3 Windows Windows Power Options Properties Start Settings Control Panel Power Options Windows 1 Windows Windows XP Power...

Page 91: ...32 Prestigio Nobile 1440W Always on Max Battery Windows Windows...

Page 92: ...Prestigio Nobile 1440W 33 Power Schemes Standby Hibernate 5 20 Windows XP Hibernate Start Settings Control Panel Power Options Advanced...

Page 93: ...34 Prestigio Nobile 1440W When I close the lid of my portable computer Do nothing...

Page 94: ...Prestigio Nobile 1440W 35 Alarms Power Options Properties Alarm Action Sound Alarm Windows Windows...

Page 95: ...36 Prestigio Nobile 1440W Power Options Properties Advanced Always show icon on the task bar Max Battery Always On...

Page 96: ...Prestigio Nobile 1440W 37 DRAM wireless LAN mini Card DVB T 9 5 mm 2 5 Serial ATA IBM...

Page 97: ...38 Prestigio Nobile 1440W 1 2 3 7 A 4 5 B...

Page 98: ...Prestigio Nobile 1440W 39 6 7 4 C...

Page 99: ...40 Prestigio Nobile 1440W 8 4 C 9 B 10 7 A...

Page 100: ...Prestigio Nobile 1440W 41 DDR2 SO DIMM SO DIMM 256MB 512MB 1024MB SO DIMM DDR2 SDRAM 200 2 5V SO DIMM DDR2 SDRAM 200 1 8V DIMM DIMM 1 2 3 7 4 DIMM...

Page 101: ...42 Prestigio Nobile 1440W 5 30 6 30 7 8 7...

Page 102: ...Prestigio Nobile 1440W 43 DIMM 1 D 2...

Page 103: ...44 Prestigio Nobile 1440W 3 DDR DIMM...

Page 104: ...Prestigio Nobile 1440W 45 4 DDR 5 DIMM 30 6 30 7...

Page 105: ...46 Prestigio Nobile 1440W 8 9 D DRAM DIMM...

Page 106: ...Prestigio Nobile 1440W 47 Mini9Card Mini Card IEEE802 11x mini card mini card mini card Mini Card Mini Card 1 Mini Card 2 Mini Card 30 mini card 30 3 Mini Card Wireless LAN...

Page 107: ...48 Prestigio Nobile 1440W 4 7 Mini Card Wireless LAN Setup exe DVB9T DVB T DVB T Module DVB T DVB T DVB T 1 2 3 G DVB T...

Page 108: ...Prestigio Nobile 1440W 49 4 DVB T 30 2 H DVB T H 30 5 DVB T 6 DVB T G 7 DVB T NewSoft Presto PVR...

Page 109: ...50 Prestigio Nobile 1440W BIOS USB plug and play BIOS Windows Microsoft Sound System Start Settings Control Panel Sounds and Audio Devices Realtek HD Audio...

Page 110: ...timedia Sounds and Audio Devices Realtek HD Audio Disk Cleanup Windows Start All Programs Accessories System Tools Disk Cleanup Internet Internet Recycle Bin Windows Start All Programs Accessories Sys...

Page 111: ...1440W Combo DVD Dual Supermulti 1024x768 1 Start Settings Control Panel Display 2 Settings 1024x768 256 Start Settings Control Panel Keyboard CMOS CMOS Checksum Failure CMOS CMOS Checksum Failure CMOS...

Page 112: ...l System Device Manager Hardware Windows Call Waiting Start Settings Control Panel Modem Settings Configuration Country Area Ethernet Ethernet Start Settings Control Panel System Hardware Device Manag...

Page 113: ...net 1000 Base TX 100 Base TX 1000 Base T 35oC 50 50 CTRL ALT DEL Windows Firewire IEEE1394 USB 2 0 USB Windows NT 4 0 USB Windows IEEE1394 Start Settings Control Panel System Hardware Device Manager O...

Page 114: ...256 512 1024MB 200 DIMM 2 GB 9 14 1 c WXGA TFT LCD Intel Integrated GMA950 Graphic Engine IDCT MPEG1 2 DirectX Intel ICH7 Realtek Audio Codec DirectSound 3D EAX 1 0 2 0 A3D I3DL2 AC97 V2 3 Azalia 2 I...

Page 115: ...Y Windows 19 05 NewCard ExpressCard Multiple Card Reader O2 Micro OZ128 Card Reader Express Card New Card 34 I 49 91 Multimedia Card MMC Secure Digital Card SD Memory Stick MS MS Pro Card 9 SPDIF SPDI...

Page 116: ...AMI PnP BIOS Power On Self Test DRAM L2 Cache APM 1 2 Advanced Power Management ACPI 2 0 Advanced Configuration Power Interface 32 Ultra DMA PIO5 Mode Microsoft Windows XP Home Edition Professional SP...

Page 117: ...rective 73 23 EEC R TTE Directive 1999 5 EC EN55022 1998 A1 2000 A2 2003 CLASS B EN61000 3 2 2000 EN61000 3 3 1995 A1 2001 EN55024 1998 A1 2001 A1 2003 IEC61000 4 2 2001 IEC61000 4 3 2002 A1 2002 IEC6...

Page 118: ...EC801 2 IEC801 3 IEC801 4 EN 300 328 2 EN 300 328 1 EN 301 489 1 EN 301 489 17 ETSI 300 328 ETSI 301 489 TBR21 ETSI TBR21 EN60950 IEC60950 I T E B REN Ringer Equivalent Numbers REN 5 IC ID 3409A M30EI...

Page 119: ...5 A 125 VAC BSI OVE CEBEC SEMKO FIMKO DEMKO NEMKO SETI EANSW SEV IMQ UTE CCC PSB PSE BSMI B VDE SASO HAR HO5VV F 3 0 03 II 1 2 X 0 75 2 2 2 10 A 125 250 X40IIx LITE ON ELECTRONICS INC P PA 1650 02 65W...

Page 120: ...teries according to the manufacturer s instructions or local laws VORSICHT Explisionsgefahr bei unsachgernazen Austausch der Batterie Ersatz nur durch denselben oder einem vom Hersteller empfohlenem a...

Page 121: ...uniquement avcc unc batterie du meme type ou d un type recommande par le constructer Mettre au rebut les batteries usagees conformement aux instructions du fabricant VORSICHT Explosionsgefahr bei uns...

Reviews: