Prestigio Nobile 1440W
45
ENG
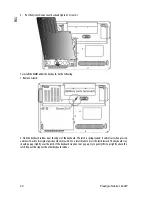
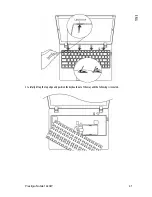
4. Put the System Device Cover back and tighten 7 Screw A’s.
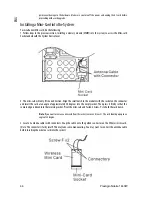
Congratulations! You have now completed the mini-card installation. During the next time the system boots to
Windows, the system will prompt for driver location. Insert the Factory CD-ROM and point to the directory where the
Wireless LAN driver can be found. In addition to installing the driver, you may also need to run a Setup.exe program
to install the card’s utility applications before it is fully operational.
Adding the DVB-T Module (Optional Device)
This section explains how to install the optional DVB-T Module to your computer.
Warning
: Installing the DVB-T Module is a delicate process. Please observe the following instructions
carefully or have a qualified technician install it for you. Damages due to mishandling of this procedure are
NOT covered by the manufacture’s warranty.
Warning
: Installing the DVB-T Module while your computer is in suspend or power-saving mode may cause
permanent damage to the hardware. Make sure you turn off the power and unplug the AC cord before
proceeding with the upgrade.
Installing the DVB-T Module into the System
To install a new DVB-T Module, do the following:
1. Power OFF the notebook. Unplug the AC cord and all cables/devices attached to the notebook. Remove the
battery.
2. Place your hand on a large metal object momentarily to discharge any static electricity. Place the notebook on a
flat surface and fully close the LCD lid.
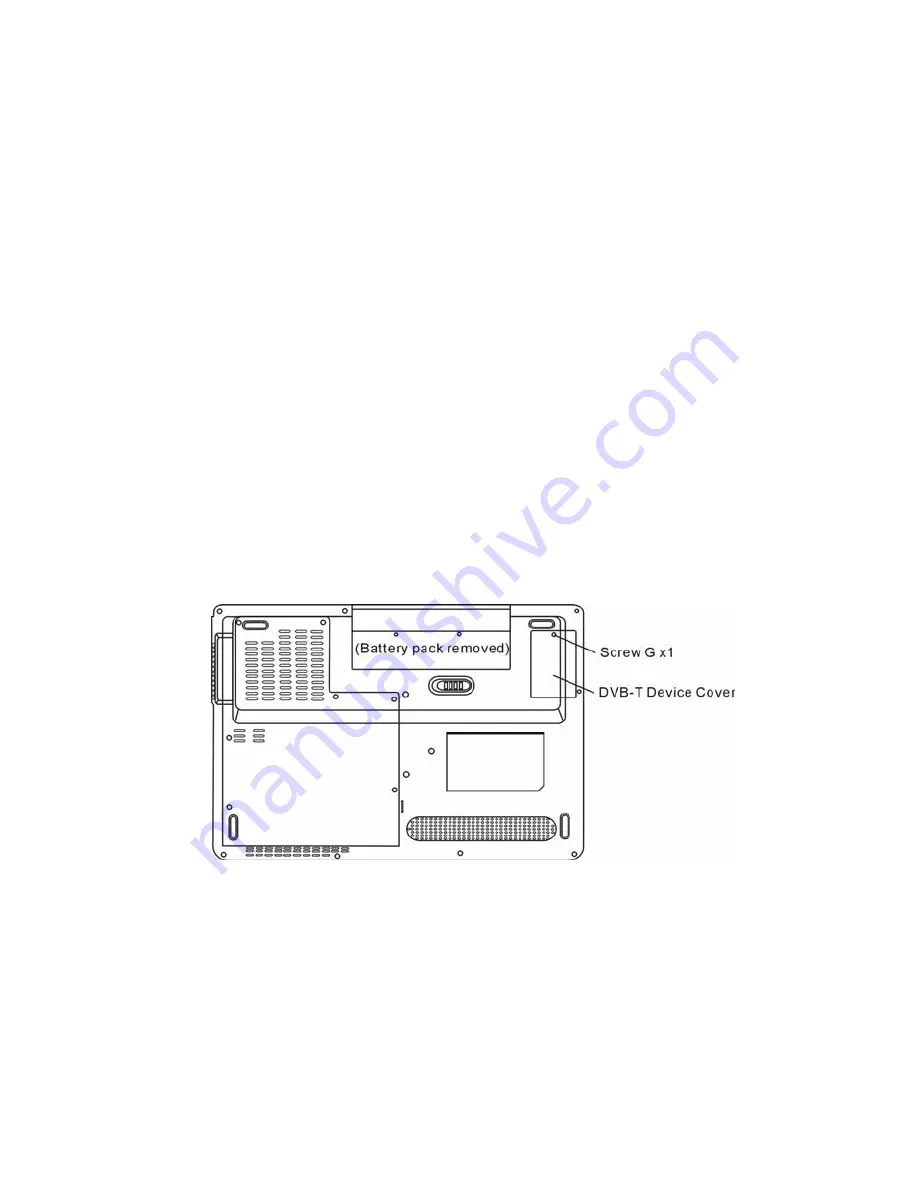
3. Remove Screw G and remove the DVB-T Device Cover.
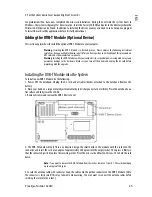
4. The DVB-T Module will only fit in one direction. Align the small notch in the module with the socket on the
connector and insert the card at an angle of approximately 30 degrees into the empty socket. Then press it firmly so
that the contact edge is driven into the receiving socket. Pivot the mini-card and fasten 2 Screw-H’s to hold the card
down.
Note
: If you want to remove the DVB-T Module from the socket, remove 2
Screw-H’s. The card should pop
up to an angle of 30 degree.
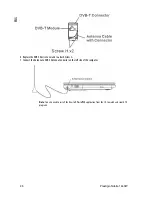
5. Locate the antenna cable with connector. Snap the cable
onto the golden connector on the DVB-T Module. (
Note:
The
connector is fairly small! This may take some maneuvering.
You may want to connect the antenna cables before
inserting
the card into the socket
.)
Summary of Contents for Nobile 1440W
Page 1: ...Nobile 1440W...
Page 65: ...6 Prestigio Nobile 1440W 1 2 Instant On WLAN 3 4 5...
Page 67: ...8 Prestigio Nobile 1440W 1 2...
Page 70: ...Prestigio Nobile 1440W 11 1 2...
Page 71: ...12 Prestigio Nobile 1440W 3 DDR 4 5 DVB T DVB T DVB T 1 DC out DC out DC in 2 3...
Page 72: ...Prestigio Nobile 1440W 13 WLAN...
Page 76: ...Prestigio Nobile 1440W 17 1 Fn F8 2 Fn F4 3 4 135...
Page 80: ...Prestigio Nobile 1440W 21 Instant On Instant On Windows F1 Instant On Instant On...
Page 86: ...Prestigio Nobile 1440W 27 BIOS POST F12 CD DVD Hard Drive Network USB Removable Disk...
Page 88: ...Prestigio Nobile 1440W 29 2 6 12 1 2 1 6 16 2 3 4 3 5 0 32 F 60 140F Fn F3 1 2...
Page 89: ...30 Prestigio Nobile 1440W 1 2...
Page 91: ...32 Prestigio Nobile 1440W Always on Max Battery Windows Windows...
Page 93: ...34 Prestigio Nobile 1440W When I close the lid of my portable computer Do nothing...
Page 96: ...Prestigio Nobile 1440W 37 DRAM wireless LAN mini Card DVB T 9 5 mm 2 5 Serial ATA IBM...
Page 97: ...38 Prestigio Nobile 1440W 1 2 3 7 A 4 5 B...
Page 98: ...Prestigio Nobile 1440W 39 6 7 4 C...
Page 99: ...40 Prestigio Nobile 1440W 8 4 C 9 B 10 7 A...
Page 101: ...42 Prestigio Nobile 1440W 5 30 6 30 7 8 7...
Page 102: ...Prestigio Nobile 1440W 43 DIMM 1 D 2...
Page 103: ...44 Prestigio Nobile 1440W 3 DDR DIMM...
Page 104: ...Prestigio Nobile 1440W 45 4 DDR 5 DIMM 30 6 30 7...


