7
Preparation
E
D
A
B
C
D
1
ENGLISH
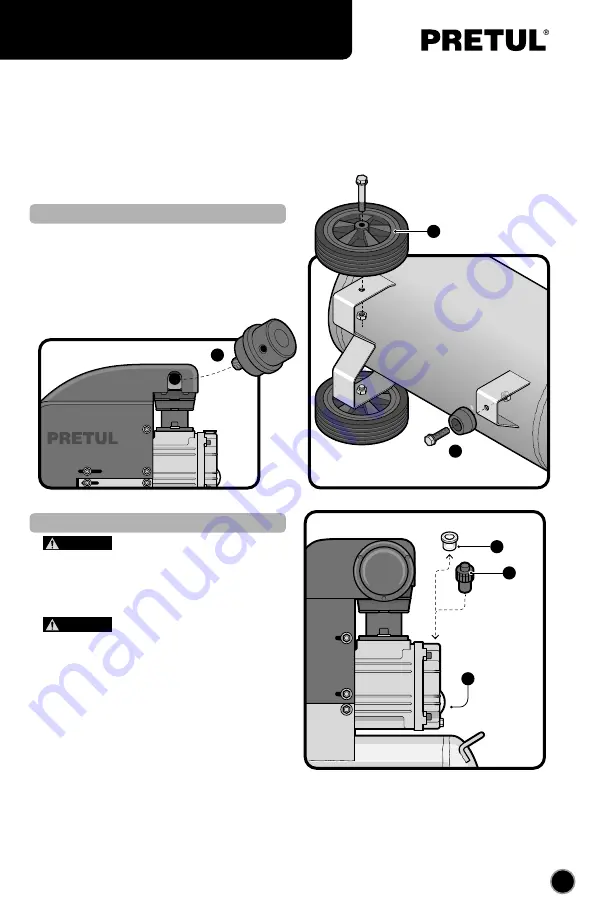
• Carefully lay down the compressor onto a flat, leveled
and solid surface to assemble the wheels (
A
) and the
front supports (
B
) with their screws and hex nuts as
shown in the illustration.
• Set the compressor up and screw on the air filter (
C
) on
one side of the carter as indicated in the illustration.
• Remove the transport cap (
D
) and use
the work cap with an orifice (
D
1
) included.
• Verify the oil level spy window (
E
). If the level is not
encompassing the medium point (red circle), remove the
tank cap (
D
1
) Fill up the deposit with lubricating oil
SAE-10W30 for compressors. Reach the indicated level.
• Check oil level before each use.
• Before you start working turn on let the compressor a
couple of minutes with the air valve totally open to allow
the correct distribution of the lubricant.
• The air compressor is used to supply energy to pneumatic tools as versatile as power tools are. The tools
can be used to drill, screw, hammer, rivet, staple, chisel, polish, blowtorching, cleaning, painting, inflate tires
or inflatable items, apply paint or varnish and maintain other tools.
• The compressor functions are completely automatic and controlled with the pressurestat. It stops the motor
when the tank’s pressure has reached the maximum level. It starts again when the level goes down to a level
lower to 80 PSI.
• The compressor shall be connected into an outlet protected with an adequate differential switch
(thermal-magnetic).
Oil
Assembly
CAUTION
CAUTION


