Appendix B –
Troubleshooting Guide for Multiplex Vehicles
181
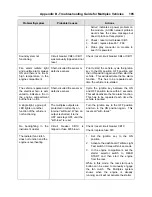
Troubleshooting
Problem/Symptom
Probable Causes
Actions
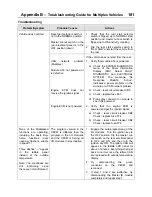
Rear Start selector switch is
not in the NORMAL position
Master cut-out switch on the
rear electrical panel is in the
OFF position (down)
1. Check that the rear start selector
switch is flipped up to NORMAL start
position and master cut-out switch is
flipped up to ON and retry cranking
2. Flip the rear start selector switch to
“Rear Start” and start the vehicle from
the rear
Vehicle does not Start
CAN network problem
(Multiplex)
Module A53 not powered or
is defective
Engine ECM does not
receive the ignition signal
Engine ECM is not powered
If the vehicle does not start from the rear:
1. Verify that module A53 is powered:
a) Check the SYSTEM DIAGNOSTIC
menu of the Driver Information
Display (DID). Select FAULT
DIAGNOSTIC and ELECTRICAL
SYSTEM. The message “No
Response ModA53, Active”,
indicates a power problem on the
module or a CAN network problem.
b) Check / reset circuit breaker CB5
c) Check / replace fuse F65
d) Probe gray connector on module to
see if it is powered.
2. Verify that the engine ECM is
powered and get the ignition signal
a) Check / reset circuit breaker CB8
Check / replace fuse F74
b) Check / reset circuit breaker CB2
Check / replace fuse F78
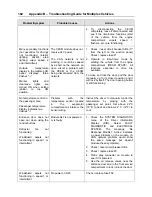
None of the Multiplexed
functions are operating,
including the basic limp-
home functions (door
opening, flashers, wipers
in speed 1)
Three dashes “---“ appear
in the telltale panel
instead of the outside
temperature
Note: The sunshades are
still functioning since
these are not multiplexed
The program version in the
CECM is different than the
program in the I/O modules
and the CECM is forcing all
I/O modules to stay inactive
1. Engage the auto-programming of the
I/O modules: Turn the ignition key to
the OFF position, flip the master cut-
out switch on the rear electrical panel
to OFF and ON and then turn the
ignition key ON. The letters CAN will
appear in the telltale LCD panel for
about 3 minutes Everything shall get
back to normal once the letters CAN
are replaced with outside temperature
display
2.
Try disconnecting the green
connector on the CECM and
reconnect
3. If step 1 and 2 are ineffective, try
disconnecting the Master ID module
completely and repeat step 1
Summary of Contents for X3-45 2011
Page 1: ...COACH MANUFACTURER OPERATOR S MANUAL X3 45 COACH PA1581...
Page 4: ......
Page 6: ......
Page 10: ......
Page 24: ......
Page 128: ......
Page 134: ......
Page 171: ...Technical Information 165 X3 45 OVERALL DIMENSIONS SIDE ELEVATION 18673...
Page 172: ...Technical Information 166 X3 45 OVERALL DIMENSIONS TOP FRONT AND REAR VIEWS 18674...
Page 182: ......
Page 186: ......
Page 206: ......

