Section 14: STEERING
Section 14 Updated Oct.2014
X3-45 Commuter PA1593 DOB 2400-2489
5
The steering gearbox weighs approximately 100
lbs (45 kg) dry. Exercise caution when handling.
1. Put a container into place, then disconnect
both the inlet and outlet hoses from the power
steering gear. Cover fittings to prevent fluid
contamination.
2. Mark both the pitman arm and sector shaft
with a line, then remove pitman arm. Refer to
"11.1 Pitman Arm Removal"
procedure.
3. Mark both the steering shaft universal joint
yoke and steering gear input shaft with a line,
then disconnect universal joint.
4. Unscrew and remove the power steering
gear.
2.3
POWER STEERING GEAR
INSTALLATION
Reverse
"Power Steering Gear Removal"
procedure paying particular attention to the
following:
1. Tighten fasteners as recommended under
paragraph 14:
‘’Torque Specifications".
2. Bleed air from the system as per step 3, next.
2.4
TROUBLESHOOTING
Perform troubleshooting of the steering gear as
outlined in the
"ZF-SERVOCOM Repair Manual"
,
the
"ZF-SERVOCOM Operating, Servicing
/Maintenance and Inspection Instructions
.
3. BLEEDING POWER STEERING
HYDRAULIC SYSTEM
To bleed the power steering hydraulic system,
refer to the
"ZF-SERVOCOM Repair Manual"
annexed to this section, under heading
"Setting
And Functional Test"
.
4. HYDRAULIC PRESSURE TEST
Perform a pressure test as outlined in the
"ZF-
SERVOCOM Repair Manual"
annexed to this
section under heading
"Setting And Functional
Test"
.
5. POWER STEERING HYDRAULIC PUMP
The power steering pump is a gear driven
hydraulic unit which supplies hydraulic pressure
for the operation of the steering gear. The pump is
mounted on the engine, at the flywheel end and is
also used for driving the fuel pump.
5.1
REMOVAL AND INSTALLATION
The pump is accessible through the engine
compartment R.H. access door.
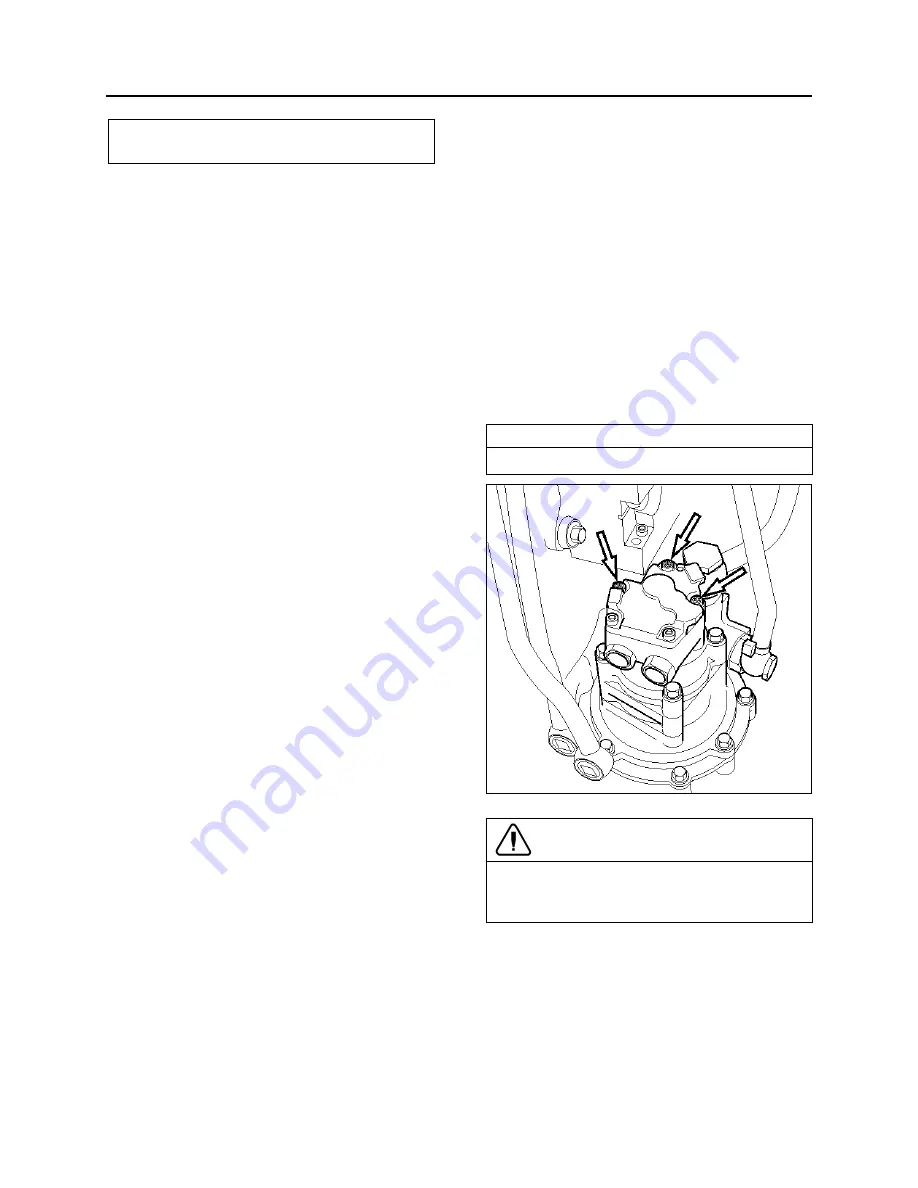
To remove the pump, proceed as follows:
•
You must first remove the fuel feed pump.
•
Clean around the fuel pump and fuel lines.
Position a container to catch any fuel that
might drain from the pump or lines.
•
Remove the fuel pump.
NOTE
Only unfasten the bolts marked with arrows.
FIGURE 4: FUEL PUMP REMOVAL
CAUTION
Ensure to clean around the head of the bolts.
Debris will prevent the tool from fitting properly
and cause damage to the fasteners.
•
Check that the adapter and fuel pump drive
axle are not damaged.
Summary of Contents for X3-45 2016
Page 4: ......
Page 16: ...Section 00 GENERAL INFORMATION PA1593 12 FIGURE 12 METRIC US STANDARD CONVERSION TABLE 00005...
Page 17: ...Section 00 GENERAL INFORMATION 13 PA1593 FIGURE 13 CONVERSION CHART 00006...
Page 18: ......
Page 26: ......
Page 58: ......
Page 72: ...Section 04 EXHAUST AND AFTERTREATMENT SYSTEM PA1593 14 7 TORQUE SPECIFICATIONS...
Page 73: ...SECTION 04 EXHAUST AND AFTERTREATMENT SYSTEM PA1593 15...
Page 74: ...Section 04 EXHAUST AND AFTERTREATMENT SYSTEM PA1593 16...
Page 76: ......
Page 96: ......
Page 134: ......
Page 176: ...SECTION 06B ELECTRICAL 38 overcurrent working Circuit 306 shorted to ground...
Page 180: ......
Page 202: ......
Page 205: ...Section 09 PROPELLER SHAFT PA1593 3 FIGURE 1 PROPELLER SHAFT ASSEMBLY 09002...
Page 256: ......
Page 268: ......
Page 295: ...SECTION 16 SUSPENSION PA1593 9 2 5 TORQUE SPECIFICATIONS...
Page 296: ...Section 16 SUSPENSION PA1593 10...
Page 297: ...Section 16 SUSPENSION PA1593 11...
Page 314: ......
Page 380: ......
Page 388: ......
Page 413: ...Section 22 HEATING AND AIR CONDITIONING PA1593 15 FIGURE 18 REFRIGERANT CIRCUIT CENTRAL SYSTEM...
Page 433: ...Section 22 HEATING AND AIR CONDITIONING PA1593 35 FIGURE 36 CENTRAL HEATING SYSTEM COMPONENTS...


