SECTION 18: BODY
38
DOB 2490-2789 | X3-45 Commuter PA1605 Maintenance Manual (Final Version – Rev.2 April 2016)
15.3.1 REAR
CAP
The fiberglass rear cap does not need any
maintenance except painting as needed. It is
held in place with adhesive. If ever it has to be
replaced, make an appointment at a Prévost
service center near you. For minor damages,
refer to Paragraph 4 "Common Fiberglass
Repair Procedure" and Paragraph 5 "Common
Painting Procedure".
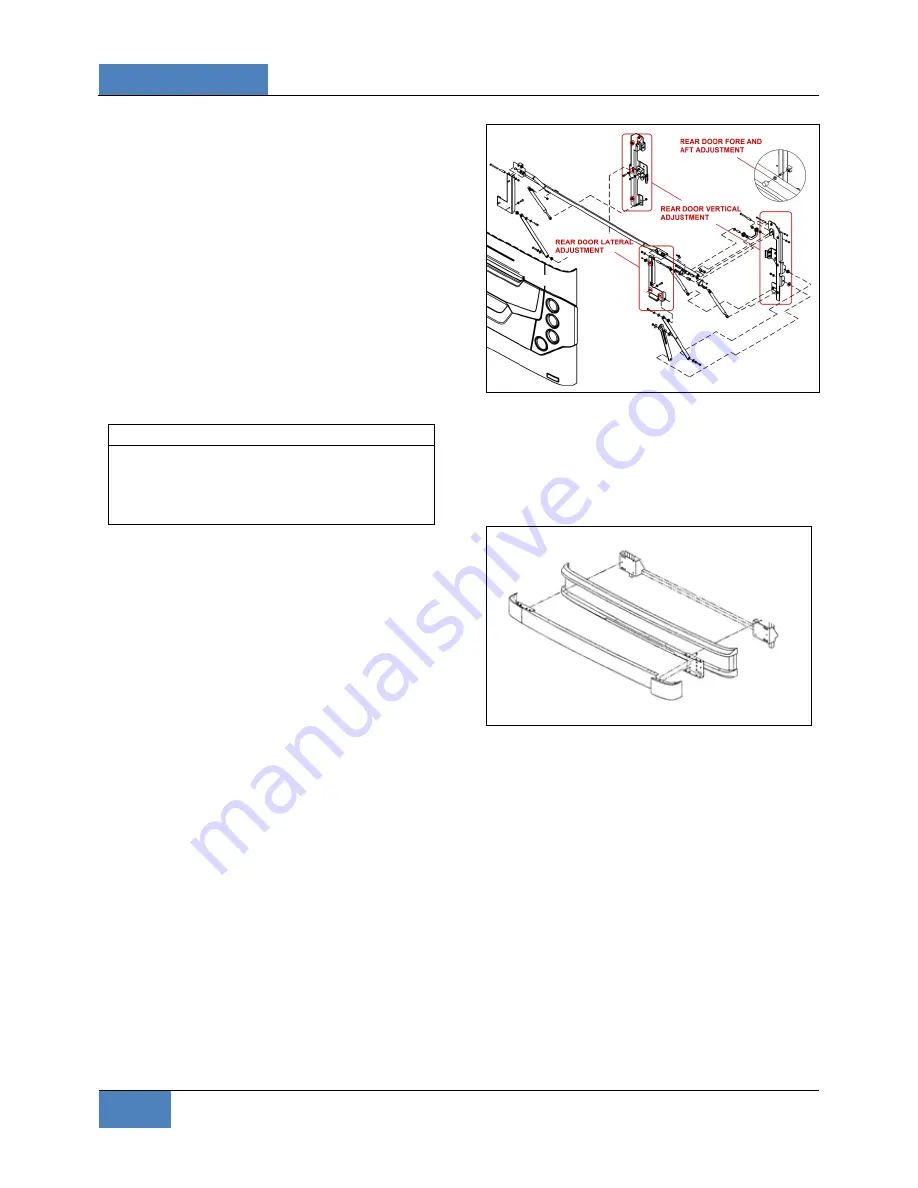
15.3.2 ENGINE COMPARTMENT DOOR
The engine compartment door may be adjusted
for proper fit by untightening support bolts:
NOTE
Consult the “BODY PANEL AND WINDOW
SPACING DIAGRAM” for proper door gaps
adjustment. (
Figure 51
Page 61 of this
section)
1.
To adjust the door VERTICAL position,
loosen the bolts (4 on each side) holding the
door supporting arm and gas springs brack-
et to the
vehicle structure
(Figure 34).
2.
To adjust the door LATERAL position,
loosen the 3 bolts on the
right
side bracket
holding two of the door supporting arm and
gas springs bracket to the
door
(Figure 34).
3.
Adjust the door FORE & AFT position by
screwing/unscrewing the rubber door stops
on each side of the door opening (Figure
34).
4.
Check that the door swings freely and close
properly.
It may be necessary to adjust the
door latch to get proper fit and operation
.
To adjust the latch mechanism and the striker
pin:
1. Open the door to access the striker pin.
2.
Slightly
loosen the striker pin.
3. Using a hammer, adjust the striker pin to
center it in the door latch mechanism.
4. Tighten the striker pin.
5. Check door fit and operation.
FIGURE 34: ENGINE COMPARTMENT DOOR
18633_1
15.3.3 REAR
BUMPER
Remove three bolts on each side holding
bumper to vehicle and remove bumper.
To install bumper, reverse the procedure.
FIGURE 35: REAR BUMPER
18634
15.3.4 EXHAUST
AFTERTREATMENT
SYSTEM ACCESS DOOR
1. Open exhaust aftertreatment system access
door.
2. Loosen the screws holding the panel to
hinge assembly.
3. Adjust the door position according to
distance required between exterior finishing
parts.
4. Tighten the nuts.
5. Check that the door swings freely and
closes properly.


