background image

Celebrity/Rev G/March 2003

           www.pridemobility.com

35

ASSEMBLY

NOTE:   Raise the tiller before starting to assemble the Celebrity.

1. Place the manual freewheel lever in the drive (down) position.

2. Position the front and rear sections next to each other.

3. Tilt the rear end to a horizontal position and insert the longer tube of the front end into the rear section first;

make sure that the locking cam levers are in the unlocked (vertical) position and the ball detent pins are

removed.

4. Slide the two sections of the unit together until the front half reaches its insertion limit.

5. Secure the front and rear sections with the ball detent pins.

6. Push the frame lock levers back to their locked (downward) position.

7. Plug the silver front-to-rear harness into the mating plug found on the rear electronics module.

8. Put the batteries in place and plug the black and white 2-pin battery harnesses into the rear electronics module.

9. Reconnect the battery tie-down straps (if so equipped).

10. Gently place the rear shroud over the pneumatic seat post.

11.  Lower the shroud into place.

12. Carefully lift the seat and slide the seat platform (on the seat bottom) onto the seat pedestal.

13. Rotate the seat until it locks into place.

I X .     D I S A S S E M B LY   A N D   A S S E M B LY

Summary of Contents for CELEBRITY X

Page 1: ...The Ultimate In Style Performance Owner s Manual Exeter PA St Catharines ON 1 800 800 8586 www pridemobility com ...

Page 2: ...wn good judgement and or common sense as well as that of your provider caregiver and or healthcare profes sional Pride is not responsible for injuries and or damage resulting from any person s failure to follow the warnings cautions and instructions in this owner s manual Pride is not responsible forinjuries and or damage resulting from any person s failure to exercise good judgement and or common...

Page 3: ... III EMI RFI 15 IV SPECIFICATIONS 17 V YOUR CELEBRITY 19 VI BATTERIES AND CHARGING 24 VII OPERATION 28 VIII COMFORT ADJUSTMENTS 30 IX DISASSEMBLY AND ASSEMBLY 33 X OPTIONAL ACCESSORIES 36 XI BASIC TROUBLESHOOTING 37 XII CARE AND MAINTENANCE 39 XIII WARRANTY 41 CELEBRITY 3 WHEEL CELEBRITY 4 WHEEL ...

Page 4: ...ature issued by Pride or contained on the Pride Scooter itself This owner s manual is compiled from the latest specifications and product information available at the time of publication We reserve the right to make changes as they become necessary Any changes to our products may causeslightvariationsbetweentheillustrationsandexplanationsinthismanualandtheproductyouhavepurchased Ifyouexperienceany...

Page 5: ...t and funding information and interactive message boards Message boards invite you to speak with other Pride customers as well as Pride representatives who are available to assist you with any questions or concerns you may have My Authorized Pride Provider Is Name _______________________________________________________________________________ Address _______________________________________________...

Page 6: ...ur time and you will soon be in full and confident control as you maneuver through doorways on and off lifts up and down ramps and over moderate terrain Below are some precautions tips and other safety considerations that will help the user become accustomed to operating the scooter safely MODIFICATIONS Pride has designed and engineered your scooter to provide maximum mobility and utility Awide ra...

Page 7: ...ving down a ramp keep the scooter s speed adjustment set to the slowest speed setting to ensure a safelycontrolleddescent n Avoid sudden stops and starts WARNING Exceeding the weight capacity voids your warranty and may result in personal injury and damage to your scooter Pride will not be held responsible for injuries and or property damage resulting from failure to observe weight limitations WAR...

Page 8: ...tingconditions These tests were conducted with the scooter s seat in the highest position and adjusted rearward on the seat base to its farthest rearward position Use this information as a guideline Your scooter s ability to travel up inclines is affected by your weight your scooter s speed your angle of approach to the incline and your scooter setup 5 6 7 250 lbs 300 350 lbs 200 lbs 8 150 lbs 6 7...

Page 9: ... tipping WARNING When cornering sharply reduce your speed When using your scooter at higher speeds do not corner sharply This greatly reduces the possibility of a tip or fall To avoid personal injury or property damage always exercise common sense when cornering Figure 2A Increased Stability Driving Position Figure 2 Normal Driving Position When you approach an incline it is best to lean forward S...

Page 10: ...ublic streets and roadways Be aware that it may be difficult for traffic to see you when you are seated on your scooter Obey all local pedestrian traffic rules Wait until your path is clear of traffic and then proceed with extreme caution STREETS AND ROADWAYS NOTE Safety accessories like fluorescent flags are available to order from your authorized Pride Provider STATIONARY OBSTACLES STEPS CURBS E...

Page 11: ...nualfreewheelleverinadvertently be released while driving the scooter WARNING Pride recommends that you do not operate your scooter in icy or slippery conditions or on salted surfaces i e walks or roads Such use may result in an accident personal injury or adversely affect the performance and safety of your scooter WARNING Do not operate or store your scooter where it may be exposed to inclement w...

Page 12: ...f Pride STAIRS AND ESCALATORS Scooters are not designed to travel up or down stairs or escalators Always use an elevator BATTERIES Inadditiontofollowingthewarnings below besuretocomplywithallotherbatteryhandlinginformation WARNING Do not use your scooter to negotiate steps or escalators You may cause injury to yourself and to others and damage your scooter BATTERY DISPOSAL AND RECYCLING If you enc...

Page 13: ...ORT Currently there are no standards approved for tie down systems in a moving vehicle of any type to transport a person while seated in a scooter Althoughyourscootermaybeequippedwithapositioningbelt thisbeltisnotdesignedtoprovideproperrestraint duringmotorvehicletransport Anyonetravelinginamotorvehicleshouldbeproperlysecuredinthemotorvehicle seat with safety belts fastened securely WARNING Do not...

Page 14: ...de Provider therapist s and other healthcare professionals are responsible for determining your requirement for a positioning belt in order to operate your scooter safely WARNING If you require a positioning belt to safely operate your scooter make sure it is fastened securely Serious personal injury may result if you fall from the scooter WARNING Consult your physician if you are taking prescribe...

Page 15: ...etherornotyourmobilityvehicleisinmotion ThemotionofanyelectricmobilityvehicleaffectedbyEMI RFIcanbeerratic Themobilityvehiclemaycometo a sudden stop or move in an uncontrolled manner Also it is possible for EMI RFI to release the brakes of an electric mobility vehicle Some intense EMI RFI can even damage the control system components of an electric mobilityvehicle Is there any way to know for cert...

Page 16: ...FI n Whilethereisnoexactwaytotellifyourmobilityvehicleistotallysafe animmunitylevelof20V misgenerally achievable and useful This product has been tested and passed at an immunity level of 20 V m What can I do to find out if my mobility vehicle is likely to be affected by EMI RFI Ifyouhavehadyourmobilityvehicleforsometimeandhavenotexperiencedanyunintendedmotion itisnotlikely thatyouwillhaveaproblem...

Page 17: ...obility com 17 I V S P E C I F I C A T I O N S 24 59 48 18 16 24 28 50 51 75 4 Wheel Turning Radius 4 Wheel Length 3 Wheel Length 3 Wheel Turning Radius 3 5 90 100 102 105 18 5 Adjustable 8 12 39 5 43 17 20 5 Figure 5 Celebrity Dimensions ...

Page 18: ...side of tiller lighted touch pad control console front basket user adjustable sliding seat full soft ride shock absorber equipped suspension pneumatic height adjustable seat post with shock absorber action four position adjustable seat back angle adjustable armrest width height angle dual microprocessor based motor controller system modular controller charger assembly infinitely adjustable tiller ...

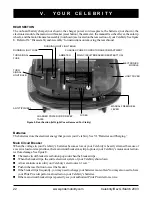
Page 19: ...olconsoleassemblyhousesallofthecontrolsyouneedtodriveyourCelebrity includingthespeedadjustment dial throttlecontrollevers batteryconditionmeter statusLED runninglightsbutton hornbuttons turnsignalbuttons andthehazardlightbutton Seefigure7 WARNING Do not expose the control console assembly to moisture In the event that the console does become exposed to moisture do not attempt to operate your Celeb...

Page 20: ...turnstothecenter stop positionandengagesyour Celebrity s brakes Battery Condition Meter This meter gives an approximate reading of your scooter s battery voltage when the key is fully inserted into the keyswitch n Green indicates the Celebrity s batteries are fully charged n YellowindicatesthattheCelebrity sbatteryvoltagelevelisgettinglowandwillrequireachargesoon n Red indicates that your Celebrit...

Page 21: ...Status LED The StatusLEDwillalertyoutoelectricalproblemsthatmayoccurwiththeCelebrity TheLEDremainsconstantlylit whileyourscooterison IftheCelebritydevelopsanelectricalproblem thestatusLEDwillflashacode SeeXI Basic Troubleshooting IfthestatusLEDflashesacodeotherthanacodelisted in BasicTroubleshooting contactthe Pridetechnicalservicedepartmentbycalling 1 800 800 8586 V Y O U R C E L E B R I T Y ...

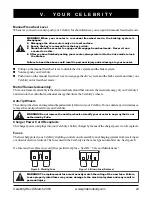
Page 22: ...tbreakermaytriptoprotectyourCelebrity smotorandelectron ics from damage See figure8 n The main circuit breaker reset button pops out when the breaker trips n When the breaker trips the entire electrical system of your Celebrity shuts down n Allow a minute or two for your Celebrity s electronics to rest n Push in the reset button to reset the breaker n If the breaker trips frequently you may need t...

Page 23: ...shelpprotectyourCelebrity slighting controlconsoleassembly andchargingsystemsfromreceivingan overload of electrical current The fuses used in the Celebrity are the same type automobiles use See figure 8 If a fuse must be replaced use only the specified amp fuse See XII Care and Maintenance Figure 9 Working Fuse Figure 10 Blown Fuse Replace V Y O U R C E L E B R I T Y WARNING When your scooter is i...

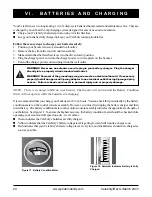
Page 24: ...r batteries for 8 to 14 hours You can check this periodically by the battery condition meter on the control console assembly However you must first unplug the battery charger and then insert the key Thebatteryconditionmeteronthecontrolconsoleassemblyindicatestheapproximatestrengthof yourbatteries Seefigure11 Toensurethehighestaccuracy thebatterycondition metershouldbecheckedwhile operating your sc...

Page 25: ... Examine the 5 amp charger fuse If the fuse is blown the batteries will not charge See figures 9 and 10 Can I use a different charger Forthesafest mostefficientandbalancedchargingofyourCelebrity sbatteries wepreferandhighlyrecommend the simultaneous charging of both batteries by use of the onboard battery charger How often must I charge the batteries Two major factors must be considered when decid...

Page 26: ... to reorder deep cycle batteries Type Deep cycle AGMorGelCell Size U 1 Voltage 12voltseach Amperage 32AHor40AH amphours To change a battery in your Celebrity 1 Remove the seat and the rear shroud See IX Disassembly andAssembly 2 Disconnect the battery tie down straps if equipped 3 Disconnect the battery cables from the rear electronics module 4 Disconnect the battery cables from the battery termin...

Page 27: ...rgingcyclebringsthebatteryuptoabout88 of itspeakperformancelevel 2 OperateyournewCelebrityinfamiliarandsafeareas Driveslowlyatfirst anddonottraveltoofarfromyour homeorfamiliarsurroundingsuntilyouhavebecomeaccustomedtoyourCelebrity scontrolsandhaveprop erly broken in your Scooter s batteries 3 Fully recharge the batteries They should be at over 90 of their peak performance level 4 Operate your Cele...

Page 28: ...r height SeeVIII ComfortAdjustments n Is the seat locked securely in place SeeVIII ComfortAdjustments n Is the tiller handle at a comfortable setting and locked securely in place SeeVIII ComfortAdjustments n Is the key fully inserted into the key switch and in the on position See V Your Celebrity n Is the speed adjustment dial set to a slower setting See V Your Celebrity n Are you grasping the han...

Page 29: ...e of your Celebrity 4 Make certain that the seat is locked securely in position 5 Carefully and safely get out of the seat and stand to the side of your Celebrity 6 Youmay ifyouwish leavetheseatfacingtothesidetofacilitateboardingyourCelebritythenexttimeyouare going to operate it POWER DOWN TIMER FEATURE Your scooter is equipped with an energy saving automatic power down timer feature designed to p...

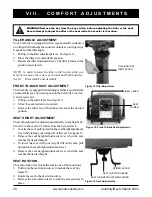
Page 30: ...d position SEAT HEIGHT ADJUSTMENT Theseatheightcanbeadjustedpneumaticallytoanyheightbe tween 17 inches and 20 5 inches from the Scooter deck 1 To raise the seat pull upward on the seat height adjustment leverwhiletakingyourweightoffoftheseat Seefigure15 2 Release the seat height adjustment lever when the seat reaches the desired height 3 To lower the seat with your weight still on the seat pull up...

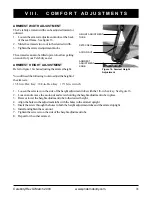
Page 31: ...O M F O R T A D J U S T M E N T S HEIGHT ADJUSTMENT TUBE ACORN NUT SETSCREW Figure 16 Armrest Height Adjustment ARMREST ADJUSTMENT KNOB 5 32 in Hex Key 1 8 in Hex Key 7 16 in wrench 1 Loosen the setscrew on the side of the height adjustment tube with the 1 8 in hex key See figure 16 2 Loosen and remove the acorn nut and screw holding the height adjustment tube in place 3 Raise or lower the height ...

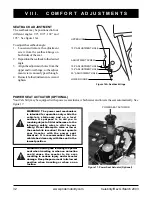
Page 32: ... the vehicle be driven only with the seat in the lowest position SEATBACK ADJUSTMENT The seatback may be positioned to four different angles 90 100 102 and 105 See figure 16A To adjust the seatback angle 1 Loosen and remove the adjustment screw from the seatback hinge on both sides of the seat 2 Repositiontheseatbacktothedesired angle 3 Align the adjustment holes from the upperandlowerhinge sothea...

Page 33: ...rity See figure 18 4 Gently lift the rear shroud off of the Celebrity See figure 19 5 Disconnect the battery tie down straps if so equipped 6 Unplug both black and white 2 pin battery harnesses See figure 20 7 Unplug the silver front to rear harness that connects the control console assembly to the rear electronics module See figure 21 8 Lift both batteries off the Celebrity See figure 22 9 Push t...

Page 34: ... A S S E M B LY Figure 24 Ball Detent Pins With Rings Figure 25 Separating The Frame Sections Figure 26 Motor Harness Figure 22 Battery Removal Figure 21 Disconnecting the Front to Rear Cable Figure 20 Disconnecting the Battery harnesses UNLOCKED POSITION Figure 23 Locking Cam Levers ...

Page 35: ...ittogetheruntilthefronthalfreachesitsinsertionlimit 5 Secure the front and rear sections with the ball detent pins 6 Push the frame lock levers back to their locked downward position 7 Plugthesilverfront to rearharnessintothematingplugfoundontherearelectronicsmodule 8 Putthebatteriesinplaceandplugtheblackandwhite2 pinbatteryharnessesintotherearelectronicsmodule 9 Reconnect the battery tie down str...

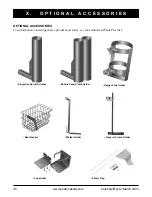
Page 36: ... C C E S S O R I E S OPTIONAL ACCESSORIES For information concerning these optional accessories see your authorized Pride Provider Walker Holder Single Cane Crutch Holder Forearm Crutch Holder Double Cane Crutch Holder Oxygen Tank Holder Rear Basket Cup Holder Safety Flag ...

Page 37: ...the rear electronics module See IX DisassemblyandAssembly n Be sure the auto shutoff feature hasn t been activated See VII Operation n Check the fuses See XII Care and Maintenance for fuse replacement What if the motor runs but my Celebrity does not move n With the key turned to the on position check the status LED If the LED flashes three times a short pause thentwotimes thisisthemanualfreewheell...

Page 38: ...iesandCharging or IV Specifications forinformationaboutyourCelebrity sbatterytype What if the battery condition meter dips way down and the motor surges or hesitates when I press my Celebrity s throttle control lever See V Your Celebrity n Fully charge your Celebrity s batteries SeeVI Batteries and Charging n Have your authorized Pride Provider load test each battery n Or see the previous troubles...

Page 39: ...ionalapplicationofrubberorvinylconditioner WARNING Do not use a rubber or vinyl conditioner on the scooter s vinyl seat or tire tread They will become dangerously slippery and result in personal injury and or damage to your scooter BATTERY TERMINAL CONNECTIONS n Makecertainthattheterminalconnectionsremaintightanduncorroded n Thebatteriesmustsitflatinthebatterywells n The battery terminals should f...

Page 40: ...it will be exposed to temperature extremes For prolonged storage you may wish to place several boards under the frame of your scooter to raise it off of the ground This takes the weight off the tires and reduces the possibility of flat spots developing on the areas of the tirescontactingtheground CONSOLE CHARGER AND REAR ELECTRONICS n Keep these areas free of moisture n Allowtheseareastodrythoroug...

Page 41: ...notreturnfaultypartstoPride without prior consent All transportation costs and shipping damage incurred while submitting parts for repair or replacementaretheresponsibilityoftheoriginalpurchaser WARRANTY EXCLUSIONS n ABS plastic shrouds and footrest covers wear items and not warranted n Batteries thebatterymanufacturerprovidesa limitedwarranty n Tires and tire tubes wear items and not warranted n ...

Page 42: ...42 www pridemobility com Celebrity Rev G March 2003 N O T E S ...

Page 43: ...182 Susquehanna Ave Exeter PA 18643 1 800 800 8586 www pridemobility com ...

Reviews: