background image

Jazzy EVO 614 Series 

www.pridemobility.com 

23

V I I .   C A R E   A N D   M A I N T E N A N C E


„

Check the entire power chair for loose hardware and changes in the function or performance of the power 

chair. See your authorized Pride Provider for service or repair.


„

Keep your power chair clean and free of foreign material, such as mud, dirt, hair, food, drink, etc.


„

Spring shocks and gas dampers should be visually checked for any abnormality, structure damage, or bent 

rods. See your authorized Pride Provider for repair.

Yearly Checks

Take your power chair to your authorized Pride Provider for yearly maintenance, especially if you use your power chair 

on a daily basis. This helps ensure that your power chair is functioning properly and helps prevent future complications.

Storage

Your power chair should be stored in a dry place, free from temperature extremes. When storing, disconnect the 

batteries from the power chair. See VI. “Batteries and Charging.” 

WARNING! If you fail to store the unit properly, the frame can rust and the electronics can be damaged.

Batteries that are regularly and deeply discharged, infrequently charged, stored in extreme temperatures, or stored without 

a full charge may be permanently damaged, causing unreliable performance and limited service life. It is recommended 

that you charge the batteries periodically throughout periods of prolonged storage to ensure proper performance.

You may wish to place several boards under the frame of your power chair to raise it off of the ground during 

periods of prolonged storage. This takes the weight off the tires and reduces the possibility of flat spots developing 

on the areas of the tires contacting the ground.

Disposal of Your Power Chair

Your power chair must be disposed of according to applicable local and national statutory regulations. Contact your 

local waste disposal agency or authorized Pride Provider for information on proper disposal of power chair packaging, 

metal frame components, plastic components, electronics, batteries, neoprene, silicone, and polyurethane materials.

WARNING! Plastic bags are a suffocation hazard. Dispose of plastic bags properly and do not 

allow children to play with them.

Cleaning and Disinfection

Precautions must be taken when cleaning medical equipment/devices to lower the risk of spreading infection. 

This is to limit the spread of illness and other potentially infectious material (OPIM) (blood components).


„

Use a damp cloth and mild, non abrasive cleanser to clean the plastic and metal parts of your power chair. 

Avoid using products that may scratch the surface of your power chair.


„

If necessary, clean your product with an approved disinfectant. Make sure the disinfectant is safe for use on 

your product before application.

How to Clean/Disinfect Equipment:

Hard/Soft Surfaces


(Plastic shrouds, metal framing, seat fabric, tires, armrests and footplate mats, as applicable)


For hard/soft surfaces, remove visible contamination if present.


{

For  plastic  and  metal  use  Lysol®/Clorox®  disinfecting  spray/wipes  and  other  qualified  SARS-CoV-2 

disinfecting products. 


{

For other vinyl surfaces, clean with vinyl safe disinfecting wipes or solutions


„

Suggested Disinfectants

Summary of Contents for Jazzy EVO 614 HD

Page 1: ...Owner s Manual Including models Jazzy 614 and Jazzy 614 HD...

Page 2: ...k symbol with a red circle and red slash Intended Use The intended use of this Pride Mobility Products device is to provide mobility assistance to persons with mobility impairment who have the capacit...

Page 3: ...ems or other components are incorporated into a finished power chair manufactured or assembled by any third party that third party is responsible to assure the safety functionality and legal complianc...

Page 4: ...in this manual which you do not understand or if you require additional assistance for setup or operation please contact your authorized Pride Provider Failure to follow the instructions in this manu...

Page 5: ...afety Guide that is included with your power chair Please become familiar with all the warnings and safety information found in the Consumer Safety Guide and refer to this resource often Locked and in...

Page 6: ...ce Simply take your time and you will soon be in full and confident control as you maneuver through doorways on and off of elevators up and down ramps and over moderate terrain Below are some precauti...

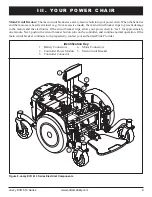
Page 7: ...se The power base assembly includes two motor brake assemblies two drive wheels four caster wheels two batteries and wiring harnesses See figures 1 2 and 3 1 2 3 5 7 8 11 6 4 A B 9 10 12 Figure 1 The...

Page 8: ...the motors Battery Connector This is where the power module connects to the batteries Controller Connector This is where the controller connects to the power module or power base Each controller uses...

Page 9: ...s the main circuit breaker trips to prevent damage to the motors and the electronics If the circuit breaker trips allow your power chair to rest for approximately one minute Next push in the circuit b...

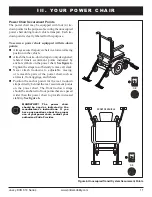
Page 10: ...e the drive motors 1 Locate the lever on the front of each motor 2 Push the two levers downward to engage the drive motors drive mode See figure 4 3 Pull the two levers upward to disengage the drive m...

Page 11: ...on the power chair See figure 6 Tighten the straps to sufficiently remove all slack Never attach tie downs to adjustable moving or removable parts of the power chair such as armrests front riggings an...

Page 12: ...free to pivot and you may lose control of the seat if they do so To install the seat 1 Slide the seat down onto the power base See figure 7 2 Install the controller into one of the armrests Tighten th...

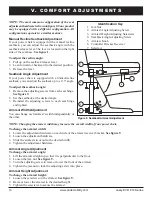
Page 13: ...chair WARNING Remove the occupant from the power chair before making any adjustments Seat Height Adjustment You can change the seat height to one of three positions in 1 in 2 5 cm increments To chang...

Page 14: ...tion Key 1 Jam Nut 2 Armrest Angle Adjusting Screw 3 Armrest Height Adjusting Setscrews 4 Seat Back Angle Adjusting Screw 5 Armrest Knob 6 Controller Bracket Receiver 7 Setscrew NOTE The most common c...

Page 15: ...Slide the controller out of the armrest 6 Loosen the setscrew in the other armrest 7 Place the controller in the other armrest 8 Tighten the setscrews in each armrest 9 Secure the controller harness t...

Page 16: ...ecured at all times Never allow the positioning belt to hang or drag on the floor as it may become entangled To install the positioning belt 1 Remove the rearmost screw that holds the seat hinge to th...

Page 17: ...harger Plug the charger directly into a properly wired standard electrical outlet PROHIBITED Do not allow unsupervised children to play near the power chair while the batteries are charging Pride reco...

Page 18: ...s and break in the batteries 3 Give the batteries another full charge of at least 8 to 14 hours and operate your power chair again The batteries will now perform at over 90 of their potential 4 After...

Page 19: ...reset the charge reminder feature once it has been activated it is important to note that the controller must be powered on prior to attaching the charger to the charger port and must remain on throug...

Page 20: ...ction of the care it receives How can I ensure maximum battery life A fully charged deep cycle battery will provide reliable performance and extended battery life Keep your power chair s batteries ful...

Page 21: ...power chair to an authorized Pride Provider Power chairs that are frequently exposed to sources of water such as incontinence should be inspected often for corrosion and electronic components may need...

Page 22: ...o not handle or try to repair it See your authorized Pride Provider if there is a problem Visually inspect the controller harness Make sure that it is not frayed cut or has any wires exposed See your...

Page 23: ...it off of the ground during periods of prolonged storage This takes the weight off the tires and reduces the possibility of flat spots developing on the areas of the tires contacting the ground Dispos...

Page 24: ...mixture of 70 isopropyl alcohol 30 water solution The cloth should be damp but not dripping or excessively wet Dry surfaces thoroughly to avoid pooling of liquids and prior to boxing WARNING Follow al...

Page 25: ...urn off the power to the controller 2 Raise and support the power base at least 1 in 25 mm off the ground 3 If you are changing a pneumatic tire completely deflate it before removing the wheel 4 Remov...

Page 26: ...x old and new batteries Always replace both batteries at the same time To replace the batteries 1 Turn off the power to the controller 2 Make sure that the power chair is in drive mode See III Your Po...

Page 27: ...t Removed for Clarity INCORRECT CONNECTION 1 Rear Shroud 2 Top Shroud 3 Right Battery 4 Left Battery 5 Thumbscrews Identification Key BATTERY SET CONFIGURATION POSITIVE RED TERMINAL POST NEGATIVE BLAC...

Page 28: ...blies Does not power up Powers up but does not move Loose seat or seating conponents Corrective Maintenance If the battery condition meter does not light up when you turn on the power Check the harnes...

Page 29: ...Jazzy EVO 614 Series www pridemobility com 29 N O T E S...

Page 30: ...30 www pridemobility com Jazzy EVO 614 Series N O T E S...

Page 31: ......

Page 32: ...sed EU Representative De Zwaan 3 1601 MS Enkhuizen www pride mobility nl www pridemobility eu Switzerland Authorised CH Representative SODIMED SA Chemin Praz Devant 12 1032 Romanel sur Lausanne Italy...

Reviews: