background image

10

              www.pridemobility.com

                      J

et 2 HD

I I .   S A F E T Y

Transfers

Transferring onto and off of your power chair requires a
good sense of balance. Always have an attendant or
healthcare professional present while learning to properly
transfer yourself.

To eliminate the possibility of injury, Pride recommends that
you or a trained attendant perform the following tasks be-
fore attempting a transfer:

!

Turn off the power  to the controller . See VII. “Op-
eration.”

!

Ensure your power chair is not in freewheel mode.
See III. “Your Power Chair.”

!

Turn both caster wheels toward the transfer destina-
tion to improve power chair stability during transfer.

!

Make sure both armrests are flipped up or removed
from your power chair.

!

Flip up the foot platform or move the leg rests aside;
this will help to keep your feet from getting caught on
the foot rigging during the transfer.

!

Reduce the distance between your power chair and
the object you are transferring onto.

WARNING! Before transferring, position yourself as far back as possible in the power

chair seat to prevent the power chair from tipping forward during transfer and causing

injury.

WARNING! Avoid using your armrests for weight bearing purposes. Such use may cause

the power chair to tip and cause personal injury.

WARNING! Avoid putting all of your weight on the foot riggings. Such use may cause the

power chair to tip and cause personal injury.

Doors

!

Determine if the door opens toward or away from you.

!

Drive your power chair gently and slowly forward to push the door open. Or drive your power chair gently
and  slowly backwards to pull the door open.

Elevators

Modern elevators have a door edge safety mechanism that, when pushed, reopens the elevator door(s).

!

If you are in the doorway of an elevator when the door(s) begin to close, push on the rubber door edge or
allow the rubber door edge to contact the power chair and the door will reopen.

!

Use care that pocketbooks, packages, or power chair accessories do not become caught in elevator doors.

Lift/Elevation Products

If you will be traveling with your power chair, you may find it necessary to use a lift/elevation product to aid in
transportation. Pride recommends that you closely review the instructions, specifications, and safety information
set forth by the manufacturer of the lift/elevation product before using that product.

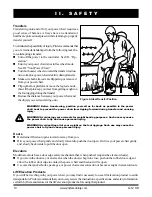
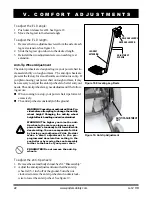
Figure 4. Ideal Transfer Position

Summary of Contents for Jet 2HD

Page 1: ...s Power Chairs Power Chairs Power Chairs Power Chairs Power Chairs Power Chairs Power Chairs Power Chairs Power Chairs Power Chairs Power Chairs Power Chairs Stylish Design and Premium Performance Own...

Page 2: ...her personal injury component damage or malfunction black symbol on yellow triangle with black border MANDATORY These actions should be performed as specified Failure to perform mandatory actions can...

Page 3: ...TERIES AND CHARGING 28 IX CARE AND MAINTENANCE 32 X WARRANTY 36 This owner s manual is compiled from the latest specifications and product information available at the time of publication We reserve t...

Page 4: ...and or damage to the power chair includingvoidingthewarranty PURCHASER S AGREEMENT By accepting delivery of this product you promise that you will not change alter or modify this product or removeorr...

Page 5: ...edicated to current and potential Pride product owners Youwillgainaccesstointerviews stories recreationideas dailylivingtips productandfundinginforma tion andinteractivemessageboards Thesemessageboard...

Page 6: ...e Simply take your time and you will soon be in full and confident control as you maneuver through doorways on and off of elevators up and down ramps and over moderate terrain Below are some precautio...

Page 7: ...onal injury Incline Information More and more buildings have ramps with specified degrees of inclination designed for easy and safe access Some ramps may have turning switchbacks 180 degree turns that...

Page 8: ...rake activatesmechanicallyafterregenerativebrakingslowsthevehicletonearstop orwhen power is removed from the system for any reason Cornering Information Whileyourpowerchairisequippedwithrearcasterwhee...

Page 9: ...rmadmirablyonpackedsoil grass and gravel Feel free to use your power chair safely on lawns and in park areas Reduce your power chair s speed when driving on uneven terrain and or soft surfaces Avoidta...

Page 10: ...during transfer and causing injury WARNING Avoid using your armrests for weight bearing purposes Such use may cause the power chair to tip and cause personal injury WARNING Avoid putting all of your w...

Page 11: ...nd other healthcare professionals are responsible for determining your requirement for a positioning belt in order to operate your power chair safely WARNING If you require a positioning belt to safel...

Page 12: ...r ability to operate your power chair in a safe manner Alcohol The power chair user must exercise care and common sense when operating his her power chair This includes awarenessofsafetyissueswhileund...

Page 13: ...authorized by Pride WARNING The electrically powered mobility vehicle itself can disturb the performance of other electrical devices located nearby such as alarm systems NOTE For further information o...

Page 14: ...SSEMBLY THE JET 2 HD TheJet2HDhastwomainassemblies theseatandthepowerbase Seefigures5through7 Typically theseating assembly includes the armrests seat back seat base and a controller The power base as...

Page 15: ...Options Medium back standard Highbackwithheadrest Drivetrain Twomotor mid wheel Batteries NF 22 batteries Range Up to 25 miles BatteryCharger 4 amp onboard standard Electronics 50 amp VSI Controller s...

Page 16: ...reaker button turn on the controller and continue normal operation If the main circuit breaker continues to trip repeatedly contact your authorized Pride Provider Onboard Battery ChargerAC PowerCord R...

Page 17: ...presence of an attendant Do not disengage the drive motors when the power chair is on an incline The chair could roll down on its own causing injury To engage or disengage the freewheel feature 1 Turn...

Page 18: ...est To install the controller 1 Flipupthearmrestandloosenthesetscrew Seefigure14 2 Slide the controller mounting bracket into the armrest to thedesiredposition 3 Tighten the setscrew to secure the con...

Page 19: ...nce to lift or carry them Please refer to the specifications table for specific component weights before you disassemble the power chair WARNING Prevent injury Remove the occupant from the power chair...

Page 20: ...urspecificneeds To change the armrest angle 1 Liftthearmreststraightupsothatitisperpendicularto the floor See figure 14 2 Loosen the jam nut 3 Turn the adjusting screw clockwise to raise the front of...

Page 21: ...tofthefoot platform 3 Turn the setscrew counterclockwise to raise the front of thefootplatform 4 Tightenthejamnut Swing away Footrests Swing away Footrests SFRs enable you torotate the foot rests toth...

Page 22: ...stop your power chair tips forward excessively Theanti tipwheelsconstantlyrubtheground WARNING Consult your authorized Pride Pro vider before attempting to change the anti tip wheel height Changing t...

Page 23: ...s on the left swivel the seat counterclockwise and then pull the seat upward Body Shroud Removal The body shroud is a one piece molded plastic body that covers the power base frame It helps protect th...

Page 24: ...mmed incorrectly or outside of the safe limits as determined by your healthcare professional it can create a dangerous situation Only the power chair manu facturer an authorized representative of the...

Page 25: ...ght will begin to slowly flash reminding you the batteries need to be charged immediately Rapid flash of lights Indicates a fault in the VSI or the electrical system Refer to VSI Error Codes Ripple si...

Page 26: ...rward position until the VSI beeps 3 Pull the joystick to the full rearward position until the VSI beeps 4 Release the joystick There should be a long beep 5 The VSI is now unlocked NOTE If the above...

Page 27: ...ects aproblemeitherinitsowncircuitsorinthepowerchair selectricalsystem itmaydecidetostopthepowerchair depending on the severity of the problem The VSI is designed to maximize the user s safety under a...

Page 28: ...h the supplied onboard battery charger Do not use an automotive type battery charger PROHIBITED Removal of grounding prong can create electrical hazard If necessary properly install an approved 3 pron...

Page 29: ...rdtocompletethechargingcycle Whenthebatteryisfullycharged theamperagefrom the charger is nearly at zero This is how the charger maintains a charge but does not overcharge the battery Can I use a diffe...

Page 30: ...ge andthenacceptarelativelyquickrecharge AGMandGel Cellbatteriesshouldbechargedas oftenaspossible Theydonothavea memory likenickel cadmiumbatteries We work closely with our battery manufacturer to pro...

Page 31: ...y Acoldor frozen battery should be warmed for several days prior to recharging What about public transportation AGM and Gel Cell batteries are designed for application in power chairs and other mobili...

Page 32: ...ke your power chair to your authorized Pride Provider Temperature Some of the parts of your power chair are susceptible to extreme changes in temperature Always keep your power chair between the tempe...

Page 33: ...k if a noticeable difference in performance is detected or if the joystick does not operate properly To calibrate the joystick power off the unit place the joystick in the center position and power th...

Page 34: ...an result in personal injury To replace the batteries 1 Turn off the power to the controller 2 Unplugtheconnectorsfromtheelectronicstray 3 Remove the seat 4 Removetheshroud 5 Loosenthewingnutsonthepos...

Page 35: ...re that the controller s power is turned off and the power chair is not in freewheel mode before performing this procedure WARNING Completely deflate the tire before attempting re pair Follow these ea...

Page 36: ...Powers up but does not move Corrective Maintenance If the battery indicator gauge does not light up when you turn on the power Check the harness connections Make sure they are tight Check the circuit...

Page 37: ...nents including Brakes electronicfunctionONLY l Motor gearboxassembly Foot riggings Bearingsandbushings Plastic components except body ElectricalHarness Foot rigging mounting brackets SIX MONTH LIMITE...

Page 38: ...nual and those located on your Pride product can result in personal injury or product damage and will void Pride s product warranty There is no other express warranty IMPLIED WARRANTIES Implied warran...

Page 39: ...roughly inspected your Jet 2 HD The following checkmarks indicate that it has been driven and inspected Pride keeps a more detailed report on file at the factory Date Inspected Inspector FitandFinish...

Reviews: