Lift Chair Series 11
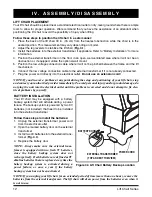
MASSAGE
UNIT
HEAT CONNECTION
TO JUNCTION BOX
MASSAGE
UNIT
JUNCTION
BOX
For LL770 Lift Chairs, after attaching the
back per the KD instructions, fully recline
the lift chair and place the base flap over
the gap between the seat and back.
Using the reusable fasteners, secure the
base flap to the chair and then secure
the bottom-most pillow to the base flap.
Place the bolster pillow over the covered
gap, slightly wedging it between the back
and seat, and return the LL770 Lift Chair
to the seated position.
For units equipped with the heat and
massage option, connect the heat and
massage harnesses to the chair.
The heat pad(s) and massage units have
been factory installed on your lift chair. You
should only need to connect the harnesses
to the chair. If you find any further assem-
bly is required with this system, contact
your authorized provider immediately.
*STANDARD HEAT/MASSAGE CONFIGURATION
I V . A S S E M B L Y / D I S A S S E M B L Y
NOTE: See figure 4.2 for additional instructions regarding LC770 models.
4. Connect the hand control harness to the lift chair and heat/massage harnesses (if equipped) to the
lift chair
(Fig 4.3).
WARNING! Do not connect the push-button or heat/massage hand control
directly to the motor. Connect the hand control directly to the junction box to
prevent equipment damage.
5. Attach the chair-back to the hook and loop flaps on the bottom of the chair base.
Figure 4.2 LL770 Additional Assembly
Figure 4.3 Harness Connections
WARNING! Be aware that the average temperature of the heating pad ranges
between 106°F - 118°F (41°C - 48°C) and can be affected by the ambient
temperature of the room and clothing worn by the user. Your provider
recommends that the heat units not be used for more than 20 minutes at a time
as prolonged exposure may have an adverse effect on sensitive skin. However,
you should consult the physician about how often you should use the heat and
massage options on your lift chair.
NOTE: Depending on chair width, you may need to slide on one side of the back at a time. If this is the
case, level the chair-back before pressing down to lock into position.
3. Push firmly on the top of the back to lock into position. You must hear a click from each side of the chair
to ensure the back is locked in properly.
NOTE: Pull up on the chair-back to ensure that it is locked in place.
Summary of Contents for LIFT CHAIR Series
Page 1: ...LIFT CHAIR...
Page 36: ......


