background image

5

Pathrider 140 XL                                   www.pridemobility.com 
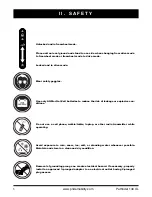
I I .   S A F E T Y

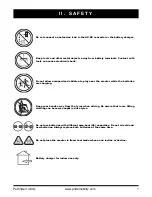
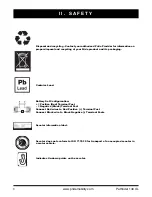
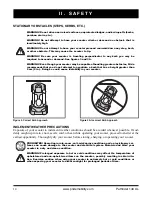
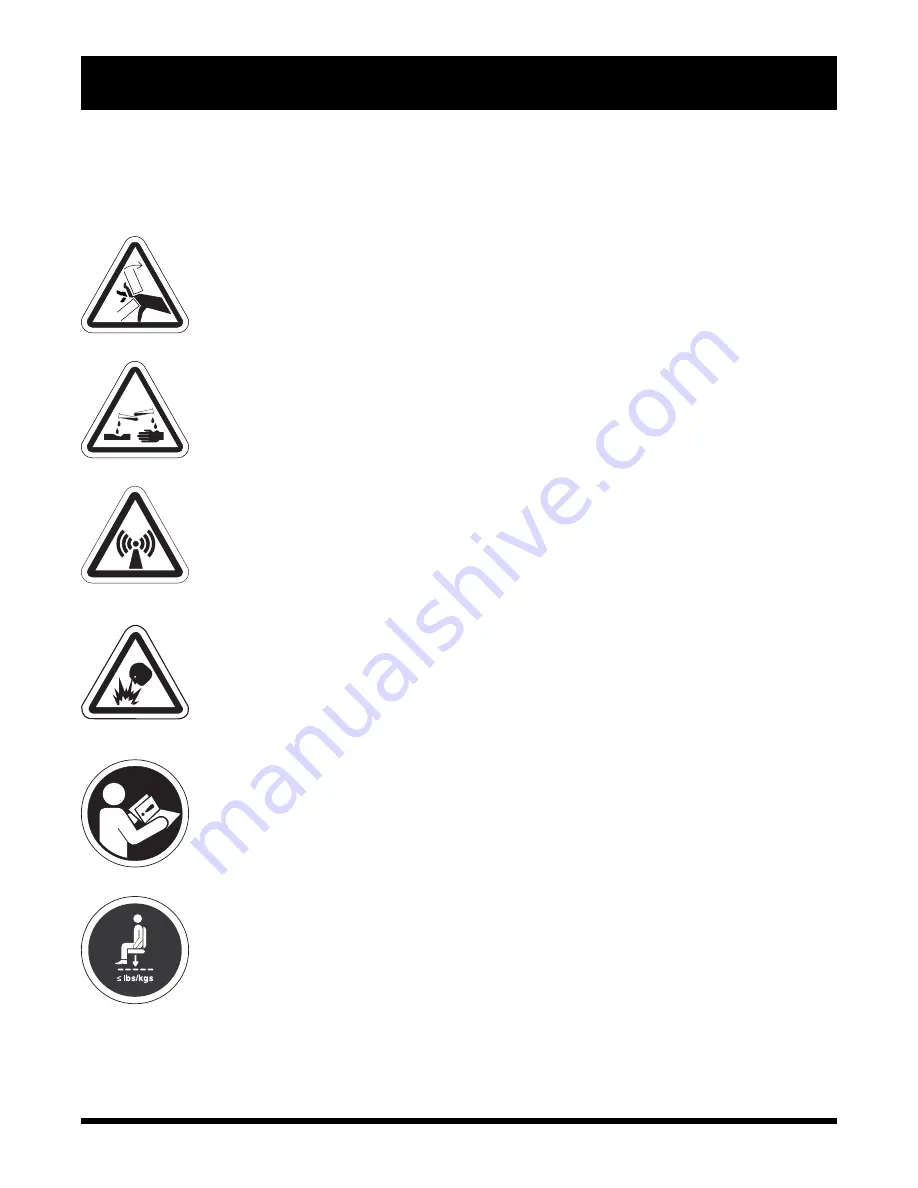
PRODUCT SAFETY SYMBOLS

The symbols below are used on the scooter to identify warnings, mandatory actions, and prohibited actions.
It is very important for you to read and understand them completely. 

Pinch/Crush points created during assembly.

Corrosive chemicals contained in battery. 

EMI-RFI - This product has been tested and passed at an immunity level of 20 V/m.

Explosive conditions exist!

Read and follow the information in the owner’s manual.

Maximum seating weight.

Summary of Contents for PATHRIDER 140 XL

Page 1: ...PATHRIDER 140 XL...

Page 2: ...ROHIBITED These actions are prohibited These actions should not be performed at any time or in any circumstances Performing a prohibited action can cause personal injury and or equipment damage On the...

Page 3: ...m C O N T E N T S I INTRODUCTION 4 II SAFETY 5 III YOUR SCOOTER 19 IV BATTERIES AND CHARGING 24 V OPERATION 30 VI COMFORT ADJUSTMENTS 32 VII BASIC TROUBLESHOOTING 35 VIII CARE AND MAINTENANCE 37 IX WA...

Page 4: ...that you will not change alter or modify this product or remove or render inoperable or unsafe any guards shields or other safety features of this product fail refuse or neglect to install any retrof...

Page 5: ...s and prohibited actions It is very important for you to read and understand them completely Pinch Crush points created during assembly Corrosive chemicals contained in battery EMI RFI This product ha...

Page 6: ...only AGM or Gel Cell batteries to reduce the risk of leakage or explosive con ditions Do not use a cell phone walkie talkie laptop or other radio transmitter while operating Avoid exposure to rain sn...

Page 7: ...allow unsupervised children to play near the scooter while the batteries are charging Do not use batteries with different amp hour Ah capacities Do not mix old and new batteries Always replace both ba...

Page 8: ...oduct and its packaging Contains Lead Battery Set Configureation Positive Red Terminal Post Negative Black Terminal Post Connect Red wires to Red Positive Terminal Post Connect Black wire to Black Neg...

Page 9: ...rofessional specially trained in assisting a scooter user in various daily living activities As you begin using your scooter during daily activities you will probably encounter situations in which you...

Page 10: ...erinflate them resulting in a burst tyre NOTE If the tyre on your scooter lists the psi rating only use the following conversion formulas to find the bar or kPa rating bar psi x 0 06895 kPa psi x 6 89...

Page 11: ...or down a potentially hazardous incline i e areas covered with snow ice cut grass or wet leaves WARNING Even though your scooter is capable of climbing slopes greater than those illustrated in figure...

Page 12: ...turning uneven road surfaces inclined road surfaces riding from an area of low traction to an area of high traction such as passing from a grassy area to a paved area especially at high speed while t...

Page 13: ...ng is difficult 100 humidified oxygen should be adminis tered by a qualified individual Seek medical attention immediately and keep the affected individual warm and at rest If ignited use dry chemical...

Page 14: ...ooter INCLEMENT WEATHER PRECAUTIONS Exposure of your scooter to inclement weather conditions should be avoided whenever possible If sud denly caught up in rain snow severe cold or heat while operating...

Page 15: ...r is acting as a speed governor If the key is switched on while in freewheel mode you will encounter considerable resistance at any speed This prevents the scooter from gaining unwanted momentum shoul...

Page 16: ...s below be sure to comply with all other battery handling information MANDATORY Battery posts terminals and related accessories contain lead and lead compounds Wear goggles and gloves when handling ba...

Page 17: ...rmrests up to make getting onto and off of the scooter easier WARNING Position yourself as far back as possible in the scooter seat to prevent the scooter from tipping WARNING Avoid putting all of you...

Page 18: ...y waves can have an adverse affect on the performance of electrically powered mobility vehicles Electromagnetic and Radio Frequency Interference can come from sources such as cellular phones mobile tw...

Page 19: ...he tiller console to moisture In the event that the tiller console does become exposed to moisture do not attempt to operate your scooter until the tiller console has dried thoroughly Speed Adjustment...

Page 20: ...ard to turn on the lighting system Toggle the switch rearward to turn off the lighting system WARNING Scooter users are required to use their lights when visibility is restricted day or night Hazard L...

Page 21: ...ed for use as an emergency brake and or parking brake only Off board Charger Port The off board charger power lead plugs into this port during battery charging The off board charger port will be locat...

Page 22: ...d on the manual freewheel lever to disable the drive system and the brake system This will enable you to push the scooter 3 Pull back on the manual freewheel lever to reengage the drive and the brake...

Page 23: ...r could tip or slide out of place Figure 10 Front Section Figure 10A Rear Section FRONT SECUREMENT POINTS REAR SECUREMENT POINTS Main Circuit Breaker When the voltage in the batteries becomes low or y...

Page 24: ...ts through these slots WARNING If your battery charger has not been tested and approved for outdoor use then do not expose it to adverse or extreme weather conditions If the battery charger is exposed...

Page 25: ...es the charger work When your scooter s battery voltage is low the charger works harder sending more electrical current to the batteries to bring up their charge As the batteries approach a full charg...

Page 26: ...d without a full charge may be permanently damaged causing unreliable performance and limited service life How can I get maximum range or distance per charge Rarely will you have ideal driving conditi...

Page 27: ...be serviced or replaced by an authorised Pride Provider or a qualified technician PROHIBITED Keep tools and other metal objects away from battery terminals Contact with tools can cause electrical sho...

Page 28: ...o recharge the battery It may take a few days for the temperature of your scooter s batteries to stabilize and adjust to their new room or ambient temperature More importantly it takes a few charging...

Page 29: ...come accustomed to your scooter s controls and have properly broken in your scooter s batteries 3 Fully recharge the batteries They should be at over 90 of their peak performance level 4 Operate your...

Page 30: ...ort Adjustments Is the key fully inserted into the key switch and turned clockwise to the on position Does the horn work properly Is your proposed path clear of people pets and obstacles Have you plan...

Page 31: ...hat the seat is fixed securely in position 5 Carefully and safely get out of the seat and stand to the side of your scooter 6 You can leave the seat facing to the side to facilitate boarding your scoo...

Page 32: ...tall the mirror see figure 16 1 Determine on which side to install the mirror and remove the rubber plug from the top of the tiller handle 2 Insert the threaded end of the mirror holder into the openi...

Page 33: ...ard or rearward 3 Release the seat sliding lever once the seat is in the desired position ARMREST ANGLE ADJUSTMENT There is an armrest adjustment dial on the underside of each armrest See figure 18 Tu...

Page 34: ...ert the bolt through the appropriate ends of the positioning belt and then reinstall the bolts and belt back into the seat bottom 5 Tighten the bolts V I C O M F O R T A D J U S T M E N T S Figure 20...

Page 35: ...reset button See III Your Scooter Make certain that both battery harnesses and the front to rear harness are firmly connected Be sure the power down timer feature has not been activated See V Operatio...

Page 36: ...ve both of your scooter s batteries load tested by your authorised Pride Provider You may also perform the load test yourself Battery load testers are available at most automotive parts stores Follow...

Page 37: ...he plastic and metal parts of your scooter Avoid using products that may scratch the surface of your scooter If necessary clean your product with an approved disinfectant Make sure the disinfectant is...

Page 38: ...ing repair WARNING Be sure that the key is removed from the key switch and the scooter is not in freewheel mode before performing this procedure WARNING When changing a pneu matic tyre remove only the...

Page 39: ...ove the fuse by pulling it out of its slot 2 Examine the fuse to be sure it is blown See figures 23 and 23A 3 Insert a new fuse of the same rating WARNING The replacement fuse must exactly match the r...

Page 40: ...y damaged causing unreliable performance and limited service life It is recommended that you charge the scooter batteries periodically throughout periods of prolonged storage to ensure proper performa...

Page 41: ...s which may need replacement due to normal wear and tear tyres belts bulbs upholstery plastic shrouds motor brushes fuses and batteries or damage to the prod uct caused by misuse or accident for which...

Page 42: ...del Number SC714 Obstacle Climbing Ability 13 cm 5 in Overall Length2 142 8 cm 56 25 in Overall Width2 69 2 cm 27 25 in Total Weight 172 59 kg 380 5 lbs Total Weight Without Batteries2 5 117 70 kg 259...

Page 43: ...N D I X I S P E C I F I C A T I O N S Figure 24 Dimensions 69 2 cm 27 25 in 142 8 cm 56 25 in 13 33 cm 5 25 in 114 3 110 5 cm 45 43 5 in 47 cm 18 5 in 53 34 57 15 cm 21 22 5 in 208 3 cm 82 in Turning...

Page 44: ...44 www pridemobility com Pathrider 140 XL N O T E S...

Page 45: ...45 Pathrider 140 XL www pridemobility com N O T E S...

Page 46: ...46 www pridemobility com Pathrider 140 XL N O T E S...

Page 47: ...INFMANU3939...

Reviews: