Athena www.pridemobility.com 21
SECUREMENT
BRACKET
SECUREMENT
BRACKET
SECUREMENT BRACKET
I V . A S S E M B L Y
Seat Installation and Removal
Do not attempt to install or remove your seat. If your
seat needs to be removed and reinstalled, contact your
Quantum Rehab Dealer.
WARNING! Your seat should only be
installed or adjusted by a Quantum
Rehab Dealer.
NOTE: If your power chair is equipped with a Syn-
ergy Seat or a TRU-Balance Power Positioning Sys-
tem, refer to the information provided in separate
manuals.
Controller Installation
It may be necessary to install your controller.
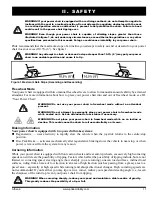
Figure 10. Controller Harness Routing
To install the controller:
1. Install the controller into one of the armrests. See V. “Comfort Adjustments.”
2. Route the controller harness to the front of the power base, ensuring the harness cannot be pinched in the seat
hinge. See figure 10.
3. Plug the controller harness into the connector. See figure 6.
4. Secure the controller harness to the armrest receiver with wire ties.
MANDATORY! Prevent controller harness damage! Avoid routing the controller harness on the
outside of the armrest pad. Route the harness under the armrest or toward the inside of the
armrest pad. Use correct tie-down points for the controller harness to prevent the harness from
getting caught in the drive tyres, pinched in the seat frame or damaged when passing through
doorways.
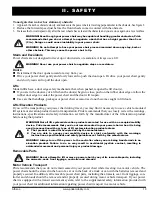
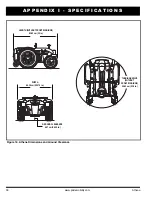
Transit Securement System
If your power chair is equipped with a transit
securement system, it is equipped with manufacturer-
installed front and rear securement brackets and
positioning belt anchoring brackets. See figure 11.
Refer to the supplement provided with your power
chair for information on how to use the transit
securement system.
Figure 11. Transit Securement Brackets

