background image

CAUTION!

1.

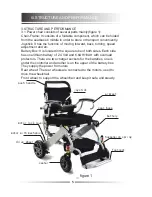
Make sure that the locating pins have been inserted into

the


positioning holes when the wheelchair has been fully

folded open

,


and then it can be used.

2.

Make sure that the anti-tippers are fully pulled out in order

to prevent the wheelchair back 

from tipping over, which

 may

result


inpersonal


injury.

3.

Batteries must be fully inserted

.

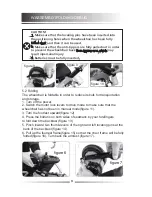
5.2 Folding

The wheelchair is foldable in order to reduce its bulk for transportation 

and storage.

1.

Turn off the power.

2.

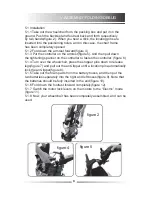
Switch the motor lock levers to drive mode to make sure that the

wheelchair has not been in manual mode(figure 11).

3.

Turn the footrest upward(figure 12)

4.

Press the buttons on both sides of seatback by your forefingers

t

o fold down the backrest (figure 13)

5.

Pinch inward two thumb-levers of the right and left locating pins at


the

back of the 

backrest 

(figure 14).

6.

Pull up the footrest frame(figure 15) so that the chair frame will be fully

folded(figure 16). Turn back the armrest.(figure 17).

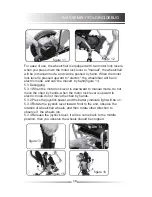
For ease of use

, the wheelchair is equipped with two motor lock levers, 

when 

you press down

 the motor lock lever to "manual", the wheelchair 

will be 

in

 manual mode, 

and

 can be pushed by hand

When the motor 

lock lever

 is pressed

 upward to "electric", the wheelchair will be on 

electric mode, 

and

 can't be moved  by hand(figure 11)

5.3 Debugging

5.3.1 When the motor lock lever 

is 

downward to manual mode, do not  

move the chair by hands; when the motor lock lever

 is 

upward to 

electric mode,do not move the chair by hands.

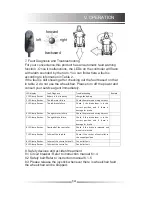
5.3.2 Press the joystick power,and the battery indicate light will be on.


5.3.3 Rotate the joystick lever toward front to the end, observe the 

rotation of wheelchair wheels, and then rotate other direction to 

observe if  the wheels run.

5.3.4 Release the joystick lever, it will be come back to the middle 

position, then you observe the wheels should be stopped.

9

10

IV.ASSEM

B

LY/FOLDING/DEBUG

IV.ASSEM

B

LY/FOLDING/DEBUG

figure 6

figure 7

figure 13

figure 15

figure 14

figure 16

figure 12

figure 11

figure 8

figure 9

figure 10

Summary of Contents for i-Go

Page 1: ...Castricummer Werf 26 1901 RW Castricum The Netherlands www pride mobility co uk www quantumrehab co uk ...

Page 2: ...MANCE 5 7 ASSEMNLY FOLDING DEBUG 8 10 OPERATION 11 14 MAINTENANCE 15 16 WARRANTY 17 Rea befo ther if yo con The imp stro com I In This mat Esp con trav per dail This who This This indo slop 1 CONTENTS Pride Mobility Products Ltd INFMANUI GOUK Rev B NOVEMBER 2017 ...

Page 3: ...ht is only 19 8kg without battery Especially its structure for quick disassembly and assembly are very convenient for you to store or place at the trunk of your vehicle while traveling We are certain that the design features excellent performance and trouble free operation of this product will ensure your daily life more convenient This product is suitable for all disabled pe the elderly and the i...

Page 4: ...cohol or when tired 2 1 4 Do not drive at night or in the case of an unclear line of sight 2 1 5 Please self test before driving and refer to the manual section 5 3 Commissioning and 6 2 1 Practice before operation if driving for the first time 2 1 6 This chair is not waterproof do not expose in rain and snow as well as driving in rain or snow 2 2 Notices for use 2 2 1 This power chair can drive o...

Page 5: ...ference EMI Such interference may be from radio stations TV stations mobile phones and other radio transmitters If the wheelchair exhibits abnormal situations due the wheelchair and consult your service agent We accepts no legal liability for losses of any kind arising from failure to comply with this condition 2 2 6 Please ensure that the controller system fixed well joystick is straight and corr...

Page 6: ...s one lithium battery of 24 Volt and 6 6AH 10AH with overload protectors There are two charger sockets for the batteries one is under the controller and another is on the upper of the battery box They supply the power for motors Rear wheel The rear wheels are connected to the motors used to drive the wheelchair Front wheel to support the wheelchair and keep it safe and steady 3 2 Cl su Cl pa Cl co...

Page 7: ...heelchairs are non AP or APG type device Classification according to the operation pattern classification run continuously The power of the equipment internal power DC 24V 3 3 ELECTRICAL DIAGRAM OF MODEL 5513 st spring 6 CONTROLLER CONNECTORS FOR RIGHT MOTOR CONNECTORS FOR BATTERY CONNECTORS FOR LEFT MOTOR RIGHT MOTOR RIGHT BRAKE LEFT BRAKE LEFT MOTOR JOYSTICK III STRUCTURE AND PERFORMANCE 24V LIT...

Page 8: ... surface 水平路面制动 1000mm Minimum Turning Radius 900mm Weight Capacity 120kg cal Travel Range 10km Static Stability 6 Dynamic Stability 3 Slope Performance 6 Climing Ability 3 Motor Type 24V 200W 2 Lithium Battery Type Max Output Current of Controller 35A Max Output Current of Charger 2A Front Wheel Solid Tyre Outside size of 178mm Rear Wheel Solid Tyre Outside size of 216mm 7 SPECIFICATION III STRUC...

Page 9: ...sten the controller figure 6 5 1 4 Turn over the wheelchair press the stopper pins down to release legs figure 7 and pull out the anti tipper until a location pin automatically lock the anti tipper figure 8 5 1 5 Take out the foam pads from the battery boxes and then put the two batteries separately into the right and left boxes figure 9 Note that the batteries should be fully inserted in the end ...

Page 10: ...urn off the power 2 Switch the motor lock levers to drive mode to make sure that the wheelchair has not been in manual mode figure 11 3 Turn the footrest upward figure 12 4 Press the buttons on both sides of seatback by your forefingers to fold down the backrest figure 13 5 Pinch inward two thumb levers of the right and left locating pins at the back of the backrest figure 14 6 Pull up the footres...

Page 11: ...rd to manual mode do not move the chair by hands when the motor lock lever is upward to electric mode do not move the chair by hands 5 3 2 Press the joystick power and the battery indicate light will be on 5 3 3 Rotate the joystick lever toward front to the end observe the rotation of wheelchair wheels and then rotate other direction to observe if the wheels run 5 3 4 Release the joystick lever it...

Page 12: ...ease the joystick it will automatically go back to the center and the brake will be automatically operative to stop the wheelchair Horn button The horn will sound if you press this button Speed Up Down Buttons and Speedometer After turning on the power the speedometer shows the current maximum speed setting This maximum speed setting can be adjusted through the speed up button or speed down button...

Page 13: ... can charge its batteries quickly and easily to make your wheelchair the best CAUTION The charge of 24V 2A supplied by this company meets the requirements mentioned in Section I General Safety Requirements of medical electrical equipment GB9706 1 2007 Please be sure to use the charger we supplied and do not use the other chargers Charging the batteries using the off board charger supplied by us Be...

Page 14: ... from your assistant when the wheelchair is in manual mode Otherwise it may result in personal injury Do not set your wheelchair in manual mode by yourself while you are seated in the wheelchair Otherwise it may result in personal injury In this case please ask your assistant to help you Do not set your wheelchair in manual mode when it is on an incline Otherwise the wheelchair could be out of con...

Page 15: ...roller in the central posi on 8 LED lamp flashes Failure of the controller itself Controller fault 9 LED lamp flashes Failure of the controller Controller fault 8 Safety devices and accident treatment 8 1 Circuit breaker Refer to instruction manual 6 1 4 8 2 Safety belt Refer to instruction manual 6 1 5 8 3 Please release the joystick whenever there is wheelchair fault the wheelchair will be stopped...

Page 16: ...emperature above 55 may cause your wheelchair s speed to be reduced 9 1 3 General Guidelines Avoid beating the controller especially the joystick Avoid the exposure of your wheelchair for long time to extreme conditions such as hot cold or moisture environment Keep the controller clean Check all electric connections including the cable and connectors of the charger and ensure that they are all tig...

Page 17: ...dry it for use 9 1 5 Routine Checks Inspec on Items At any me Weekly Monthly Six monthly All parts Joys ck func on Brake System Connec on Ba ery Condi on Tire Condi on Frame Condi on Front Wheel Condi on Pureness 9 1 6 Cleaning Never wash your wheelchair with water or expose directly to water Surface of wheelchair frame is coated with a protective coating Therefore it is very easy to wipe it clean...

Page 18: ...V2A 3 4 Instruc on Manual 1pc 17 VII WARRANTY Wanrrty card 11 Opening and checking Attached the packing list in the packing box You can check whether there is any missing or damage No Name Quan ty Remark 1 Electric Wheelchair 1pc Model N5513 2 Charger 1pc Model HP0060WL2 60HZ 24V2A 3 Instruction Manual 1pc 12 Warranty 1 Two year limited warranty on frame 2 One year limited warranty on Controller 3...

Page 19: ...e ...

Page 20: ...32 Wedgwood Road Bicester Oxon OX26 4UL www pride mobility co uk ...

Reviews: