background image

I35 DAC Integrated Amplifier User Guide

15

These instructions help you get the best possible sound 

from your I35.

phase

The phase of the AC supply can make a significant 

difference to the sound.
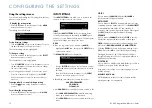
Use the Polarity Pen supplied with the I35 to verify which 

pin is live on your AC power cable.
Ensure that the live pin of the AC power cable is 

connected to the left-hand pin of the power connector, 

viewed from the back panel:

Live

Burn-in

Your Primare will start to sound best after an initial burn-in 

of approximately  hours. 
You will notice a further smaller improvement in sound 

quality for at least another 3 days’ playing.
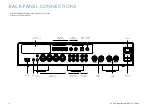
rS232 and trigger

The RS3 input allows you to connect the I35 to a 

controller system. Use a twisted (null modem) cable. For 

more information contact Primare at info@primare.net or 

visit www.primare.net.
The Trigger output allows the I35 to switch on other 

devices, such as a CD3.

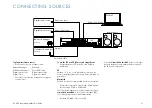
Using the I35 with a CD35

Your I35 is an ideal companion to the Primare CD35 CD 

Player. For best results link the two products together as 

follows using the two cables supplied with the I35:

to connect the trigger cable

The Trigger cable ensures that the CD35 switches on, or 

to standby, when you operate the 

O

 button on the front 

panel of the 

I35.

Connect the Trigger cable from the I35 TRIG OUT to 

the CD35 TRIG IN.

error messages

The following error messages on the front panel display 

indicate an error condition:

DeCreASe InpUt gAIn

Clipping has occurred on an input. Decrease the input 

gain; see 

INPUT GAIN, page 1.

DC errOr

Try the following

Power off I35 and disconnect the speaker connections.

If this solves the problem, check the speaker wiring.
If the problem persists

Power off I35 and disconnect all input connections.

If this solves the problem, there is a DC offset on one of 

the inputs.
If the problem persists

Contact your dealer for service arrangements.

l

l

l

l

factory reset

Press and hold the 

O

 standby button on the front panel to 

display the main firmware version number.
Press and hold the 

O

 standby button on the front panel for 

10 seconds to perform a factory reset of the I35.
You can also do a factory reset from the Prisma app, 

or from the 

generAl SettIngS

 menu; see 

GENERAL 

SETTINGS, page 13.

ADDITIONAL INFORMATION

Summary of Contents for I35 DAC

Page 1: ...I 3 5 D A C i n t e g r at e d A m p l i f i e r User Guide...

Page 2: ...es or other appliances including other amplifiers that produce heat 6 Climate The appliance has been designed for use in moderate climates 7 Racks and stands Only use a rack or stand that is recommend...

Page 3: ...cause undesired operation of the device Le pr sent appareil est conforme aux CNR d Industrie Canada applicables aux appareils radioexempts de licence L exploitation est autoris e aux deux conditions s...

Page 4: ...I35 DAC Integrated Amplifier User Guide...

Page 5: ...ging the volume 10 Selecting a source 10 Changing the display brightness 10 Connecting sources 11 Configuring the settings 12 Using the settings menus 12 INPUT SETTINGS 12 AUDIO SETTINGS 13 GENERAL SE...

Page 6: ...e describes the features and explains how to set up the amplifier for the best sound quality and ease of operation in order to allow for the most enjoyable reproduction of sound from all your sources...

Page 7: ...output on an RCA connector l l l l l l l 3 Connect inputs You can connect up to two balanced sources up to three unbalanced sources and up to six digital sources to the inputs on the back panel Balanc...

Page 8: ...f the connectors on the back panel Back panel connections Right speaker Unbalanced analogue inputs Analogue outputs IR in out Trigger RS232 Left speaker Balanced analogue inputs Power and fuse On off...

Page 9: ...rol can operate any associated Primare products you have in your system To make the remote control operate the I35 Press the AMP AV button once To make the remote control operate another product Press...

Page 10: ...shown in the following table but you can give them your own aliases to suit the sources in your system see ALIAS page 12 Label Description A1 A2 Balanced analogue on XLR connectors A3 A5 Unbalanced an...

Page 11: ...remote control l l To use the I35 as a PC Mac sound output device Connect the Mac or PC to the I35 via a USB A to USB B cable PC Windows 7 8 8 1 or 10 32 64 bit is required You need to install the Pri...

Page 12: ...rce a name eg RADIO Highlight the ALIAS item then press the SELECT button on the remote control The RENAME INPUT menu is displayed RENAME INPUT 20 A Turn the SELECTOR control on the front panel or pre...

Page 13: ...uts that have a signal FRONT PANEL Choose LOCKED to lock the front panel buttons and knobs or UNLOCKED default to use them To unlock the front panel buttons use the remote control to select this menu...

Page 14: ...z Digital output 1 x RCA Analogue input selectable between 48 or 96kHz Digital input native output Performance Gain Preamplifier output 16 5dB Line output 0dB Speaker output 42 5dB Analogue frequency...

Page 15: ...wo products together as follows using the two cables supplied with the I35 To connect the trigger cable The Trigger cable ensures that the CD35 switches on or to standby when you operate the O button...

Page 16: ...I35 DAC Integrated Amplifier User Guide 16...

Page 17: ...settings menus 12 Input gain settings menus 12 Inputs connecting 7 Input settings menu 12 IR input 8 L LED brightness settings menus 13 M Maximum volume settings menus 13 Menus Audio settings 13 Gene...

Page 18: ...L imstensgatan 7 2 1 6 1 6 L imhamn S weden More information at primare net T H E S O U N D A N D V I S I O N O F S C A N D I N AV I A S I N C E 1 9 8 6...

Reviews: