background image

A

DJUSTING

 S

CANNER

 S

ETTINGS

14

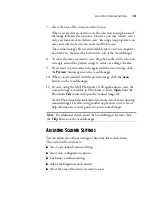
Selecting the proper scanner setting before scanning produces the best 
results for a scanned item. The scanner setting determines the resolution 
of the item and the number of possible shades of gray or color. The 
symbols next to the setting names indicate the scan mode—color, 
grayscale, or black and white. The scanner settings affect the speed of 
the scan and the file size. The Scan Manager shows the approximate file 
size of a scanned item to help you decide whether to use a particular 
scanner setting.

S

ELECTING

 S

CAN

 C

ONFIGURATION

 O

PTIONS

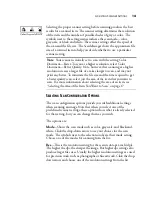
The scan configuration options provide you with additional settings 
when scanning an image. Note that when you select one of the 
predefined scanner settings, these options show what is already selected 
for that setting, but you can change them as you wish.

The options are:

Mode

—Shows the scan mode such as color, grayscale, and black-and-

white. Click the drop-down arrow to see your choices for the scan 
mode. The symbols next to the selections indicate their mode setting. 
Choose one of the modes for scanning from the list.

Res

—This is the resolution setting for the scan in dots-per-inch (dpi). 

The higher the dpi, the sharper the image. But higher dpi settings also 
produce larger files sizes. Usually the higher resolution settings are used 
for precision work, such as photographs or fine artwork. Click the drop-
down arrow and choose one of the resolution settings from the list.

Color Grayscale B&W

Note

: Your scanner is initially set to scan with the setting Color 

Document—Faster. To scan at a higher resolution, select Color 
Document—Better Quality. Note, however, that scanning at a higher 
resolution creates a larger file size, takes longer to scan, and may not 
print any better. To minimize the file size and the time required to get 
a better quality scan, select just the area of the item that you want to 
scan. For more information about selecting the area of an item, see 
“Selecting the Area of the Item You Want to Scan” on page 17.

Summary of Contents for 2400P -

Page 1: ...Parallel Port Scanner Installation Guide F O R W I N D O W S...

Page 2: ...ING ANY WARRANTY OF MERCHANTABILITY FITNESS FOR A PARTICULAR PURPOSE OR NON INFRINGEMENT ARE EXPRESSLY EXCLUDED AS A RESULT EXCEPT AS SET OUT ABOVE THE PRODUCT IS SOLD AS IS AND YOU ARE ASSUMING THE E...

Page 3: ...ner Software 6 Setting Up the Scanner 7 Scanning an Item 9 Adjusting Scanner Settings 12 Selecting a Predefined Scanner Setting 13 Selecting Scan Configuration Options 14 Customizing a Scanner Setting...

Page 4: ...images on your computer WHAT S IN THE BOX Before starting the installation check the contents of the box to make sure that all parts are included If any items are missing or damaged contact the deale...

Page 5: ...d at the lower left corner Reference frame Place items face down within this frame Markings for inches and centimeters appear along the border of the frame Printer port Plug your printer cable into th...

Page 6: ...t on your computer 32 megabytes MB or more of available internal memory RAM 70 MB of free hard disk space A VGA or SVGA monitor Recommended settings for your monitor are as many colors as possible Hig...

Page 7: ...any open files then shut down the power to your computer 2 If a printer cable is attached to your computer s parallel port unplug the cable from the computer If you don t have a printer attached to yo...

Page 8: ...you plug the scanner cable into a parallel port 5 If you unplugged a printer from the computer s parallel port earlier plug it into the Printer port on the scanner 6 Plug the power adapter into the j...

Page 9: ...your computer s CD ROM drive The CD automatically starts 3 Follow the instructions on the screen to install the scanner software on your computer Note If the CD does not automatically start make sure...

Page 10: ...elect the scanner as the one to use for Twain scanning Setting up with an application is normally a one time only process Setting up again is usually only necessary if you changed the set up to a diff...

Page 11: ...SCANNER 8 2 After the MGI PhotoSuite III application starts click the Get button at the top of the window The panel on the left side of the window shows several buttons for getting photos or other ima...

Page 12: ...n with your scanner Please see the MGI PhotoSuite III SE user s manual for details about the other features on the window 5 To scan click the Scan button on the window The next section explains how to...

Page 13: ...n click the Scan button on the PhotoSuite window See the figure on page 9 If you are using another application to scan with your scanner please see the user s guide that you receivedwith that applicat...

Page 14: ...image instead of a color photo select Black White Photo in the list See the table in the section Selecting a Predefined Scanner Setting on page 13 for a description of these predefined settings Selec...

Page 15: ...ain on the Scan Manager 10 When you are satisfied with the preview image click the Scan button on the Scan Manager 11 If you re using the MGI PhotoSuite III SE application to scan the scanned image is...

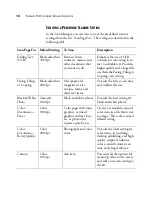
Page 16: ...azine articles receipts forms and other text items Provides the fastest scan time and smallest file size Black White Photo Grayscale 100 dpi Black and white photos Provides the best setting for black...

Page 17: ...ack and white Click the drop down arrow to see your choices for the scan mode The symbols next to the selections indicate their mode setting Choose one of the modes for scanning from the list Res This...

Page 18: ...if you put a photo in the middle of the glass the scanner will automatically determine the size of the photo When AutoCrop is selected the scanner makes two passes the first pass senses the item s si...

Page 19: ...ghtness and contrast set to be too light or too dark For example a note written with a light pencil may need to be scanned darker to improve legibility You can adjust the brightness and contrast at wh...

Page 20: ...the Preview area A selection rectangle shows the current scan area 2 optional In the Scan Configuration settings select the units of measure you want to use for the scan area You can select either inc...

Page 21: ...EANING THE SCANNER GLASS Scanning items that have excessive amounts of dirt or dust may dirty the glass To ensure the best quality scanned item wipe the scanner glass with a soft clean cloth to rid th...

Page 22: ...9 7 cm Scanner dimensions Height 3 4 inches 8 5 cm Width 11 4 inches 29 0 cm Length 17 5 inches 45 0 cm Weight 5 6 pounds 2 5 kg Operating temperature 50 104 F 5 35 C without condensation Relative hum...

Reviews: