background image

Warning: 

Turn of

f your tool at once, unplug and inspect it 

f

or serious proble

ms if:

 

Moving parts ge

t stuck

 

Speed drops to an abnormally low level

 

The motor housing gets hot

 

Sparks or odors emit from the casing

ADJUSTMENTS

 MAINTENANCE

Keep the vents clear of dust and debris. 


This will help prevent possible electri-

cal shorts and ensure proper cooling.

Keep the tool housing and handle clean and free of oil and grease by using mild

soap and a damp (not wet) cloth.

Avoid overloadin

g

 your drill

.  It will become hot and lose efficienc

y.  Run

-

ning it free of load for a minute or two will allow it to cool itself to normal tem-

perature.

Inspect the cord regularly and have it replaced by an authorized repair facility if

it is damaged.

Lubrication for this tool is done at the factory and should not be necessary

again under normal use.

An authorized repair center should do any repairs, modification, or mainte-

nance that involves disassembling the grinder.

Any damage to the tool should be corrected at an authorized repair center.

ADJUSTMENTS

6

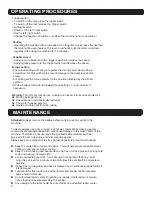
OPERATING PROCEDURES

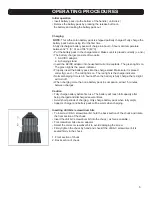
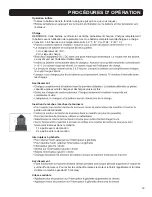
Torque setting

• The torque setting will help you regulate the driving power when using a

screwdriver bit. This will help to prevent damage to the workpiece and/or 

screw.

• For drilling set the torque selector to the position indicated by the drill bit

symbol.

• Advice: Always start with the lowest torque setting ( 1 ) and increase if

necessary. 

Attention! 

Always remove the battery before carrying out any work on the 

machine.

To clean, always use a dry or moist, but not wet, towel. Many cleaning agents 

contain chemical substances which may cause damage to the plastic parts of the 

machine. Therefore do not use any strong or flammable cleaners such as 

gas, paint thinner, turpentine or similar cleaning agents.

Always keep air ventilation holes free of dust deposits to prevent overheating. 

Trigger switch

• To switch on the tool, press the trigger switch

• To switch off the tool, release the  trigger switch

• Set the left / right switch

• Change the direction of rotation only when the machine is not in operation !

Caution

• Operating the machine with a low speed for a long time will increase the risk that

the motor will be overheated. To prevent overheating, let the motor cool down 

regularly (Stop using the machine for 15 minutes )

Variable speed

• Applying more pressure to the  trigger switch will increase the speed.

• Applying less pressure to the  trigger switch will decrease the speed.

• Left/right switch

• Shown on the left / right switch

Summary of Contents for Cab-CD304-2L

Page 1: ...ORDLESS DRILL 2 SPEED SAVE THIS MANUAL You will need this manual for safety instructions operating procedures and warranty Put it and the original sales receipt in a safe dry place for future reference Operator s Manual T O O L S ...

Page 2: ...ck that keys and adjusting wrenches are removed from any rotating tool before using 14 AVOID UNINTENTIONAL STARTING Don t carry the tool with a finger on the switch Be sure the direction switch is in the NEUTRAL position when not in use or when changing bits 15 STAY ALERT Watch what you are doing use common sense Don t operate any tool when you are tired 16 CHECK FOR DAMAGED PARTS Before using the ...

Page 3: ...not exceed 40o C CHARGE BATTERY AT LEAST 6 HOURS before initial use 1 CHARGE AT ROOM TEMPERATURE The room temperature must be higher than 32 F and lower than 104 F 2 DO NOT CHARGE IF THE CHARGER S CORD OR PLUG IS DAMAGED Charging with a damaged cord may result in a fire or electrical shock If the charger is damaged in any way have it repaired by a qualified serviceman 3 USE WITH CAUTION when coming ...

Page 4: ...ay only be replaced by the supplier or by his repair workshop Have repairs carried out only by an authorized specialist g Use only battery pack which have been produced by the original manufacturer h Always keep the surface of the charger free from dust and dirt i Insert the battery pack into the charger Follow the guidelines provided concerning polarity j Always remove battery pack before working...

Page 5: ...screw Firmly tighten the chuck by hand and check if the drill bit screwdriver bit is seated firmly in the chuck 1 Front section of chuck 2 Back section of chuck NOTE This Lithium Ion battery pack is shipped partially charged Fully charge the battery pack before using it for the first time A fully discharged battery pack will charge in about 3 5 hours at a temperature between 32 F 0 C and 104 F 40 ...

Page 6: ...hen using a screwdriver bit This will help to prevent damage to the workpiece and or screw For drilling set the torque selector to the position indicated by the drill bit symbol Advice Always start with the lowest torque setting 1 and increase if necessary Attention Always remove the battery before carrying out any work on the machine To clean always use a dry or moist but not wet towel Many clean...

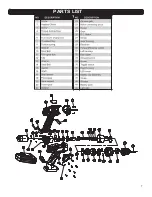
Page 7: ...7 PARTS LIST ...

Page 8: ...TESSES CONSERVEZ CE MANUEL Vous aurez besoin de ce manuel pour les instructions de sécurité les procédures d opération et la garantie Placez ce manuel et la facture originale de vente dans un endroit sec et sûr pour la référence future Manuel de l opérateur ...

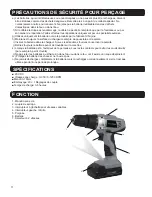
Page 9: ...oup de poussière fine ou grossière 9 NE TOUCHEZ PAS LA MÈCHE AVEC LES MAINS APRES LE FORAGE Les mèches peuvent devenir extrêmement chauds pendant votre travail 10 TRAVAIL SÉCURISÉ Utilisez des pinces ou un étau pour maintenir la pièce d ouvrage si possible C est plus sûr que d utiliser vos mains et cela libère vos deux mains pour faire fonctionner l outil 11 NE PAS SURCHARGER Gardez un bon pied et...

Page 10: ...e charge le courant utilisé doit correspondre au courant du chargeur de batterie c Ne laissez jamais l humidité la pluie ou les éclaboussures d eau atteindre l emplacement de charge d La température ambiante ne doit pas dépasser 40o C AVERTISSEMENT Les avertissements mises en garde et instructions détaillés dans ce manuel ne peuvent pas couvrir toutes les conditions et situations possibles UTILISE...

Page 11: ...ivez les directives fournies concernant la polarité j Retirez toujours la batterie avant de travailler sur la machine k Lorsque la batterie est à l extérieur de la perceuse couvrez les contacts pour éviter les courtscircuits par exemple à partir d outils l Ne pas jeter les batteries au lithium ion dans l eau ou dans le feu car il existe un risque d explosion m Protégez la batterie des chocs et ne ...

Page 12: ...teur AC DC 2 Un siège de charge Le voyant vert est l indicateur d alimentation le voyant rouge s éteint les charges Avertissement capacité après avoir été chargée et déchargée plusieurs fois complètement vide Insertion de mèches mèches de tournevis partie avant de mandarin fermement insérées dans le mandrin 1 La partie avant de mandrin 2 La partie arrière de mandrin Interrupteur à gâchette Avertis...

Page 13: ...ant fort ou inflammable tel que le gaz le diluant à peinture l essence de térébenthine ou produits de nettoyage similaires Toujours gardez les trous de ventilation d air exempts des poussières pour éviter la surchauffe Gardez les évents exempts de poussière et de débris Cela aidera à prévenir les courts circuits électriques et à assurer un refroidissement approprié Gardez le carter et la poignée d...

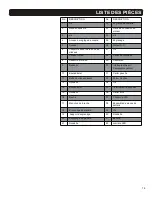
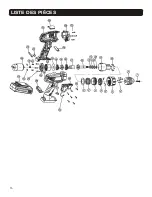
Page 14: ...rter d engrenage 8 Ressort de torsion 29 Décoration 9 Rondelle 30 Interrupteur Avant Renversemepercent 10 Boule d acier 31 Carter gauche 11 Boîte de vitesses avant 32 Porte mèches 13 Rondelle 34 Vis 14 Boule d acier 35 l interrupteur à gâchette 15 Rondelle 36 Carter droit 16 broche 37 Couvercle LED 17 Manchon de broche 38 Ensemble de pinces de batterie 18 Engrenage de planète 39 Vis 19 Support d e...

Page 15: ...15 LISTE DES PIÈCES ...

Reviews: