4 Inserting/Ejecting the Disk
47
E
4.2
Ejecting the disk
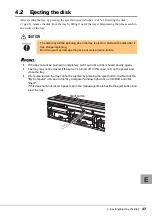
After ejecting the tray by pressing the eject button as in Steps 1-2 of "4.1 Inserting the disk"
(
pg.45), remove the disk from the tray by lifting it out of the tray while pressing the release catch in
the centre of the tray.
CAUTION
`
If the tray cannot be pushed in completely, pull it out until a click is heard and try again.
`
The tray may not be closed if the server is turned off. In this case, turn on the power and
close the tray.
`
If for some reason the tray cannot be ejected by pressing the eject button, double click the
"My Computer" icon and in the "My Computer" window right click on CD/DVD and click
"Eject".
If this does not work, insert a paper clip in the manual eject hole beside the eject button and
eject the tray.
• The disk may still be spinning when the tray is ejected. Remove the disk after it
has stopped spinning.
Not doing so may damage the device or cause device failure.
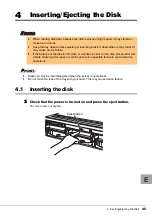
Eject button
Summary of Contents for PG-DVA102D
Page 2: ...2 PRIMERGY DVD RAM DVD RAM PRIMERGY CD 2006 5...
Page 3: ...3 J CD DVD CD DVD setup exe OS Windows...
Page 5: ...5 J...
Page 6: ...6 1 1 DHHS 21 CFR Subchapter J 1 IEC 60825 1 CENELEC EN 60825 1 JIS JISC6802 3A 3B 1 3A 3B...
Page 12: ...12 DVD RAM Ctrl Alt Delete DVD RAM DVD RAM CD ROM CD ROM DVD DVD 1 14mm 1 5mm DVD 4 4 2 LED...
Page 14: ...14 2 LED LED 4 P 18 LED Ready LED...
Page 17: ...3 17 J 6 2 7 3 4 CD ROM 1 DC 2 CD 3 CD ROM CD ROM 4 CD ROM 5 M3 4 5 CD ROM 3 DC 6 DC...
Page 18: ...18 4 4 1 1...
Page 19: ...4 19 J 2 3 4...
Page 20: ...20 4 2 4 1 P 18 1 2 CD DVD...
Page 54: ...54...
Page 56: ......


