4400
-0845-11
52590/3
ID: 845CM-0030
Design and Quality Primus AB Sweden
Tel: +46 8 564 842 30
www.primus.se
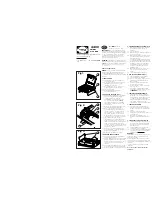
Fig 1
Fig 3
PRIMUS
Vidar BBQ
Fig 2
5
3
4
6
7
9
2
8
ENG
4400 PRIMUS
Vidar BBQ
INSTRUCTIONS FOR USE
IMPORTANT:
Read these instructions carefully
before connecting the gas appliance to the LP gas
cartridge, and then study the instructions regularly
in order to remember the way the gas appliance
works. Keep these instructions for future use:
Failure to follow these instructions can result in
serious personal injury and death!
WARNING:
This appliance consumes oxygen and
produces carbon dioxide. To avoid extreme danger,
do
NOT
use or ignite this appliance in unventilated
space, indoors, in a tent, in a vehicle or other
enclosed space.
USE OUTDOORS ONLY!
NEVER
cover the stove (gas cartridge) with wind
shields, rocks or similar which may cause ”over
heating” and damage the stove and cartridge.
Overheating a gas cartridge by this means is highly
dangerous.
1. INTRODUCTION
1.1 This appliance is intended for PRIMUS
Cassette Gas 2208.
1.2 Use Primus LP gas cartridges. Connecting
this appliance to other types of LP gas
cartridges can involve risk.
1.3 Gas consumption 130 g/h / 6100 BTU/h /
approx. 1.8 kW at 1 bar gas pressure.
1.4 Size of jet: 0.54 mm.
1.5 The appliance fulfils requirements in
accordance with EN 521.
2. ADVICE FOR SAFE USE (Fig 1)
2.1 Ensure that the sealing joints of the appliance
are in correct position and are in good
condition before being connected.
2.2 This appliance is only intended for outdoor
use. To avoid extreme danger, Do
NOT
use or ignite the appliance in unventilated
place, indoors, in a tent, in a vehicle or other
enclosed space.
2.3 Make sure that no inflammable objects are in
the vicinity, as described under item 5.6.
2.4 When connecting and replacing the LP
gas cartridge, this must be carried out in a
safe place, outdoors, not in the vicinity of
any conceivable source of ignition such as
naked flame, pilot flame or electric heater.
Avoid replacing or connecting up the LP gas
cartridge where there are numbers of people.
2.5 If the appliance leaks (smell of gas)
immediately put it in a well-ventilated place
outdoors, not in the vicinity of a source of
ignition, where the leak can be inspected and
stopped. Checking for leaks may only be
carried out outdoors. Checking for leaks must
never be carried out using a naked flame. Use
soapy water or similar.
2.6 Never use an appliance with damaged or
worn sealing joints, or a leaking, damaged or
badly functioning appliance.
2.7 Never leave a lit appliance out of sight.
3. HANDLING THE APPLIANCE
3.1 Do not touch the hot parts of the appliance
during or directly after use.
3.2 Storage: Always unscrew the LP gas cartridge
from the appliance when it is not being used.
Keep the cartridge in a dry, safe place, where
there are no sources of heat. Avoid solar
radiation.
3.3 Do not misuse the appliance or use it for other
purposes than those for which it is intended.
3.4 Handle the appliance carefully. Do not drop it.
4. ASSEMBLING THE APPLIANCE (Fig 2)
4.1 Make sure that the valve (2) is completely
shut off by turning the control knob
clockwise.
4.2 Open the hatch (4).
4.3 Make sure that the cartridge arresting lever
(5) is in its top position.
4.4 Mount the gas cartridge (3) with the groove
(6) upwards, and make sure that it fits the
valve safety wedge (7).
4.5 Lock the gas cartridge in place by pushing
the cartridge arresting lever (5) downwards.
No hissing noise should be heard by correct
installation. Otherwise, gas is leaking by
mis-installation. In such a case push the
arresting lever up again and correct the
cartridge position.
4.6 Mount and fold out the two legs (9) and
place the accompanied grill grate in
position.
4.7 The barbeque is now ready for use.
5. USE OF THE APPLIANCE (Fig 2)
5.1 Place the barbeque on a level surface.
5.2 Open the lid (8) on the barbeque.
5.3 Turn the control knob (2) counter-clockwise,
until you hear a clicking sound and the
flame is ignited
5.4 If needed, repeat the ignition procedure
each time from Off position.
5.5 To adjust the flame, turn the control knob
slowely clockwise.
5.6 The distance to inflammable material in
ceiling and walls must be at least 500 mm,
OTHERWISE
they can catch fire.
6. CHECKING AND MAINTENANCE
6.1 Always make sure that the sealing joints
are located in the correct places and are
in good condition. This should be checked
every time the appliance is assembled.
Replace sealing joints if they are damaged
or worn. New sealing joints can be
purchased from your nearest Primus retailer.
7. SERVICE AND REPAIR
7.1 If it is not possible to rectify a fault by
following these instructions, the appliance
should be returned to your nearest Primus
retailer.
7.2 Never try to carry out any other
maintenance or repair work than that which
is described here.
7.3 Never make any alterations to the
appliance, as it may then be dangerous to
use.
8. SPARE PARTS AND ACCESSORIES
8.1 Only use genuine Primus spare parts and
accessories. Take care when assembling
spare parts and accessories, and avoid
touching hot parts.
8.2 Only use PRIMUS Cassette Gas LP gas
cartridges 2208 for this appliance.
8.3 If you have difficulty in obtaining spare parts
or accessories, contact your local Primus
distributor. Visit www.primus.se
WARNING!
If the appliance does not ignite after 5 tries, the
gas must be allowed to ventilate before any
further tries are made.
Remove the grid and wait for at least 1 minute.
If the igniter is broken the appliance can be lit by
a match. Remove the grid and place the flame to
the burner.
Contact your importer if you need any further
information.
Do not store the canister inside the
appliance.

