background image

14

17

28

26

19

11

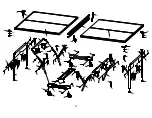
1/2 DE X .281 DI X 3/4 (largo)

Separador de Plástico (4 piezas)

13

3/4 DE X 1/4 DI X 1/16 (grueso) 

Rondana de Plástico (4 piezas)

#10-24 Tuerca de Seguridad 

(4 piezas)

#10 Rondana (8 piezas)

IDENTIFICADOR DE TORNILLOS

12

1/4-20 Tuerca de Seguridad 

(8 piezas)

1/4-20 X 2 1/4 Tornillo Phillips (4 piezas)

#10-24 X 2" Tornillo Phillips (4 piezas)

1/4-20 X 2 Tornillo de Carruaje (4 piezas)

10

#8-32 X 1 1/4 Tornillo Phillips (8 piezas)

16

#8 X 5/8 Tornillo Phillips (100 piezas)

15

3

33

#10-24 X 3/4 Tornillo de 

Mariposa (4 piezas)

3/4 DE X 1/4 DI X 1/8 


Rondana de Plástico (4 piezas)

(grueso)

(para Lamina de Metal)

(para Lamina de Metal)

Summary of Contents for Play The Best T8561

Page 1: ...re Contact Escalade Sports customer service department at Phone 1 866 873 3528 Toll Free Fax 1 866 873 3533 Toll Free E mail tabletennis escaladesports com Mailing Address correspondence only Escalade...

Page 2: ...of three 3 years from the original purchase WARRANTY COVERAGE ESCALADE SPORTS warrants to the original Consumer Purchaser that any Product of its manufacture is free from defects in material and workm...

Page 3: ...r 8 pieces HARDWARE IDENTIFICATION 12 1 4 20 Locknut 8 pieces 1 4 20 X 2 1 4 Phillips Rd Hd Bolt 4 pieces 10 24 X 2 Phillips Rd Hd Bolt 4 pieces 1 4 20 X 2 Carriage Bolt 4 pieces 10 8 32 X 1 1 4 Phill...

Page 4: ...Caster Wheel with Lock 30 into Caster Beam as shown in FIGURE 1 On the other end of the Caster Beam attach a Caster Wheel without Lock 9 Make sure you have one Caster Wheel with lock and a Caster Whee...

Page 5: ...R 3 Attach four Strut Tubes 4 to Caster Beam Assembly with four Carriage Bolts 10 and four Locknuts 14 as shown in FIGURE 3 Tighten nuts snug but DO NOT Parts Needed 4 pcs 4 Strut Tube Figure 3 10 4 1...

Page 6: ...7 and 24 Slide U Leg and U Support side to side if necessary to see hole See DETAIL A B E Thread two Screws 16 through slot in Plastic Tube brackets 24 into and two U Support 3 Screws 16 through slot...

Page 7: ...ER ALUMINUM TOP ASSEMBLY 5 A Attach one LH short Hinge Mounting Bracket Assembly 18 using four Screws 15 as shown in DETAIL C Attach one RH short Hinge Mounting Bracket Assembly 6 using four Screws 15...

Page 8: ...BASE HANDLE TOP ASSEMBLIES BY GRASPING ONLY THE TOPS THEMSELVES DO NOT GRASP METAL LEGS U SUPPORT LINKAGE OR HINGES THESE PARTS CAN MOVE AND COULD PINCH FINGERS OR HANDS CAUSING SERIOUS INJURY ASSEMBL...

Page 9: ...Hinge 5 will look like a V when attached to Strut Tube 4 CAUTION Position hinges exactly as shown in DETAIL F or table will not operate correctly and could be damaged DETAIL F 14 12 11 13 5 4 NOTE Tig...

Page 10: ...ay position See Figure 8 Figure 8 Figure 9 3 Open legs of second table half and lock both hinges as with the first half 4 Lower second top as described in step 2 5 Lock all four center hinges See Figu...

Page 11: ...20 20 21 21 22 23 23 24 27 25 27 15 30 10 8 30 10 9 10 14 14 14 14 15 26 15 26 2 20 20 15 15 16 15 15 16 27 15 15 16 27 15 13 14 11 12 15 23 15 23 11 12 13 14 5 11 13 14 15 16 15 16 3 15 15 5 4 4 24...

Page 12: ...ID Flat Plastic Washer 4 14 2B 4047 98 1 4 20 Locknut 8 15 1B 4152 00 8 X 5 8 Phillips Rd Hd Sheet Metal Screw 100 16 1B 4089 00 8 32 X 1 1 4 Phillips Rd Hd Sheet Metal Screw 8 17 1B 4154M00 10 24 X 2...

Page 13: ...lar Lea completamente cada uno de los pasos antes de empezar cada paso 2 Algunas partes peque as pueden estar empacadas dentro de las partes grandes Verifique en el interior de todas las partes y cart...

Page 14: ...ICIOS O PERDIDAS GENERADAS POR EL CONSUMIDOR ANTE CUALQUIER OTRO USO Algunos estados no permiten la exclusi n o limitaci n de las garant as impl citas o da os incidentales o conexos de modo que las li...

Page 15: ...R DE TORNILLOS 12 1 4 20 Tuerca de Seguridad 8 piezas 1 4 20 X 2 1 4 Tornillo Phillips 4 piezas 10 24 X 2 Tornillo Phillips 4 piezas 1 4 20 X 2 Tornillo de Carruaje 4 piezas 10 8 32 X 1 1 4 Tornillo P...

Page 16: ...ENSAMBLAR LA MESA Figura 2 Partes Requeridas 1 pz 7 Tubo Horizontal de Soporte Herrajes Requeridos 4 pzs 28 10 24 Tornillos De Mariposa 7 2 Deslice el Tubo Horizontal de Soporte 7 dentro del los Carri...

Page 17: ...ENSAMBLADO LAS OPERACIONES Y LAS INSTRUCCIONES DE SEGURIDAD POR LO MENOS SE REQUIERE DE DOS 2 ADULTOS PARA ENSAMBLAR LA MESA Ajuste pero no sobre apriete estos cuatro puntos de pivote 3 Una cuatro Tu...

Page 18: ...1 24 como se muestra en el DETALLE B Instale con doce tornillos 15 PRECAUCI N Las ranuras de las Abrazaderas de Pl stico 24 deben quedar hacia el centro de la mesa exactamente como se muestra la mesa...

Page 19: ...5 Instale las dos Bisagras con soporte de montaje Largas 5 utilizando ocho tornillos 15 como se muestra en el DETALLE D y la FIGURA 5 B Instale la Bisagra Corta Mano Izquierda 18 y Mano Derecha 6 a l...

Page 20: ...PARTES PUEDEN MOVERSE Y PODR AN LASTIMAR LOS DEDOS O LAS MANOS CAUSANDO LESIONES GRAVES POR FAVOR ENSAMBLE LA MESA COMO SE MUESTRA CON LAS PATAS COMPLETAMENTE CERRADAS Y EL TABLERO EN POSICI N VERTICA...

Page 21: ...vice videos html 8 Una las Bisagras Largas 5 a los Tubos Estructurales 4 utilizando dos Tornillos 12 dos Separadores de pl stico 11 dos Rondanas de Pl stico 13 y dos Tuercas de Seguridad 14 como est n...

Page 22: ...esa y asegure las dos patas con la bisagras P rese enfrente del centro de la mitad de la mesa detenga el centro de la parte superior con una mano y con la otra mano el Tubo de Soporte U Suavemente jal...

Page 23: ...20 20 21 21 22 23 23 24 27 25 27 15 30 10 8 30 10 9 10 14 14 14 14 15 26 15 26 2 20 20 15 15 16 15 15 16 27 15 15 16 27 15 13 14 11 12 15 23 15 23 11 12 13 14 5 11 13 14 15 16 15 16 3 15 15 5 4 4 24...

Page 24: ...Tubo de 1 1 2 Manual del Usuario T8561 Llantas de 4 Con Seguro Conjunto de Tornillos y Tuercas Conjunto de Red y Postes Rondana de Pl stico 3 4 DE X 1 4 DI X 1 8 gruesa Separador de Pl stico 1 2 DE X...

Reviews: