background image

GTIB-30 Installation Manual-UL 


4411-0011, Rev 2.0 


65 

This page intentionally left blank. 


Summary of Contents for GTIB-30

Page 1: ...Clean power made simple GTIB 30 Installation Manual ...

Page 2: ...www princetonpower com 4411 0011 Rev 2 0 April 1st 2014 ...

Page 3: ...648 Tel 609 955 5390 Fax 609 751 9225 Email info princetonpower com Princeton Power Systems and Clean Power made simple are registered trademarks of Princeton Power Systems Inc Specifications and descriptions in this document were in effect at the time of publication Princeton Power Systems Inc reserves the right to change specifications product appearance or to discontinue products at any time No...

Page 4: ...nual provides safety guidelines detailed planning and setup information procedures for installing the inverter as well as information about troubleshooting the unit It does not provide details about particular brands of batteries Audience This manual is intended as guidance for installing the GTIB 30 Installers are required to be certified technicians or electricians ...

Page 5: ...nd commissioning sequence for the GTIB 30 inverter Appendices Appendix A provides the technical specifications of the GTIB 30 Appendix B Return Material Authorization Product and Contact Information This chapter provides instructions for obtaining a Return Material Authorization if the product needs to be returned to Princeton Power Systems or one of its authorized service centers Abbreviations an...

Page 6: ...voltaic SPDT Single Pole Double Throw SPST Single Pole Single Throw THD Total Harmonic Distortion UL Underwriters Laboratories VPC Volts Per Cell Important Safety Instructions SAVE THESE INSTRUCTIONS This manual contains important instructions for the GTIB 30 that shall be followed during installation and maintenance of the inverter Symbols The following is a list of symbols used in this manual an...

Page 7: ... Ensure that all tools paperwork and other foreign objects not designed for use in the Inverter are removed from the enclosure prior to closing the door and re energizing the equipment High Voltage Electric Shock Hazard The Princeton Power GTIB 30 Inverter and equipment connected to it contains electrical components carrying potentially lethal voltages and currents Extreme caution should be exerci...

Page 8: ...mperatures or obstructed ventilation or incorrect software configuration Keep the door closed at all times when operating the system Additionally keep all guards screens and electrical enclosures in place when the system is operating Close the inverter enclosure and put all guards and screens in place before energizing the unit Heat Hazard The cabinet should not be mounted on a combustible surface...

Page 9: ...nal safety checks may be necessary depending on the particular installation of the unit The safety checklist above is not intended to be all inclusive Resolve all issues before operating the inverter Contact Princeton Power Systems if necessary Terms of Use Because of the wide variety of uses for power electronics equipment this manual does not describe every possible application or configuration ...

Page 10: ... in this inverter is appropriate and safe for the type of battery used and that all battery charging settings are set correctly for the battery voltage current and temperature ratings Setting these settings incorrectly may damage the battery and the inverter and may cause a hazardous condition that puts personnel at risk of grave injury or death WARNING Consult the battery manufacturer for informa...

Page 11: ...About this Manual 4411 0011 Rev 2 0 xi This page intentionally left blank ...

Page 12: ... phase Power Format 28 2 3 GTIB 30 Configuration Options 29 2 4 Important System Specifications 30 2 4 1 Isolation Transformer 30 3 Pre Installation 31 3 1 Unpacking Inspection and Storage 32 3 2 Dimensions 32 3 2 1 Outer Dimensions 32 3 2 2 Pad Mounting 33 3 3 Inverter Placement Considerations 34 4 Wiring Instructions 37 4 1 Preparing for the Installation 38 4 1 1 Installation Tools and Materials...

Page 13: ...d Product Information 66 B 1 Return Material Authorization Policy 67 B 2 Out of Warranty Service 67 B 3 Contact Information 67 B 4 Information About This System 68 Figures Figure 1 Symbolic single line diagram of GTIB 30 20 Figure 2 Symbolic representation of the GTIB 30 with isolation transformer 20 Figure 3 Functional power diagram of the GTIB 30 21 Figure 4 Closed GTIB 30 metal enclosure 22 Fig...

Page 14: ...28 PV ground wiring connections 50 Figure 29 Signal connectors 51 Figure 30 Location of digital inputs 51 Figure 31 Digital input connector pin outs 52 Figure 32 Functional diagram of SPDT relay on optional GTIB 30 client input output PCB 53 Figure 33 Connection points for BMS 54 Figure 34 RS 485 Pin outs 54 Figure 35 RS 232 3 pin Pin outs 55 Figure 36 RS 232 Male DB 9 Pin outs 55 Figure 37 Locati...

Page 15: ...Contents 4411 0011 Rev 2 0 15 This page intentionally left blank ...

Page 16: ...1 Introduction ...

Page 17: ...and flexible It is backed by a world class team of engineers at Princeton Power Systems that can ensure the technical and financial success of your application 1 2 PPS Company information Princeton Power Systems designs and manufactures advanced power conversion products and systems to provide customers with cost effective reliable smart distributed generation Our patented technologies including A...

Page 18: ...2 System Overview and Configurations ...

Page 19: ...the batteries are full the GTIB 30 supplies all of the energy to the loads At any stage the operator can request the GTIB 30 to provide additional energy and supplement the utility grid by feeding energy from the batteries into the grid See User Manual When the DC Port is configured for PV operation the GTIB 30 can draw power from a connected PV array and supply it to the loads or optionally expor...

Page 20: ...rid port is a four wire AC port with three phases and a neutral line This port can be connected to the utility grid If no utility grid is available suitable AC generators can also be connected to this port Figure 1 Symbolic single line diagram of GTIB 30 2 1 2 Isolation Transformer The GTIB 30 comes equipped with an internal isolation transformer The isolation transformer provides electrical isola...

Page 21: ...or successful installation The GTIB 30 consists of a single bi directional DC AC stage An optional internal manual utility switch can be provided Figure 7 This internal switch is not the same as an external utility grid disconnect switch An internal switch is provided on the DC port Figure 8 This is not the same as the external disconnect switch External disconnects are required on the battery ban...

Page 22: ...4 Instructions on how to open and close the enclosure are provided in Section 4 4 dimensions placement and further enclosure related information are provided in Sections 3 2 and 3 3 Figure 4 Closed GTIB 30 metal enclosure 2 1 4 2 Human Machine Interface HMI The GTIB 30 is controlled via a state of the art touch screen HMI which is installed on the front door of the GTIB 30 metal enclosure The HMI ...

Page 23: ...to connect and disconnect the Grid Port from parts of the GTIB 30 system The electrical location of this three phase overcurrent switch is shown in the functional power block diagram in Figure 3 in Section 2 1 3 This switch is open when the switch is in down position as shown in Figure 7 tripped when in the center position and closed when in the up position External disconnects on the AC port s ar...

Page 24: ...ectrical location of this AC breaker is shown in Figure 8 This switch is open when the switch is in down position as shown in Figure 7 tripped when in the center position and closed when in the up position as shown in Figure 8 This option cannot be installed with the Integrated Grid overcurrent switch described in section 2 1 4 4 Figure 8 Integrated 15kW AC Breaker GFDI Fuse and Integrated DC swit...

Page 25: ... damage to the GTIB 30 The GTIB 30 is equipped with a pre charge circuit that is always on This means that the DC bus is always charged as long as the external disconnect is closed External overcurrent protection is required on the Battery Port 150 Amps Max External DC disconnect is required Figure 9 Picture of GTIB 30 control Panel showing DC switch in the tripped position 2 1 4 7 Control Power a...

Page 26: ...A 600V Wire Tray F2 DC In 6A 600V Wire Tray F3 DC Bus 44 100A 1000V Wire Tray F4 GFDI 2A 600V Left of DC Breaker F5 DC Bus 44 100A 1000V Wire Tray F6 DC In 6A 600V Wire Tray F7 Neutral 4A 600V Wire Tray F8 Not Used F9 Source L1 4A 600V Wire Tray F10 Source L2 4A 600V Wire Tray Figure 10 GTIB 30 Wiring tray Figure 11 DC Bus fuse DC AC GRID AC LOAD DC Bus Fuse ...

Page 27: ...Blocks Once the enclosure door is opened the user can access the main power connection terminals of the GTIB 30 These terminals are shown in Figure 13 Figure 13 Main Power Connection terminal blocks 2 1 4 10 Enclosure Air Filter The bottom compartment of the GTIB 30 is covered by a vented panel secured by screws This bottom compartment contains the air filter and the transformer for the enclosure ...

Page 28: ...0V By measuring the voltages between any three line wires using a multi meter and comparing them to the values in Table 2 it is possible to verify if the power format being used is a 208V 480V three phase power format 2 2 1 Three phase Power Format In this power format the three phases are 120 degree phase shifted with a magnitude of 120Vrms or 277Vrms each and a frequency of 60Hz This power forma...

Page 29: ...rt Option 2 GFDI Option negative grounded 3 DC Port Usage PV Battery Option 4 AC Grid Port Overcurrent Switch For more detailed information please refer to Chapter 4 The Grid Tied configuration is shown schematically in Figure 15 It is highly recommended that an external bypass switch is installed which is interlocked with the external grid and load disconnect Figure 15 Single line diagram of GTIB...

Page 30: ...ng the installation process 2 4 1 Isolation Transformer The GTIB 30 includes an isolation transformer The transformer provides electrical isolation between the AC and DC ports as explained in Section 2 1 2 and allows grounding of the DC ports The position of the transformer in the GTIB 30 enclosure is shown in Figure 16 Note that the bottom front panel and the air filter have been removed Figure 1...

Page 31: ...3 Pre Installation ...

Page 32: ...y 560 lbs 254 kg Use a forklift or pallet jack to move the unit Do not attempt to lift and or move the inverter by hand Attempting to move the unit by hand may lead to serious injury CAUTION Tip over hazard Do not move this equipment without mechanical assistance Use caution when working around equipment that has not been securely mounted to mounting pad 3 2 Dimensions 3 2 1 Outer Dimensions The o...

Page 33: ...the GTIB 30 The inverter is required to be mounted to a mounting pad to prevent accidental tipping of the unit The exact positioning of the mounting holes is shown in Figure 18 Figure 18 Front view of GTIB 30 Mounting plate and Bottom view of Enclosure showing position and dimensions of mounting holes Figure 19 Suggested Mounting Pad Layout for GTIB 30 Installation ...

Page 34: ...n in Figure 20 Figure 20 GTIB 30 View showing ventilation louvers For optimal performance please ensure that these ventilation louvers are not blocked by surrounding objects or walls Under no circumstances should the right side of the inverter be moved directly up against a wall or other object This will prevent air flow through the ventilation louvers and will also prevent the enclosure door from...

Page 35: ... inverter will emit audible noise it is not advisable to install in the immediate vicinity of living quarters 9 The inverter should not be installed in an area that is excessively dusty as this may decrease the performance of the air cooling system 10 The inverter must not be installed in areas in which dust containing conductive particles e g iron filings may form 11 When installing the inverter ...

Page 36: ...GTIB 30 Installation Manual UL 36 4411 0011 Rev 2 0 This page intentionally left blank ...

Page 37: ...4 Wiring Instructions ...

Page 38: ...0 Pencil 11 Utility knife 12 Knockout punch for installing wires through gland plate 13 Assorted Rubber grommets to dress wire holes in gland plate The following materials may be required for completing this installation 1 Conduits code compliant conduit is recommended bushings wire nuts appropriate fittings for wire run and seals as necessary 2 Electrical wire of appropriate size and length see T...

Page 39: ... normal The temperature coefficients for calculating the open circuit voltage at 10 C can be found in the data sheet for the solar panels If the open circuit voltage for the solar panels rises above 600 V this may result in damage to the inverter and all warranty rights shall be declared null and void Damage to the inverter may cause a hazardous condition that puts personnel at risk of grave injur...

Page 40: ... switch requirements The external disconnect switches on the utility grid and load port as well as any bypass switches need to break all phases and leave the neutral unbroken to be fully compliant with NEC requirements 4 3 2 DC Disconnect switch requirements The DC port battery or PV must be equipped with external two pole devices that enable disconnection of the DC source or load In most cases th...

Page 41: ...by a key lock and a top and bottom twist lock shown in Figure 21 The locks are only to be unlocked by a qualified electrician or technician who is performing the installation or periodic maintenance Once the locks are unlocked and the front enclosure door can be opened Figure 21 Enclosure with lockable handle Key Lock Center Twist Lock Top and Bottom ...

Page 42: ... during installation 4 5 1 Power Conductor Sizing and Ratings All AC and DC power and earth wiring including grid port load port and DC port should meet the following specifications Table 4 Minimum power port wire requirements Voltage Rating 600 Volts or greater per NEC Temperature Class 90 C or greater per NEC Gauge DC copper 3 AWG 6 AWG Earth GND AC 208V copper 6 AWG 10AWG Earth GND AC 480V copp...

Page 43: ... shielding recommended 4 6 Wiring Terminals All cables enter and exit the enclosure from underneath the plinth in the left front of the enclosure see Figure 23 There are power cables for AC power wiring DC power wiring and signal wiring respectively A view of the power terminals is shown in Figure 22 Figure 22 View of Terminal blocks for DC PV Battery and AC power wiring Grid Port Load Port DC Por...

Page 44: ...llation Manual UL 44 4411 0011 Rev 2 0 Figure 23 External wire routing into the GTIB 30 The gland plate must be properly installed to prevent the ingress of dust small animals and insects that may damage the system ...

Page 45: ...esulting from non NEC compliant grounding arrangements 4 7 1 AC Circuit and DC Port earth wire requirements For the AC circuits and the Battery configuration a ground wire will be sized at least according to Table 7 based on the size of the over current device protecting that circuit Voltage and temperature requirements of Section 4 5 1 must also be considered The ground wire for the PV input will...

Page 46: ... earth wire requirements for ground cable size requirements The earth wire must be insulated to prevent it from touching any of the exposed power terminals or the transformer WARNING If the GFDI option is installed the battery is negative grounded to the chassis See Section 4 11 1 for more information Figure 24 Main earth terminals inside enclosure with earth wire connected 4 8 Torque Specificatio...

Page 47: ...wires must be fed into the enclosure Once inside the enclosure the utility wires must be connected to the four terminal blocks marked as U V W and N if used as shown below U V and W are live and N is Neutral Figure 25 Grid port wiring connections Wires should be stripped a minimum of 55 14mm before inserting into terminal blocks It is important to ensure that the neutral wire if used is connected ...

Page 48: ...erminal block clamps should be tightened as per Section 4 8 Wires should be stripped a minimum of 55 14mm before inserting into terminal blocks Ensure that wires are not live and remain disconnected during installation Never assume that there are no other sources connected to the load port Ensure that neutral wire is correctly connected to N phase 1 wire is connected to U phase 2 wire is connected...

Page 49: ...h an optional integrated GFDI the AC DC circuit Ground Terminals must NOT be used to ground either the positive or negative nodes of the input DC circuit The GFDI circuit grounds the negative DC terminal to earth ground and no other ground may be used to ground either the positive and negative nodes DC Input connects to a Battery If installing an ungrounded floating DC system the GFDI option shoul...

Page 50: ...t all grounding arrangements are NEC compliant before proceeding with the installation PPS takes no responsibility for damage or injuries resulting from non NEC compliant grounding arrangements 4 12 PV Ground Wiring The terminal blocks used to ground PV negative are inside the GTIB 30 inverter see below Removing this jumper will effectively disable the optional internal GFDI protection circuit If ...

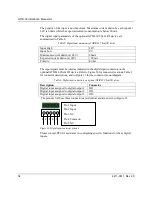
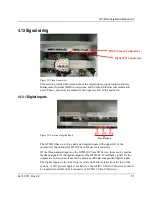
Page 51: ...he upper left of the enclosure if the optional GTIB 30 Client I O device is installed Of the three standard inputs on the GTIB 30 Client I O device three can be used as feedback signals for the digital outputs of the GTIB 30 If feedback signals for the outputs are not required these can be used as additional independent digital inputs The digital inputs work on 24V logic and are optically isolated...

Page 52: ...al input connectors on the optional GTIB 30 Client I O device Refer to Figure 30 for connector locations Table 9 for connector descriptions and to Figure 31 for the connector pin out diagram Table 9 Digital input connectors on optional GTIB 30 Client I O device Description Connector Digital input assigned to digital output 1 IO1 Digital input assigned to digital output 2 IO2 Digital input assigned...

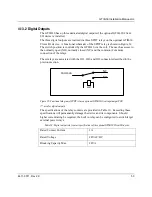
Page 53: ...on connection of the relays These relays are associated with the IO1 IO2 and IO3 connectors described in the previous section Common NC NO coil Figure 32 Functional diagram of SPDT relay on optional GTIB 30 client input output PCB used for digital outputs The specifications of the relay contacts are provided in Table 10 Exceeding these specifications will permanently damage the device and its comp...

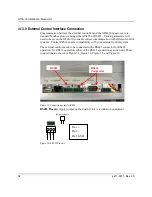
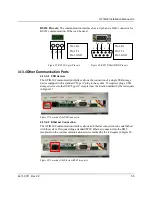
Page 54: ... control systems Contact PPS to ensure compatibility with your external control system The external control needs to be connected to the RS485 connector for RS485 operation for RS232 operation either of the RS232 connections can be used These connections are shown in Figure 33 Figure 34 Figure 35 and Figure 36 Figure 33 Connection points for BMS RS485 Pinouts Apply jumper on the board if this is t...

Page 55: ... device equipped with a standard Type A plug to the system If required plug a USB storage device into the USB Type A receptacle at the location marked by the red square in Figure 37 Figure 37 Location of the USB connection 4 13 4 2 Ethernet Connection The GTIB 30 Communication interface allows an Ethernet connection to be established with the system If required plug a standard 8P8C Ethernet connec...

Page 56: ...GTIB 30 Installation Manual UL 56 4411 0011 Rev 2 0 This page intentionally left blank ...

Page 57: ...5 Commissioning Sequences ...

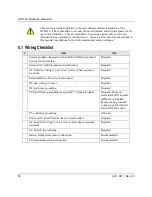
Page 58: ...r earth spike Required External AC Grid disconnect circuit breaker Required AC Grid Port wiring 3 or 4 wires correct phase sequence required Required External Battery Port circuit disconnect Required DC port wiring 2 wires Required DC enclosure grounding Required PV Panel frame grounding via special PV Ground terminal Required Must use external GFDI if internal GFDI is not installed Panels can be ...

Page 59: ...be 600V b Visually check battery polarity if possible c Close External DC disconnect Ensure internal DC disconnect is open d Check polarity of battery voltage on terminal blocks inside GTIB 30 24V Power supply inside GTIB 30 will power up if batteries sufficiently charged e Close integrated battery switch If DC port is connected to PV array a Measure and verify PV voltage on PV array side of Exter...

Page 60: ...scharge Close external DC disconnect Ensure integrated battery disconnect is open 24 V PSU inside GTIB 30 will power up if battery is sufficiently charged Close external Grid disconnect Only performed if grid is available Close integrated DC disconnect Close integrated grid disconnect Only necessary when grid connection available 24 V PSU in GTIB 30 will power up if battery was insufficiently char...

Page 61: ...GTIB 30 Installation Manual UL 4411 0011 Rev 2 0 61 This page intentionally left blank ...

Page 62: ...A GTIB 30 kW Specifications ...

Page 63: ...ge 280 580 VDC PV Array Configuration Monopole negative grounded DC Voltage Ripple 1 Grid Connection Port Specifications GTIB 480 30 GTIB 208 30 AC Line Voltage 480 VAC 10 12 3 phase 208 VAC 10 12 3 phase AC Line Frequency 60 Hz nominal 59 3 60 5 Hz range field adjustable Continuous AC Current 40 A RMS 85A RMS Continuous AC Power 30 kVA Power Factor 0 1 00 leading or lagging adjustable power facto...

Page 64: ...re Standards Compliance IEEE 1547 UL 1741 Pending Safety Features Anti islanding grid fault detection isolation auto reconnect UL compliant trip points field adjustable User Interface Features Front Panel Interface Touch screen viewable in and protected from sunlight Communication MODBUS Over RS485 and RS232 Efficiency Peak Efficiency 96 5 CEC Efficiency 95 0 Nighttime TARE Losses 40 W Energy savi...

Page 65: ...GTIB 30 Installation Manual UL 4411 0011 Rev 2 0 65 This page intentionally left blank ...

Page 66: ...B Return Material Authorization Contact and Product Information ...

Page 67: ...your instruction manual ready for reference and be prepared to supply The serial number of your product Information about the installation and use of the unit Information about the failure and or reason for the return A copy of your dated proof of purchase Record these details on page 76 B 2 Out of Warranty Service For information regarding out of warranty service contact a PPS Customer Service Re...

Page 68: ...s give you better service Type of installation e g PVwith storage EV Charging Micro grid ________________________________ Length of time inverter has been installed ________________________________ Battery battery bank size ________________________________ Battery type e g PbA LiPh PbC other ________________________________ DC wiring size and length ________________________________ Alarm sounding ...

Page 69: ...GTIB 30 Installation Manual UL 4411 0011 Rev 2 0 69 This page intentionally left blank ...

Reviews: