115
10.2
Troubleshooting
Your printer is extremely reliable, but occasionally problems may occur. This chapter provides
information on some of the common problems you may encounter and how you may solve
them. If you encounter problems that you cannot resolve, contact your dealer or service
partner for assistance.
10.2.1
Print Quality Problems and Solutions
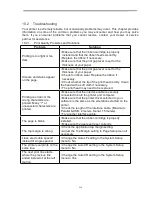
Problem
Solution
Printing is too light or too
dark.
• Make sure that the ribbon cartridge is properly
installed and that the ribbon feeds smoothly.
• Replace the ribbon if necessary.
• Make sure that the print gap lever is set for the
thickness of your paper.
Smears and stains appear
on the page.
• Make sure that the print gap lever is set for the
thickness of your paper.
• Check for ribbon wear. Replace the ribbon if
necessary.
• Check whether the tip of the print head is dirty. Clean
the head with a soft cloth if necessary.
• The print head may need to be replaced.
Printing is erratic or the
wrong characters are
printed. Many “?” or
unexpected characters are
printed.
• Make sure that the interface cable is securely
connected to both the printer and computer.
• Make sure that the printer driver selected in your
software is the same as the emulation selected on the
printer.
• Check the length of the interface cable. (Maximum
Parallel & USB: 2 meters, Serial: 15 meters)
• Try another interface cable.
The page is blank.
• Make sure that the ribbon cartridge is properly
installed.
• Make sure the gap lever is set correctly.
The top margin is wrong.
• Check the application top margin setting.
• Adjust the Top Margin setting in Page Setup menu if
necessary.
Lines are double spaced
instead of single spaced.
• Change the Auto LF setting in the System Setup
menu to No.
The printer overprints on the
same line.
• Change the Auto CR setting in the System Setup
menu to No.
The next print line starts
where the previous line
ended instead of at the left
margin.
• Change the Auto CR setting in the System Setup
menu to Yes.
Summary of Contents for PrintMaster 700 Series
Page 1: ...PrintMaster 700 Series Printer...
Page 2: ......
Page 11: ...2 1 3 Prepare your printer n Front View n Rear View...
Page 12: ...3 n For Fanfold n For Cut Sheets...
Page 23: ...14 3 2 2 2 Rear tractors for fanfold...
Page 24: ...15 3 2 2 3 Top pull tractors for fanfold For the steps and please refer to the 2 3...
Page 27: ...18 This page left intentionally blank...
Page 28: ...19 This page left intentionally blank...
Page 29: ...20 This page left intentionally blank...
Page 30: ...21 This page left intentionally blank...
Page 31: ...22 This page left intentionally blank...
Page 36: ...27 This page left intentionally blank...
Page 37: ...28 This page left intentionally blank...
Page 40: ...31 Menu Printout...
Page 85: ...76 7 Addendum 7 1 Character Set standard character set 1 standard character set 2...
Page 86: ...77 IBM character set 1 IBM character set 2...
Page 87: ...78 OCR A character set 1 OCR A character set 2...
Page 88: ...79 OCR B character set 1 OCR B character set 2...
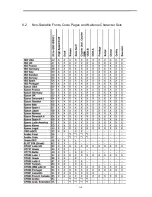
Page 119: ...110 9 2 Non Scalable Fonts Code Pages and National Character Sets...
Page 120: ...111...

