40
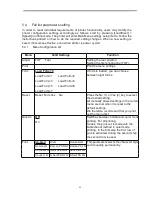
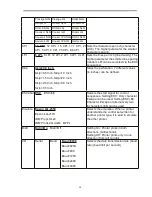
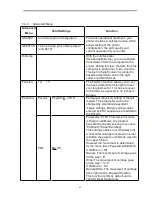
Formlen Lines
=6 – 132
Default 6LPI = 66
Single:3
ü
22 inches
TrFront
ǃ
TrRear
ǃ
PullTr
˖
1
ü
22 inches
Sets the form length via line formats.
Please note that the adjustment in Lines
depends on the selected LPI. For
example 8 LPI at a selected line number
of 96 lines results in a form length of 12
inches (96lines/[8lines/inch]) = 12 inches.
The selectable range is between 3 and
21 inches, i.e. for 2 LPI from 6 to 42 lines
and for 12 LPI from 24 to 262 lines.
If the form length is set it will not be
changed by changing the LPI later on.
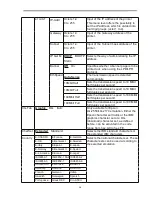
Standard
No format
DIN A3 (420 mm)
DIN A4 (297 mm)
DIN A5 (210 mm)
DIN B5 (250 mm)
DIN B6 (176 mm)
DIN C6 (162 mm)
Executive 10.5"
Letter 11"
Fanfold 12”
Legal 14"
Selects the form length by standard
formats. Using Standard, different paper
formats can be selected directly, e.g. DIN
A4, Legal, Letter.
The Menu indicates No format if a value
is selected by the Line function or ESC
sequences, which does not correspond
to a standard format.
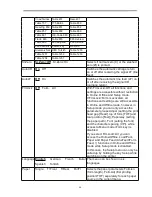
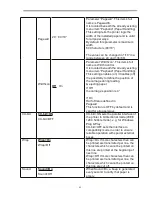
FormAdj FormAdj=0 -220/72”
Default 12/72”
Sets the first print position of a form in
n/72 inch, separately adjustable for each
paper path.
Autotear
Tear=1s
View=1s/3s/6s
Tear=1s/3s/6s
Tear at TOF
The auto tear function or the auto view
function can be selected as desired.
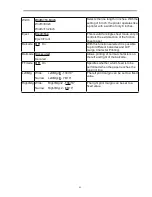
When auto view is switched on, the last
printed text is visible. As soon as data is
received the paper moves to the “normal”
print position. After printing the printer
waits for the given interval to bring the
paper once more to the auto view
position.
The paper is in the tear off position when
auto tear is switched on, the perforation
of the positioned at the tear off edge of
the printer. If data is received, the paper
returns to the normal print position. After
printing, the printer waits for the given
interval to bring the paper once more to
the tear off position. If the tear off edge
does is not aligned with the perforation of
the paper then this can be corrected.
Summary of Contents for PrintMaster 700 Series
Page 1: ...PrintMaster 700 Series Printer...
Page 2: ......
Page 11: ...2 1 3 Prepare your printer n Front View n Rear View...
Page 12: ...3 n For Fanfold n For Cut Sheets...
Page 23: ...14 3 2 2 2 Rear tractors for fanfold...
Page 24: ...15 3 2 2 3 Top pull tractors for fanfold For the steps and please refer to the 2 3...
Page 27: ...18 This page left intentionally blank...
Page 28: ...19 This page left intentionally blank...
Page 29: ...20 This page left intentionally blank...
Page 30: ...21 This page left intentionally blank...
Page 31: ...22 This page left intentionally blank...
Page 36: ...27 This page left intentionally blank...
Page 37: ...28 This page left intentionally blank...
Page 40: ...31 Menu Printout...
Page 85: ...76 7 Addendum 7 1 Character Set standard character set 1 standard character set 2...
Page 86: ...77 IBM character set 1 IBM character set 2...
Page 87: ...78 OCR A character set 1 OCR A character set 2...
Page 88: ...79 OCR B character set 1 OCR B character set 2...
Page 119: ...110 9 2 Non Scalable Fonts Code Pages and National Character Sets...
Page 120: ...111...


