Epson LQ2550/LQ2170, IBM XL 24, MTPL, Genicom ANSI, PJL
This list is somewhat different than previous Printek printer models. Most importantly, there is no specific
“Printek” emulation in the PM700. If your established print jobs were using Printek emulation, try “Epson”
emulation in the PM700 as a substitute. In most cases, use of the Epson emulation here will provide
identical printout results for users, as the command codes are very similar. Please contact Printek
Technical Support (800-368-4636 x422) if you are experiencing problems or if you have questions
regarding your specific situation.
NOTE THAT THE PM700 IS SHIPPED WITH EPSON EMULATION AS THE DEFAULT
CONFIGURATION.
Display
The printer message display is slightly different on the PM700 than on previous Printek models. Specific
functionality of the control panel and display is described starting on page 23.
PLEASE NOTE THAT IN PM702 CONFIGURATION THERE IS NO RELATIONSHIP BETWEEN THE
TRACTOR SELECTION AND THE FORM#. WHILE ONLINE, THE CONTROL PANEL DISPLAY WILL
ALTERNATE BETWEEN SHOWING PRESENT ACTIVE FORM# AND PRESENT ACTUAL PHYSICAL
TRACTOR SELECTED.
Configuration
In the PM700, configuration is possible via the front control panel or using a computing host, as always.
Configuration via the control panel is described starting on page 23.
In the case of the host-based approach (typically selected when multiple printer parameters need to be
configured), the PM700 has an on-board web page which is accessed using an Ethernet connection and
the web browser on your host computer.
To connect to the printer via the web browser, you must first determine the IP address of the printer. This
can be obtained by printing out a configuration page:
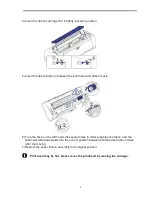
Install the ribbon cartridge (page 8) and load paper (page 14-default rear feed) into the printer.
On the control panel of the printer push the SETUP button.
Push the Forms button (1)
Push the Print button (2)
This will printout a configuration page of the printer. At the bottom of the printout under the listing
ETH-
INT
is the current IP address of the printer.
Open a web browser of your choice, i.e. Internet Explorer, Chrome, Firefox.
In the Address Bar of the web browser type the IP address obtained from the configuration printout and
select GO.
The opening screen of the web interface will appear,
WebPanel PM700
.
On the right side of the page is the Printer Status information. Below the status settings is a selection for
Virtual Control Panel
. Click Virtual Control Panel. This will open another window that looks and
functions the same as the control panel on the front of the printer. All printer configurations that can be
done from the front control panel can be done using the Virtual Control Panel. Printer configuration
settings begin on page 23 of the manual.
Summary of Contents for PrintMaster 700 Series
Page 1: ...PrintMaster 700 Series Printer...
Page 2: ......
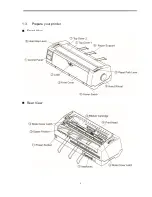
Page 11: ...2 1 3 Prepare your printer n Front View n Rear View...
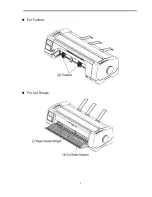
Page 12: ...3 n For Fanfold n For Cut Sheets...
Page 23: ...14 3 2 2 2 Rear tractors for fanfold...
Page 24: ...15 3 2 2 3 Top pull tractors for fanfold For the steps and please refer to the 2 3...
Page 27: ...18 This page left intentionally blank...
Page 28: ...19 This page left intentionally blank...
Page 29: ...20 This page left intentionally blank...
Page 30: ...21 This page left intentionally blank...
Page 31: ...22 This page left intentionally blank...
Page 36: ...27 This page left intentionally blank...
Page 37: ...28 This page left intentionally blank...
Page 40: ...31 Menu Printout...
Page 85: ...76 7 Addendum 7 1 Character Set standard character set 1 standard character set 2...
Page 86: ...77 IBM character set 1 IBM character set 2...
Page 87: ...78 OCR A character set 1 OCR A character set 2...
Page 88: ...79 OCR B character set 1 OCR B character set 2...
Page 119: ...110 9 2 Non Scalable Fonts Code Pages and National Character Sets...
Page 120: ...111...


