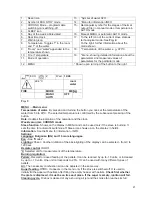
speed.
Pump activation.
Used after completion of the system installation, just before ignition. It helps the
better filling and bleeding of the system.
Technical menu.
Not used by the user.
Menu for information INFO /lots of useful information for diagnostics/.
The information about the codes of the equipment is followed by:
Time of operation (h). The accumulated time in hours, during which the stove has been operating.
Required service (h). There are certain number of hours set in the program, after the accumulation
of which, the stove will require visit by an authorised service company. A warning message will
appear, which will disappear once the company technician resets this amount of hours.
Smoke fan speed (rpm). Actual measured rpm of the smoke fan.
Measured flow of air lpm Measured flow of combustion air in litres per minute.
Smoke temperature.(°
ɋ
) Measured temperature of flue gases.
Auger time period 1 (s). Auger operation duration per cycle, in seconds.
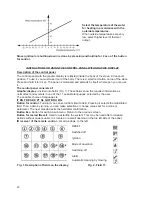
MODES.
MANU
– this mode allows selection of one of 5 stages of thermal output. Stage 1 is operation at
minimum output. Stage 5 is operation at maximum output. Below the word FIRE in field 15
appears a rectangular symbol filled in accordance with the thermal output, and in field 17, to the
right, after PL is shown the stage of output.
AUTO*
- automatic mode. Field 15 shows the word TEMP, and below it – the room temperature
set from 5 to 40°
ɋ
.
Operation with thermostat (optional)*.
The stove can be operated in a mode, controlled by additional external thermostat.
* AUTO and thermostat-controlled operation modes are not recommended
to be used
individually
, because the stove will only work at its maximum output in order to achieve the set
temperature, and upon reaching it, it will switch to minimum output, without shutting itself down.
ECO mode can only be activated, if AUTO mode has previously been selected. This is a
complex mode, because its control is dependent on both the room temperature and on the
temperature of the water in the system.
Upon reaching any of these temperatures, burning
power is automatically reduced and if that temperature is exceeded, the stove will shut itself down.
In this case, the room temperature must have priority. If the stove shuts itself down in advance on
the basis of the water temperature, this shall mean that too low temperature of the water was
selected and a higher temperature must be set.
Within this mode, shutting down and starting up are fully automatic and there is no need of any
external intervention.
There is an additional waiting time programmed, aiming at avoiding any reaction to abrupt or
arbitrary peaks of the monitored room temperature.
This mode can also be used with a thermostat additionally installed at a suitable location, which
must be activated after the installation in the password-protected technical menu.
CHRONO function.
CHRONO function allows the user to set 6 different intervals of time On/Off. Each interval, several
of them, and all 6 of them, can be activated for one or more days of the week, in order to ensure
the user with a pretty flexible weekly schedule, which can be easily configured so that it will meet
any requirement.
ALARMS.
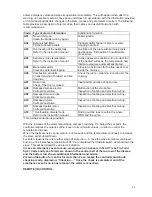
The stove’s state and operation are continuously controlled by the controller unit. If any changes
occur, which are not right in terms of mode and state, but they are not emergency, the sign
appears in field 7 - Warning and a message, providing particular information. In accordance with
this information, you can take measures to exit this state.
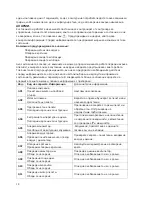
Possible warnings for abnormal conditions:
Damaged air sensor.
Open door.
Damaged temperature probe. Air.
Damaged temperature probe. Water.
If the state does not permit the stove to continue its operation due to some danger, the firebox
22
Summary of Contents for PLW 13G
Page 1: ...p 2L9 2 9 2ELLET S618 9 6 WAT 4 EA6 0 4 2 9 2 9...
Page 4: ...2 5W 48W 6mm 30mm 1...
Page 5: ...3 IR 12 15...
Page 7: ...5 2 bar 0 2 MPa ZhE K hW...
Page 8: ...6 230V 50Hz OFF 6 11 16 15 12 50 80 2...
Page 11: ...9 h h rpm lpm 1 s 5 1 5 15 17 PL 15 5 40 6 6...
Page 12: ...10 7 A01 A02 A03 A04 t A05 06 07 A08 A09 A10 A11...
Page 13: ...11 A18 5 95 17 1 2 2 IR...
Page 14: ...12 PLW 13 PLW 27...
Page 16: ...14 E E E...
Page 32: ...PRITY PLW 13G PLW 27 Year of manufacture Serial number QS passed Stamp 352 8 7 02...


