background image

Operation Page EN-15

Using the whisk or 
blender staff

 WARNING

Risk of injury!
The blender staff and blend-
er cup have sharp cutting 
blades. Improper handling of 
these parts may lead to inju-
ries!

Do not switch the appli-
ance on until the blender 
staff or whisk has been in-
serted into the container 
being used to puree or beat 
eggs/whip cream.

1. Attach the whisk or blender 

staff, as described in the sec-
tion "Attaching the whisk or 
blender staff"on page EN-12.

2. Fill the blender cup or other 

container with the desired in-
gredients.

3. Plug the mains plug into an 

easily accessible, properly in-
stalled socket.

4. Hold the appliance in the con-

tainer.

(9)

5. Press the On/Off switch (9) to 

start the appliance. 

6. Release the On/Off switch (9) 

to stop pureeing or beating/
whipping.

Summary of Contents for 441476

Page 1: ...Stabmixer Gebrauchsanleitung Anleitung Version 92502 20210617 Bestell Nr 441476 Nachdruck auch auszugsweise nicht gestattet HB968...

Page 2: ...ervice DE 22 Allgemeiner Service DE 22 Ersatzteile DE 22 Umweltschutz Entsorgung DE 23 Unser Beitrag zum Schutz der Ozonschicht DE 23 Abfallvermeidung DE 23 Elektro Altger te um weltgerecht entsorgen...

Page 3: ...tle ren Risikograd die wenn sie nicht vermieden wird den Tod oder eine schwere Verletzung zur Folge ha ben kann VORSICHT Dieser Signalbegriff bezeichnet eine Gef hrdung mit einem niedri gen Risikograd...

Page 4: ...n Sie den Mixer nur wie in dieser Gebrauchsanlei tung beschrieben Jede andere Verwendung gilt als nicht bestim mungsgem und kann zu Sach sch den oder sogar zu Personen sch den f hren Der Mixer ist kei...

Page 5: ...lussleitung sind von Kin dern fernzuhalten Kinder d rfen nicht mit dem Ger t spielen Reinigung und Wartung d rfen nicht von Kindern durchgef hrt werden Dieses Ger t kann von Per sonen mit reduzierten...

Page 6: ...ie Anschluss leitung defekt ist ungewohnte Ger usche von sich gibt IndiesenF llenNetzstecker aus der Steckdose ziehen und Ger t reparieren lassen siehe Kapitel Service Ger t regelm ig auf Sch den pr f...

Page 7: ...z gegen Gefahrenquellen un erl sslich sind Bei Repara turen d rfen ausschlie lich Teile verwendet werden die den urspr nglichen Ger te daten entsprechen Eingriffe und Reparatu ren am Ger t d rfen aus...

Page 8: ...wen den Darauf achten dass kein Wasser in die elektrischen Teile dringt Gefahren im Umgang mit einem Mixer WARNUNG Kurzschlussgefahr Die maximale Betriebs zeit bei P rierstab Betrieb betr gt 1 Minute...

Page 9: ...derbauen oder Reinigen HINWEIS Unsachgem er Umgang mit dem Ger t kann zu Besch digungen des Ger ts f hren Das Ger t auf einer gut zu g nglichen ebenen trocke nen und ausreichend stabi len Arbeits che...

Page 10: ...Packen Sie das Ger t aus 2 Pr fen Sie ob die Lieferung vollst ndig ist 3 Kontrollieren Sie ob das Ger t Transportsch den aufweist 4 Sollte die Lieferung unvollst n dig sein oder das Ger t einen Trans...

Page 11: ...mente Seite DE 11 Ger teteile Bedienelemente 1 Handger t mit Netzstecker und Netzkabel 2 Schneebesen 3 P rierstab 4 Messbecher 1 2 3 4 6 5 7 8 9 5 Mixbecherdeckel 6 Mixbecher 7 Schneidmesser 8 Drehreg...

Page 12: ...11 liegt 2 Schneebesen 2 oder P rierstab 3 im Uhrzeigersinn drehen so dass das Sym bol 10 direkt ber dem Symbol 12 liegt und mit ei nem h rbaren Klick einrastet Mixer auf Mixbecher montieren WARNUNG...

Page 13: ...es Mixbechers 6 setzen 1 5 11 12 10 2 Handger t 1 so auf den Mix becherdeckel 5 setzen dass das Symbol 10 direkt ber dem Symbol 11 liegt 3 Handger t 1 im Uhrzeiger sinn drehen so dass das Symbol 10 di...

Page 14: ...ser bzw beim Verbinden mit dem Mixer vorsichtig vor Fassen Sie niemals bewegli che Teile an Kurzschlussgefahr Die maximale Betriebs zeit bei P rierstab Betrieb betr gt 1 Minute bei Mi xer Betrieb 2 Mi...

Page 15: ...m Gef be ndet in dem p riert bzw Schnee oder Sah ne geschlagen wird 1 Schneebesen oder P rierstab montieren wie beschrieben im Abschnitt Schneebesen oder P rierstab montieren auf Sei te DE 12 2 Mixbec...

Page 16: ...n sachgem er Umgang mit diesen Teilen kann zu Verlet zungen f hren Verwenden Sie das Ger t nur dann als Mixer wenn der Mixbecher fest mit dem Mixer verbunden ist ffnen Sie den Deckel des aufgesetzten...

Page 17: ...llen 3 Das Handger t samt Mixbe cherdeckel auf den Mixbecher setzen 4 Netzstecker in eine leicht zu g ngliche vorschriftsm ig installierte Steckdose stecken 9 5 Ein Aus Taster 9 dr cken um den Mixvor...

Page 18: ...enung Seite DE 18 Leistung regeln Sie k nnen die Leistung Ihres Ge r ts stufenlos regeln 8 Benutzen Sie den Drehreg ler 8 um die gew nschte Leistung zwischen den Werten Min und Max stufenlos einzu ste...

Page 19: ...dere Fl ssigkeiten Fassen Sie den Netzstecker nie mit feuchten H nden an Benutzen Sie zum Reinigen keinen Dampfreiniger VORSICHT Verletzungsgefahr Zubeh rteile des Ger ts P rierstab Mixbecher sind mit...

Page 20: ...b Zur Reinigung des Hand ger ts 1 benutzen Sie ein m ig feuchtes gut ausge wrungenes Tuch Danach mit einem anderen Tuch trocken reiben Um Verf rbungen am Mess und Mixbecher zu beseitigen die von Karo...

Page 21: ...und sp tere Benutzer in Gefahr bringen Nur autorisierte Fachkr fte d rfen diese Reparaturen ausf hren Problem M gliche Ursache Problembehebung Der Mixer funktioniert nicht Der Netzstecker ist nicht e...

Page 22: ...utschland Wenden Sie sich bitte an die Firma Hermes Fulfilment GmbH Telefon 057 32 99 66 00 Montag Donnerstag 8 15 Uhr Freitag 8 14 Uhr E Mail ersatzteilservice eletrokleingeraete hermes ws com Kunden...

Page 23: ...gie Wenn Sie sich von der Verpackung trennen m chten entsorgen Sie diese bitte umweltfreundlich Abfallvermeidung Ma nahmen der Abfallvermei dung haben nach den Vorschriften der Richtlinie 2008 98 EG g...

Page 24: ...d res sourcenschonenden Verwertung zugef hrt Sie k nnen Elektro Altger te kos tenlos beim lokalen Wertstoff Recyclinghof abgeben F r weitere Informationen zu die sem Thema wenden Sie sich di rekt an I...

Page 25: ...Blender User manual Manual version 92502 20210617 Article no 441476 Reproduction even of excerpts is not per mitted HB968...

Page 26: ...r to the blender cup EN 13 Operation EN 14 General instructions EN 14 Using the whisk or blender staff EN 15 Using the appliance as a food processor EN 16 Adjusting the power EN 18 Cleaning and mainte...

Page 27: ...nual Keep all safety notices and in structions for future reference Pass all safety notices and in structions on to the subsequent user of the product The following terms and symbols can be found in t...

Page 28: ...control system Only use the blender as described in this user manual Any other use is deemed improper and may re sult in damage to property or even personal injury The blender is not a children s toy...

Page 29: ...ection cable must be kept away from children Children shall not play with the appliance Cleaning and maintenance may not be performed by children This appliance can be used by persons with reduced phy...

Page 30: ...he mains plug out of the socket and have the appli ance repaired see chapter Service Check the appliance regu larly for damage The appliance can be oper ated without switching at 220 240 V 50 60 Hz We...

Page 31: ...urces of danger Only parts corresponding to the original appliance spec i cations may be used for repairs Investigations and repairs to the appliance may only be carried out by author ised specialists...

Page 32: ...at water does not enter the electrical compo nents Risks when using a blender WARNING Risk of short circuit The blender can be oper ated in hand held blend er mode for up to 1 min ute and in food proc...

Page 33: ...bling disas sembling or cleaning NOTICE Improper handling of the ap pliance may cause it to be come damaged Place the appliance on an easily accessible level dry and suf ciently stable work surface Do...

Page 34: ...Check package contents 1 Unpack the appliance 2 Check that the delivery is com plete 3 Check whether the appliance was damaged during transit 4 If the delivery is incomplete or the appliance has been...

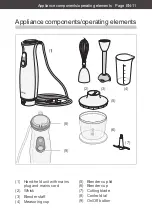
Page 35: ...s Page EN 11 Appliance components operating elements 1 Hand held unit with mains plug and mains cord 2 Whisk 3 Blender staff 4 Measuring cup 1 2 3 4 6 5 7 8 9 5 Blender cup lid 6 Blender cup 7 Cutting...

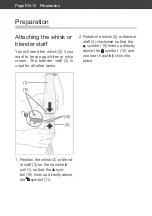
Page 36: ...am The blender staff 3 is used for all other tasks 1 11 2 10 1 Position the whisk 2 or blend er staff 3 on the hand held unit 1 so that the sym bol 10 lines up directly above the symbol 11 2 Rotate th...

Page 37: ...cise caution when inserting re moving cleaning the cut ting blades or connecting them to the blender 7 6 13 1 Position the cutting blade 7 on the axis 13 of the blender cup 6 1 5 11 12 10 2 Position t...

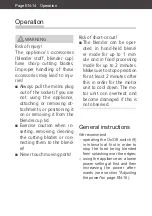
Page 38: ...to the blend er Never touch moving parts Risk of short circuit The blender can be oper ated in hand held blend er mode for up to 1 min ute and in food processing mode for up to 2 minutes Make sure to...

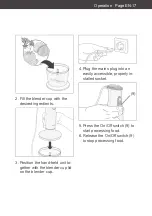
Page 39: ...the container being used to puree or beat eggs whip cream 1 Attach the whisk or blender staff as described in the sec tion Attaching the whisk or blender staff on page EN 12 2 Fill the blender cup or...

Page 40: ...arp cutting blades Improper handling of these parts may lead to injuries Only use the appliance as a food processor when the blender cup is securely at tached to the blender Do not open the lid of the...

Page 41: ...ts 3 Position the hand held unit to gether with the blender cup lid on the blender cup 4 Plug the mains plug into an easily accessible properly in stalled socket 9 5 Press the On Off switch 9 to start...

Page 42: ...eration Page EN 18 Adjusting the power Your appliance s power setting can be continuously adjusted 8 Use the control dial 8 to con tinuously adjust the desired power level between the Min and Max valu...

Page 43: ...rge the appli ance the mains cord or the mains plug in water or any other uid Never touch the mains plug with wet hands Do not use steam cleaners to clean CAUTION Risk of injury The appliance s access...

Page 44: ...ly dry all parts af ter cleaning Use a slightly damp cloth that has been well wrung out to clean the hand held unit 1 Then rub dry with another cloth To remove stains from the measuring cup and blend...

Page 45: ...fective You can put your own and future users lives in danger Only authorised specialists are allowed to carry out this repair work Problem Possible cause Solution The blender is not working The mains...

Page 46: ...rts Customers in Germany Please contact the company Hermes Fulfilment GmbH Phone 49 0 57 32 99 66 00 Monday Thursday 8 a m 3 p m Friday 8 a m 2 p m Email ersatzteilservice eletrokleingeraete hermes ws...

Page 47: ...y insulation and technology If you would like to dispose of the packaging please dispose of it in an environmentally friendly way Waste prevention According to the provisions of Directive 2008 98 EC w...

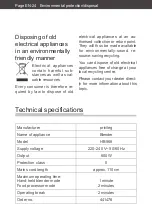
Page 48: ...be made available for environmentally sound re source saving recycling You can dispose of old electrical appliances free of charge at your local recycling centre Please contact your dealer direct ly f...

Reviews: